
Category Archives: Desserts
Chocolate Ganache Raspberry Tart

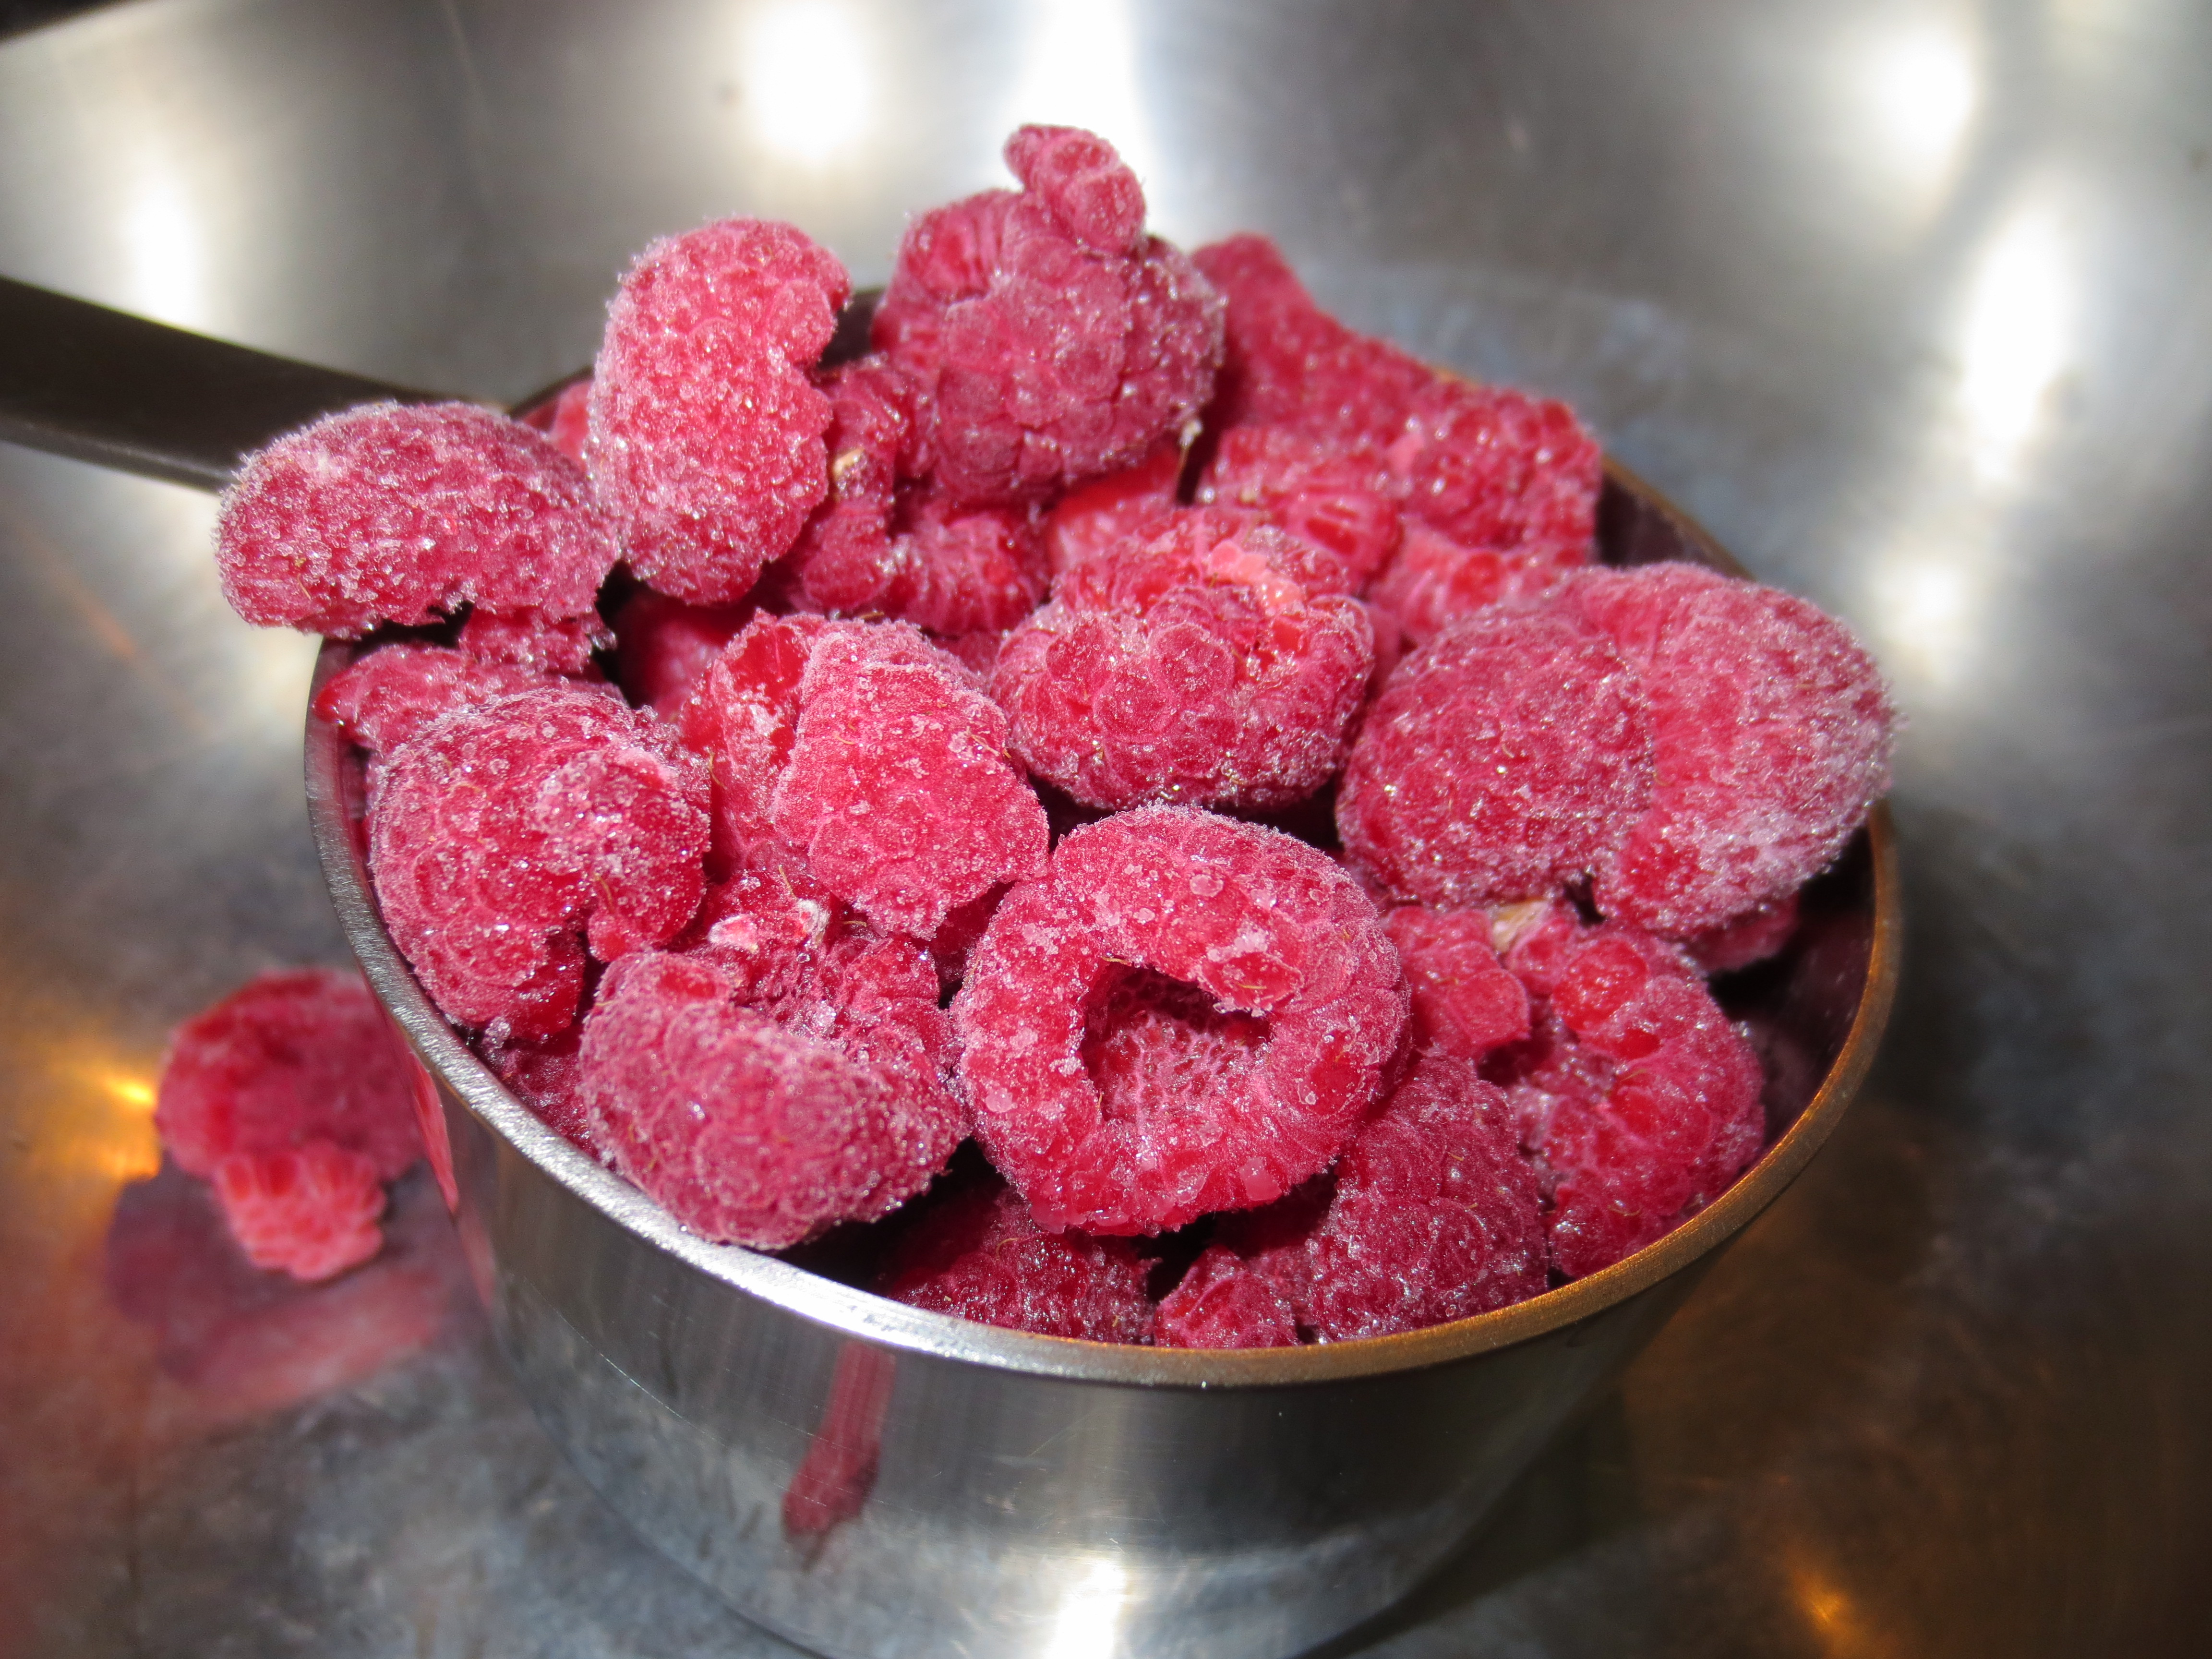
Last Thanksgiving, my sister-in-law Megan requested that I contribute something chocolaty and decadent for dessert, for which I made a slightly adapted version of vegan chocolate truffles from Giada’s latest cookbook “Giada’s Feel Good Food”. Homemade cashew cream replaced the traditional heavy cream in the truffles and they were a huge hit! So, when I was planning Colin’s birthday treat, I decided to use the same recipe but transform it into a tart. The cashew cream recipe creates more than is needed for the chocolate ganache, so I decided to mix up some of the extra cream with frozen raspberries and a little raspberry jam to sandwich between two layers of the ganache, the result was good enough to share and then some.

In a medium bowl combine, Almond Meal, ½ cup of the Oat Flour and salt. Next add in Coconut Oil, Maple Syrup and Vanilla. Mix completely with a fork, then add in the remaining half cup of Oat Flour and the water. Continue to mix with a fork until the mixture resembles wet sand.


Finally to assemble the tart: (really the recipe comes together pretty quickly)


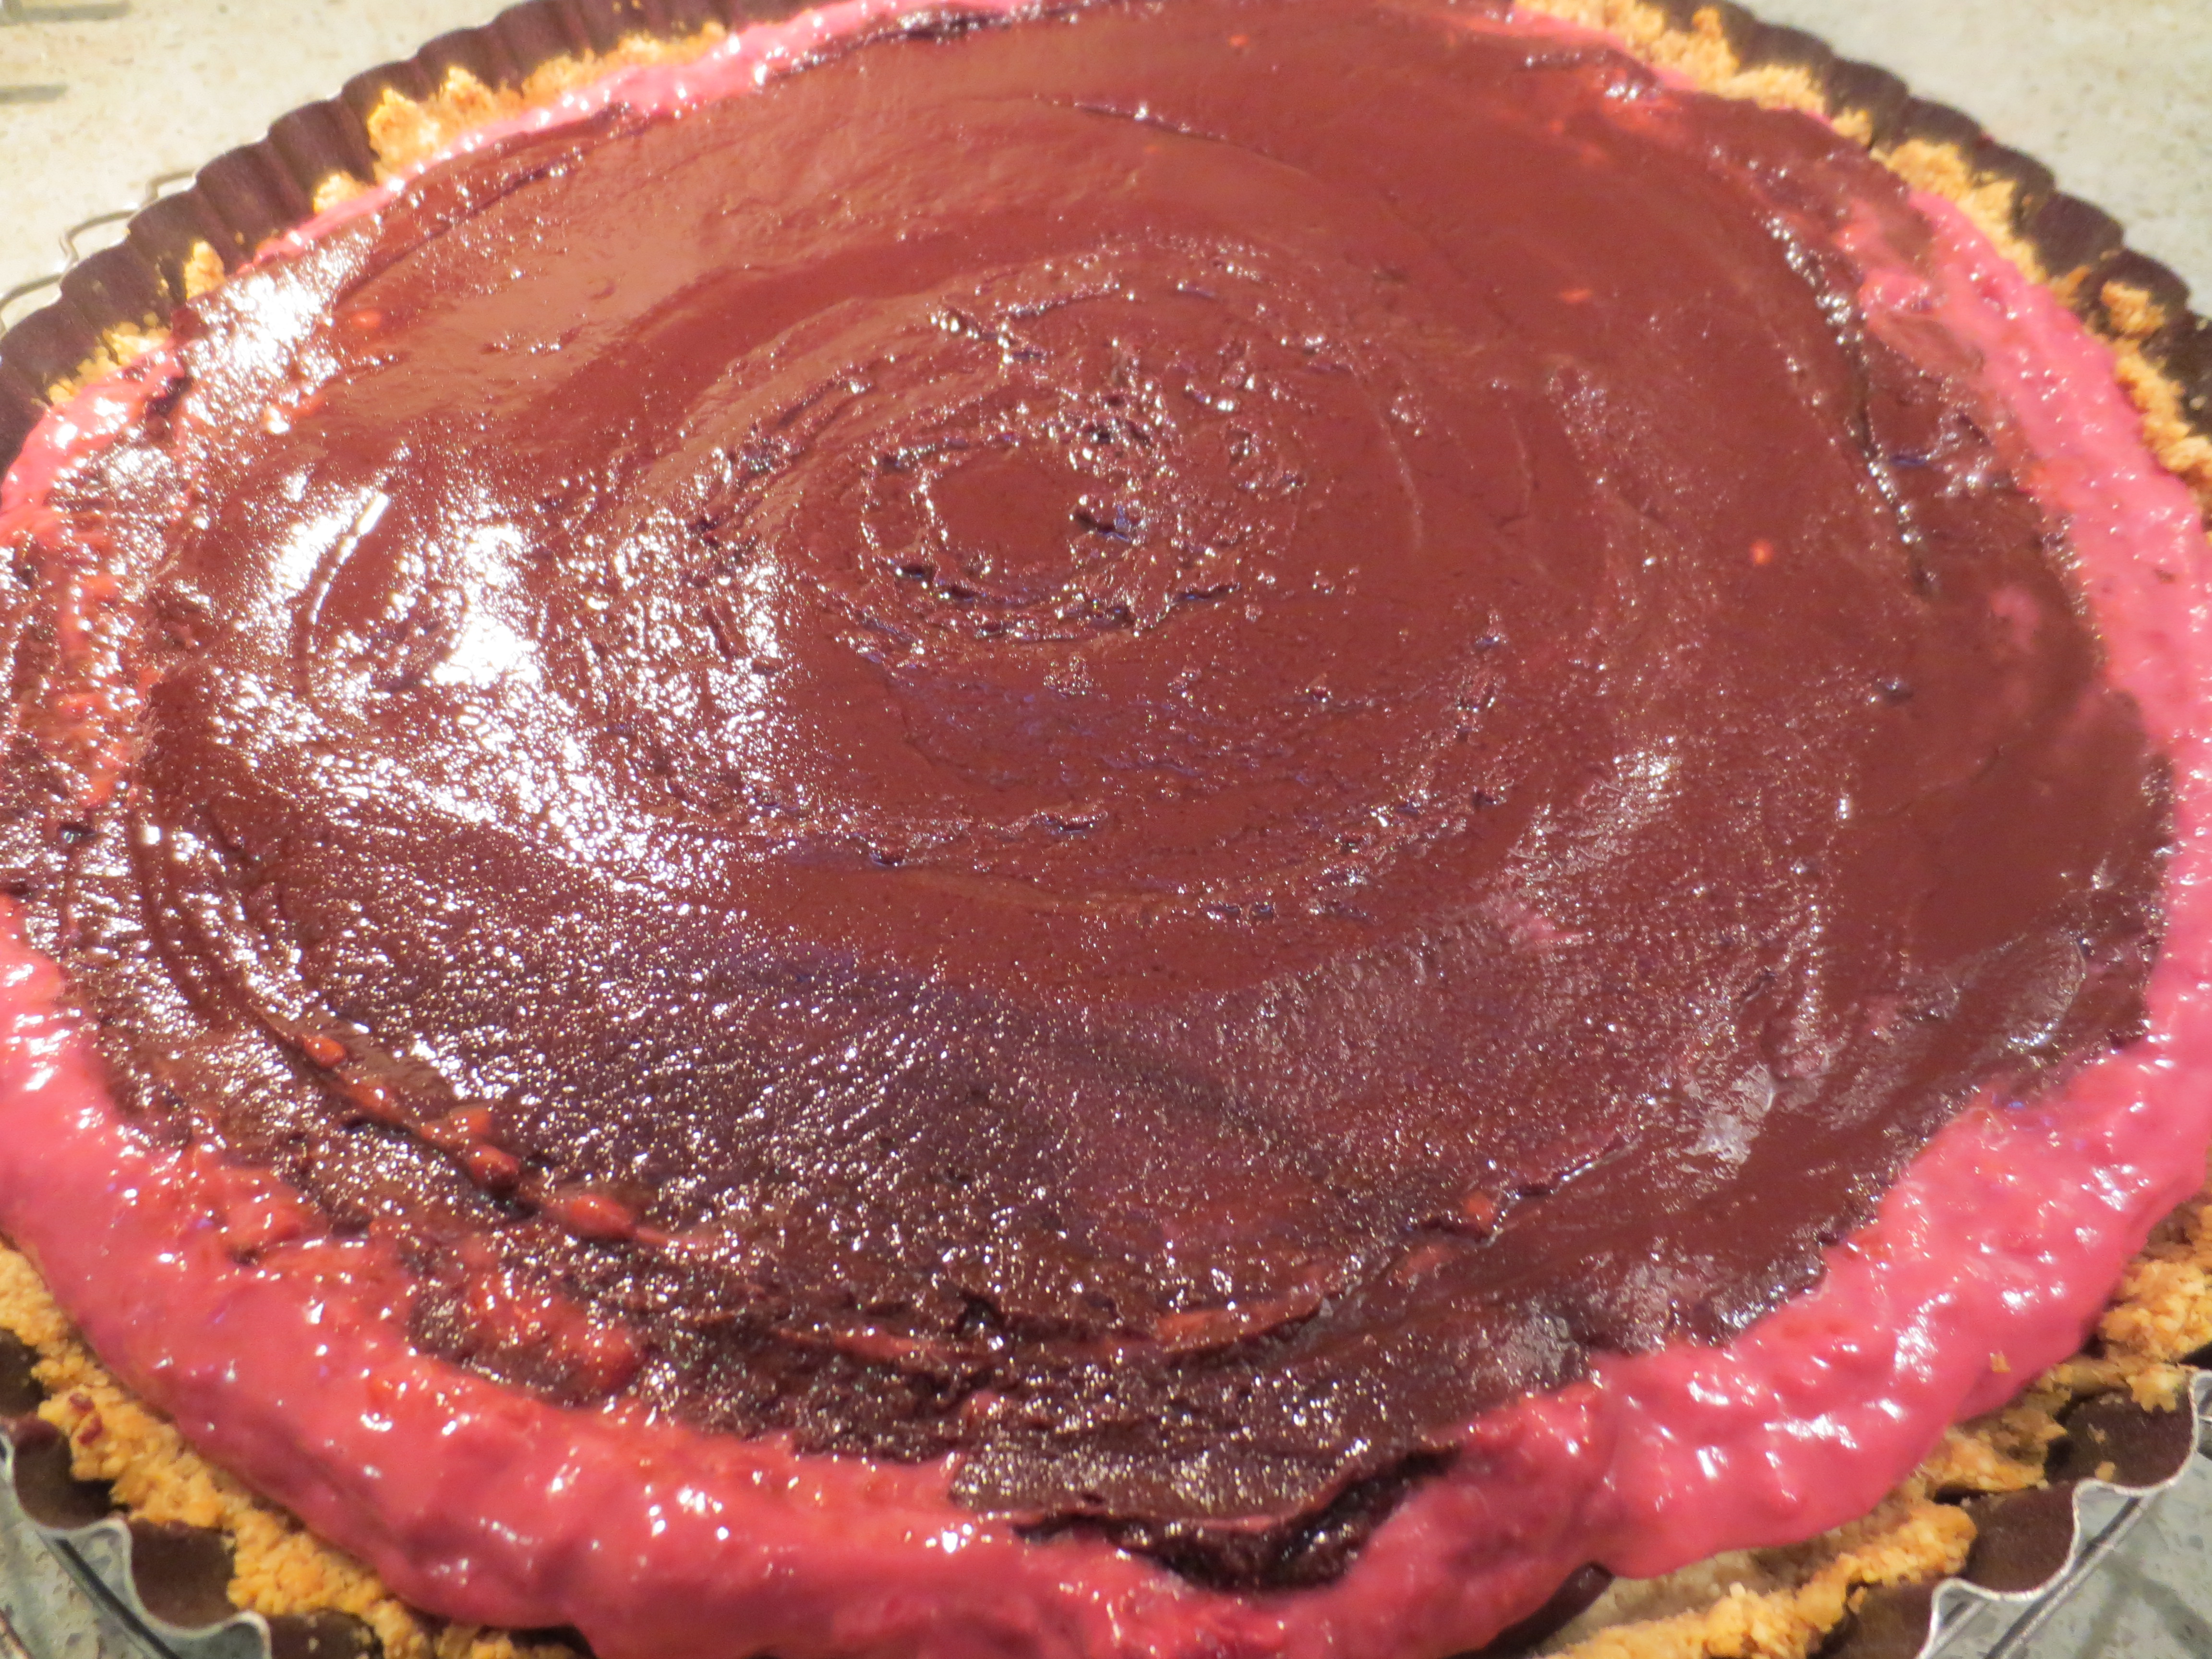
Chill again in the refrigerator, this time for at least an hour to allow the ganache to fully firm up.
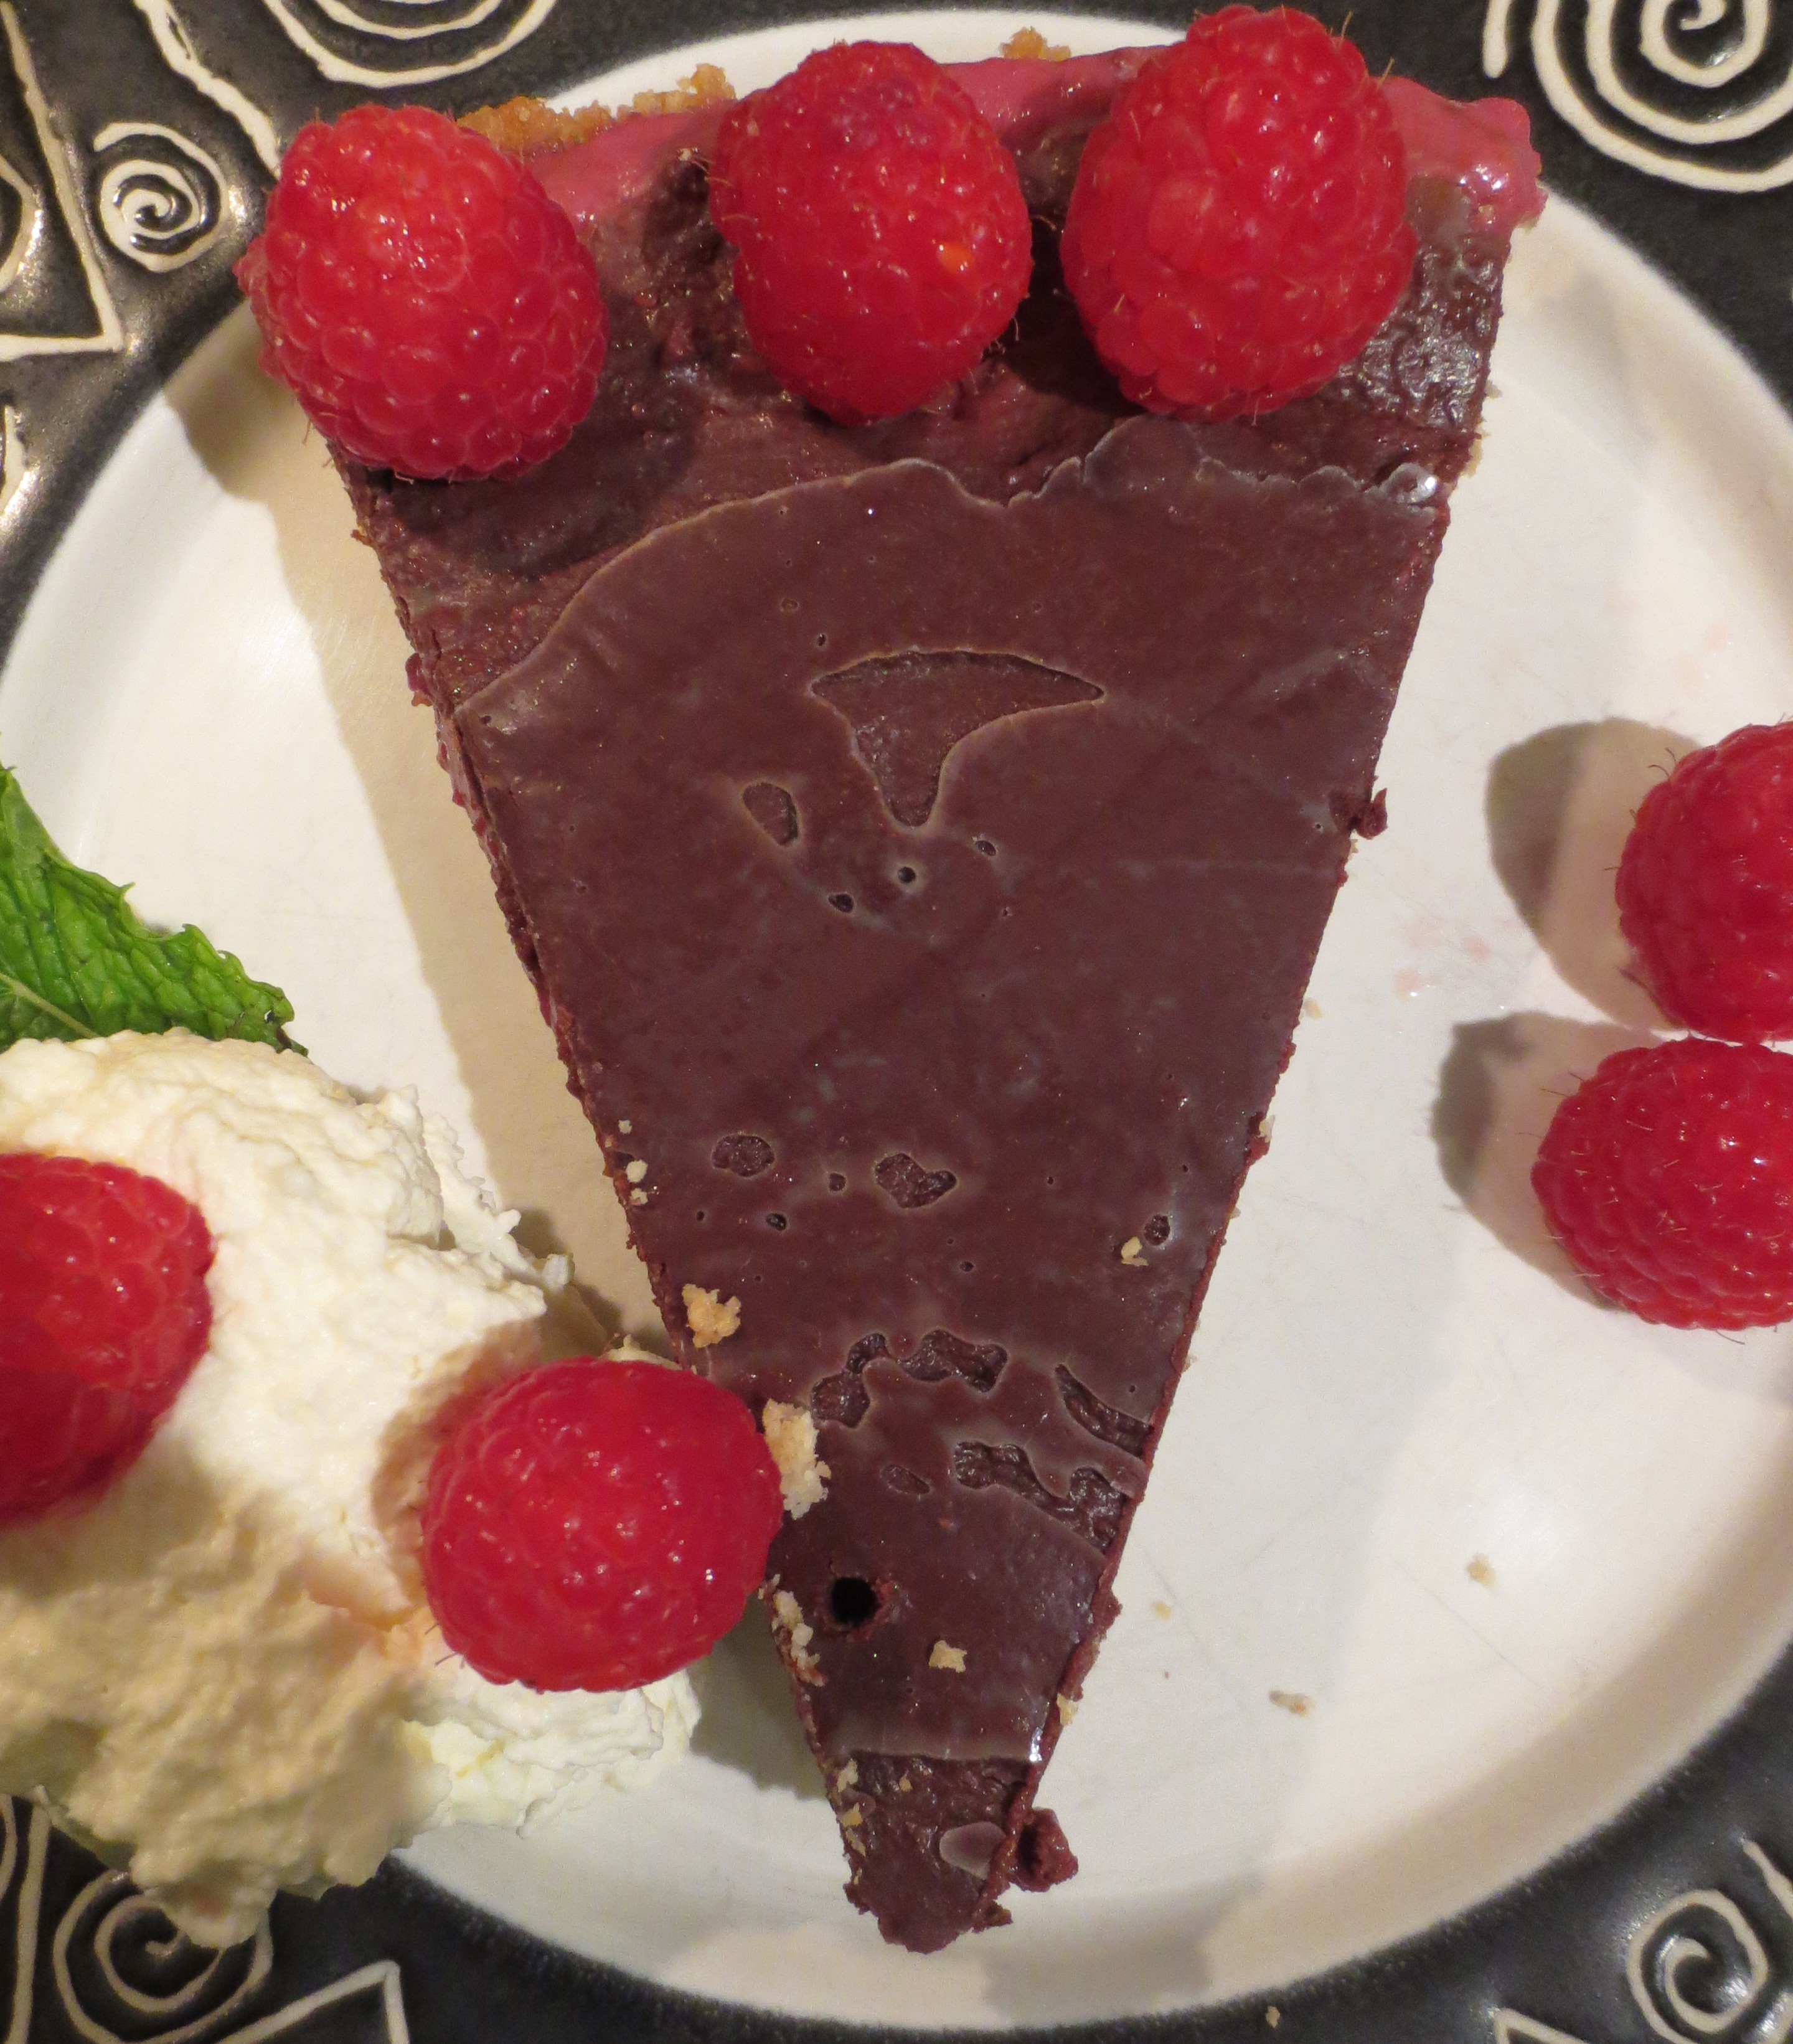
Serve the tart with fresh raspberries and cream. If you don’t need to keep your dessert vegan or dairy free, lightly sweetened fresh whipped cream is a perfect accompaniment. Otherwise, whip up the remaining cashew cream (you should still have about 1/3 to ½ cup left) with a bit of maple syrup and serve that alongside the finished tart OR double the raspberry cashew cream recipe and use the leftover as a topping. Raspberry sorbet would also be really good.

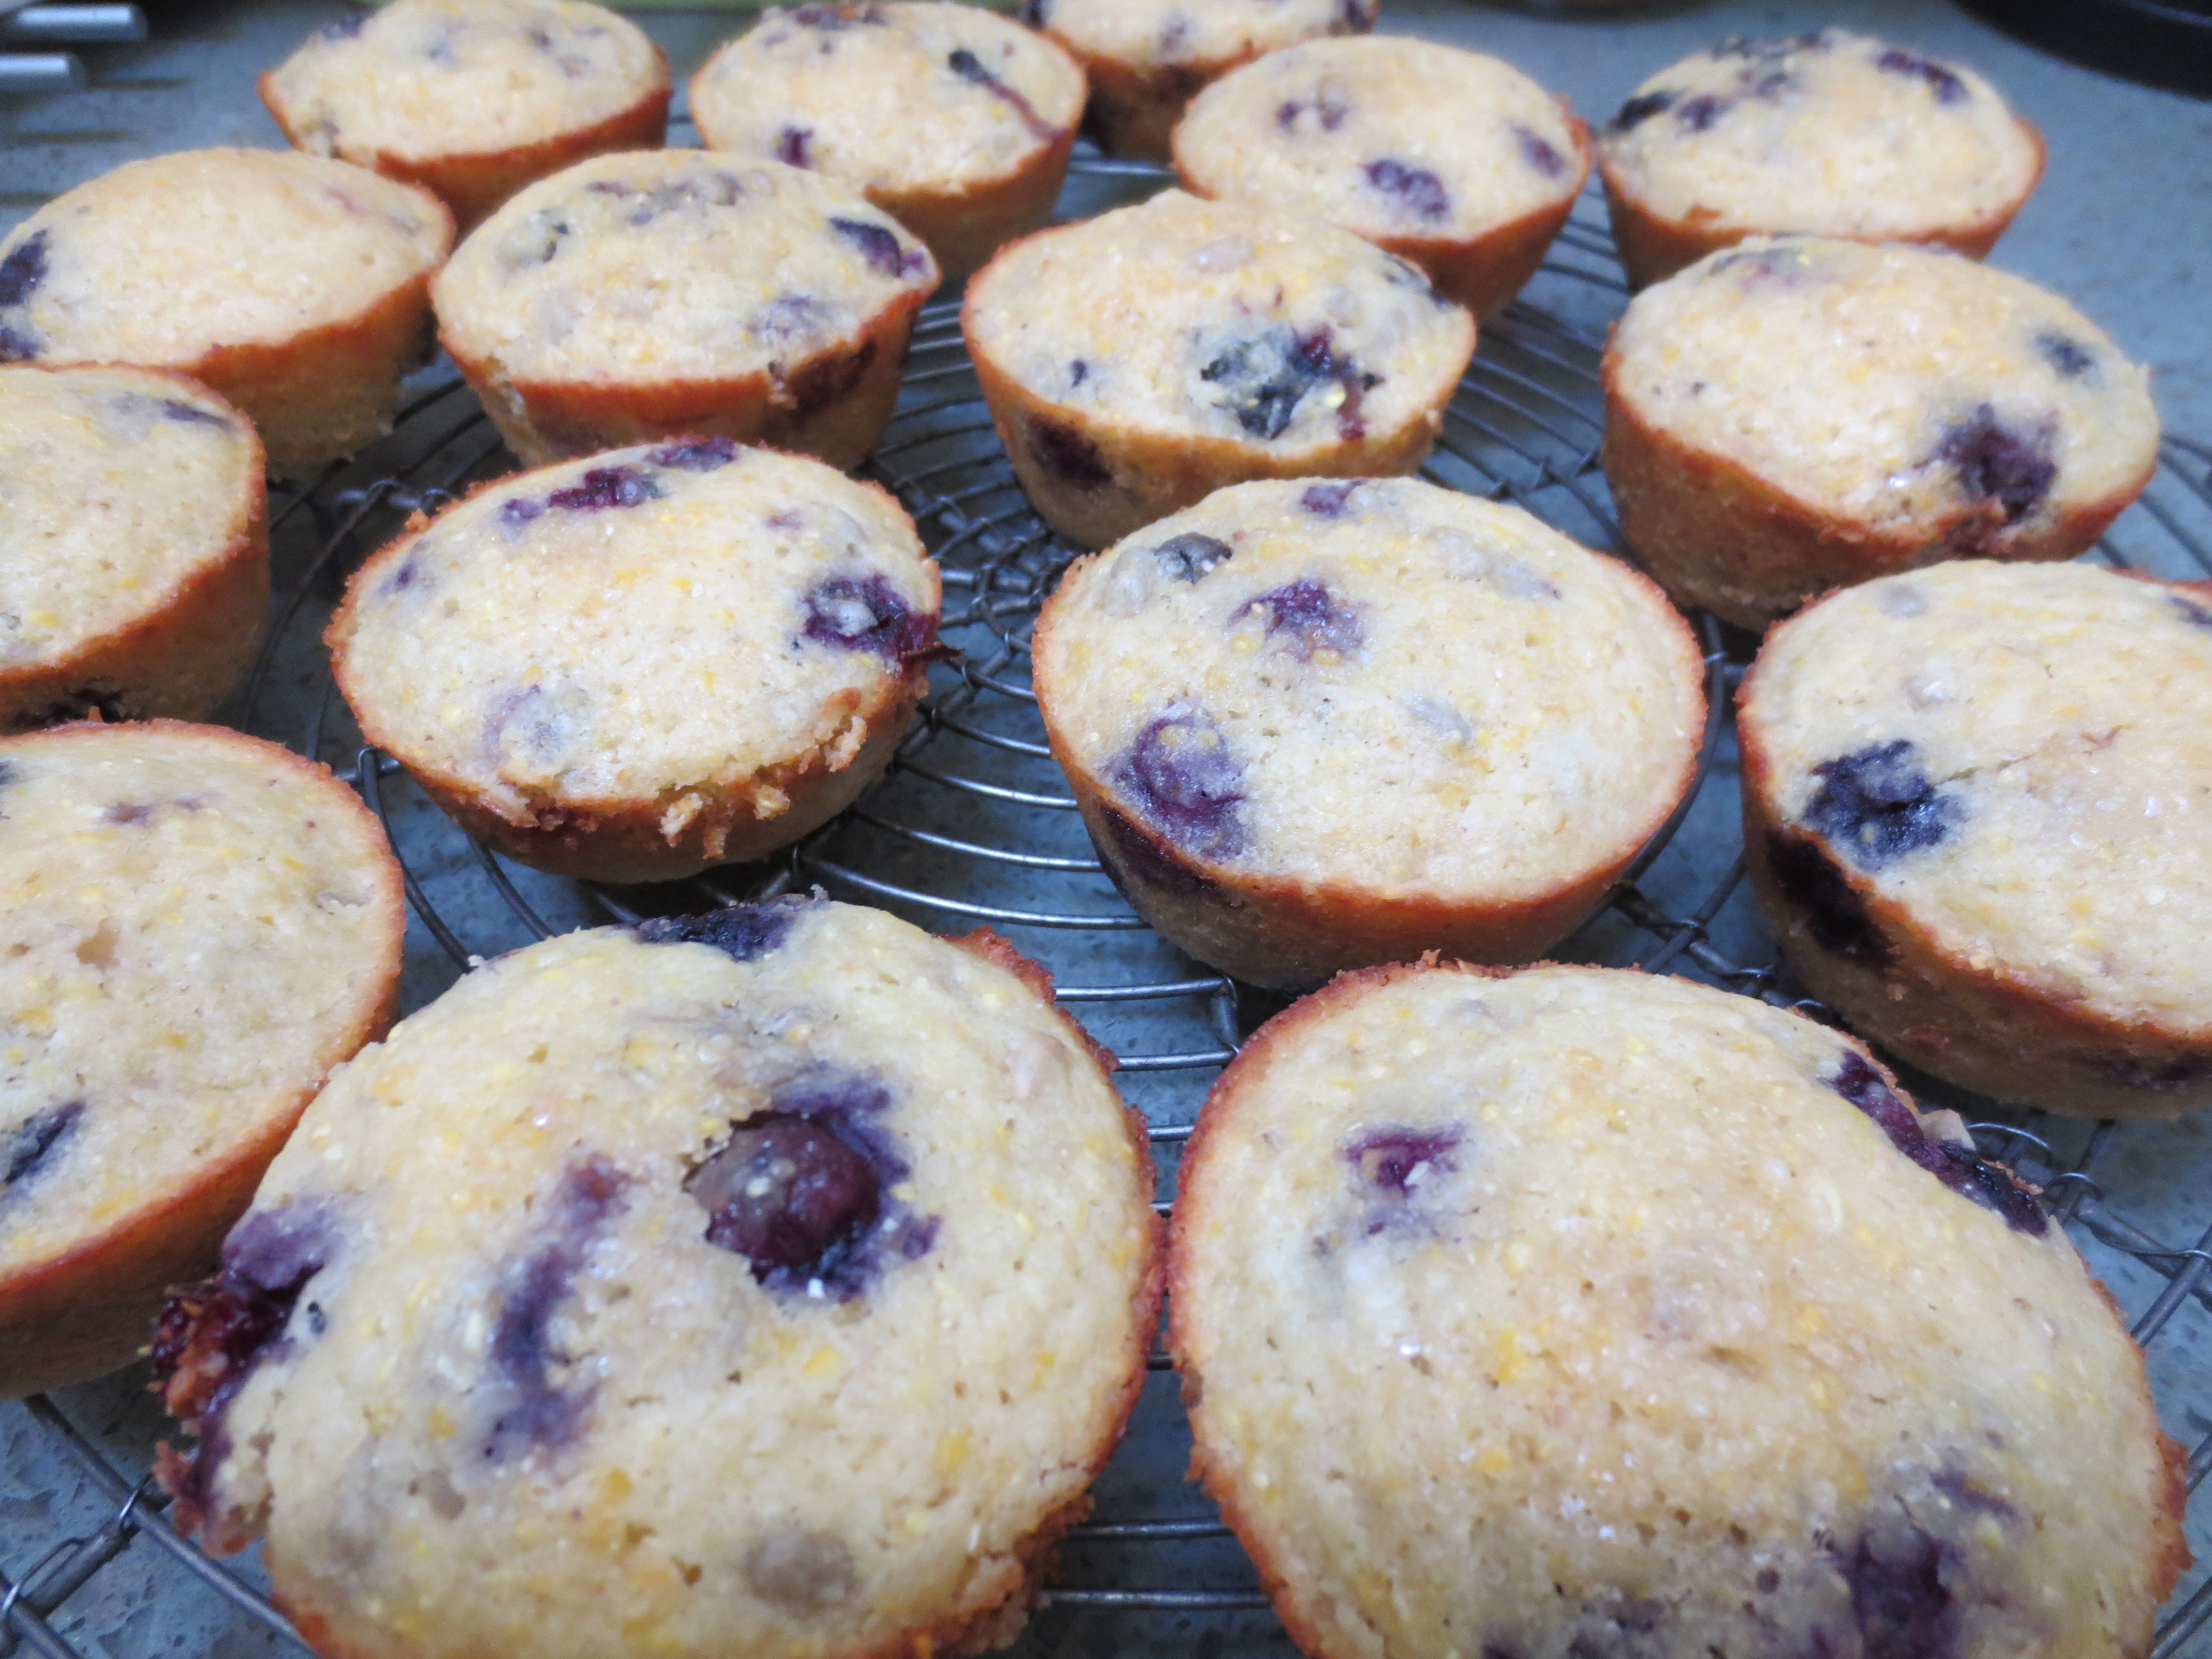
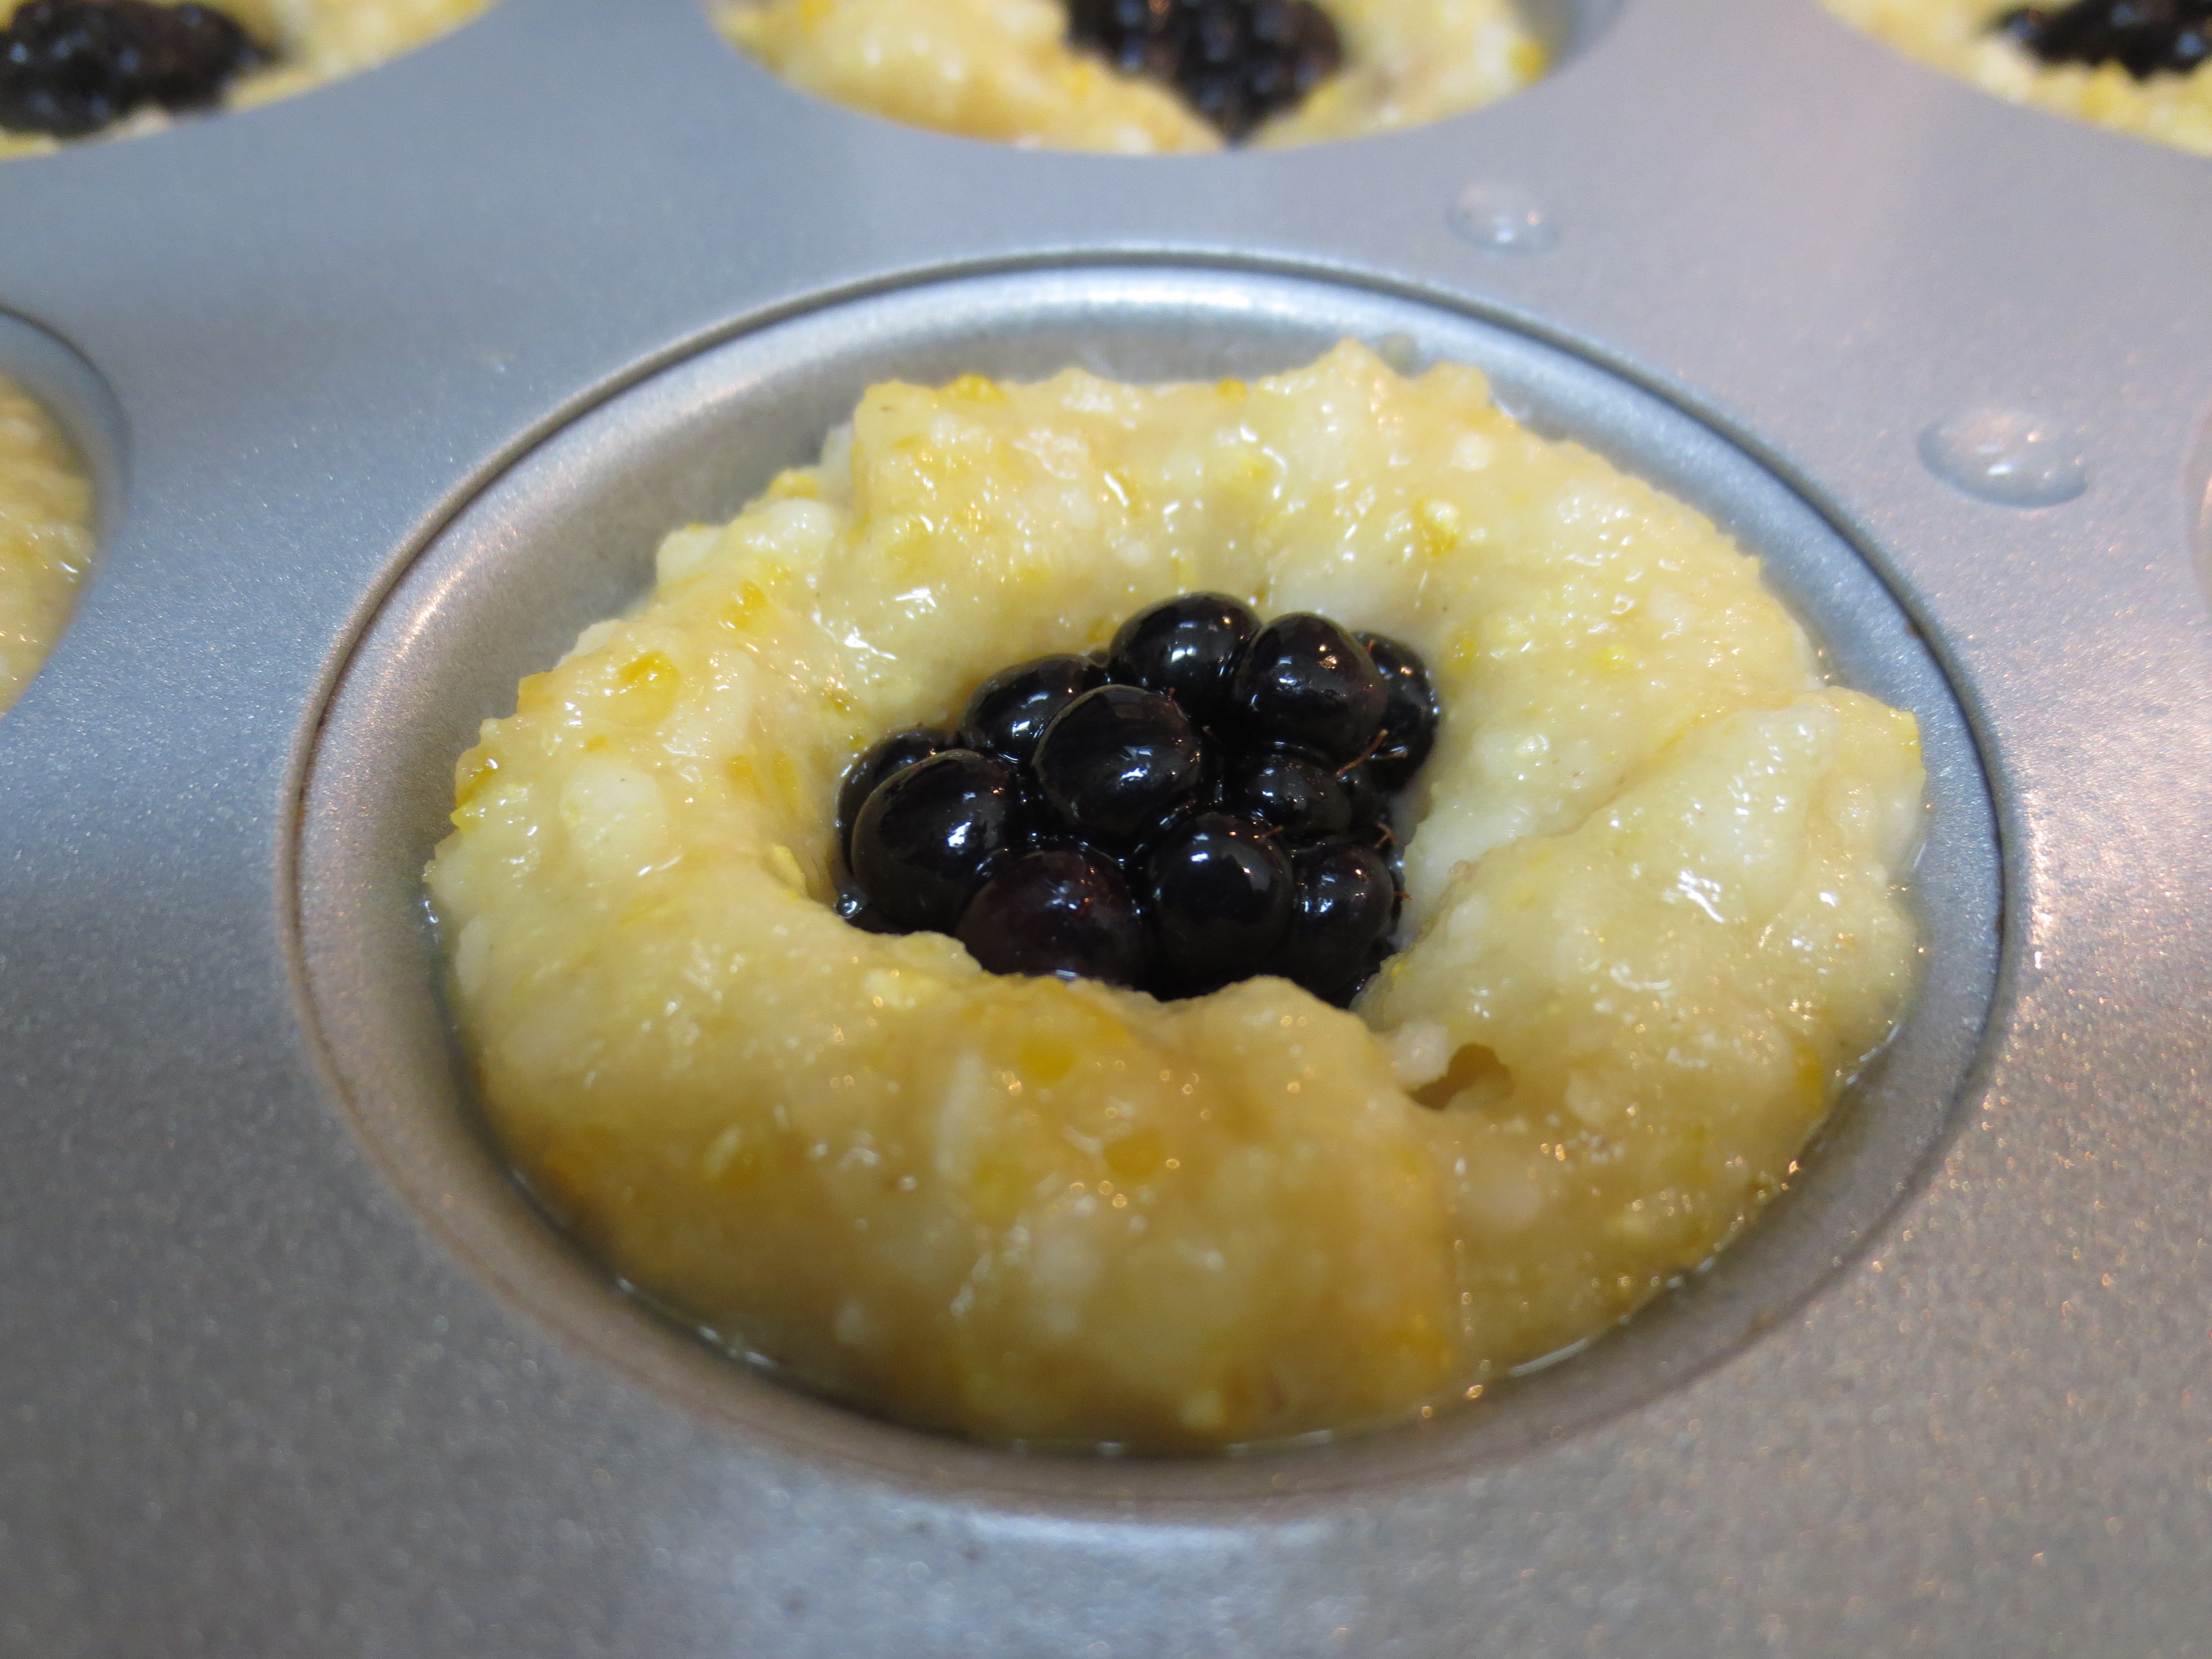
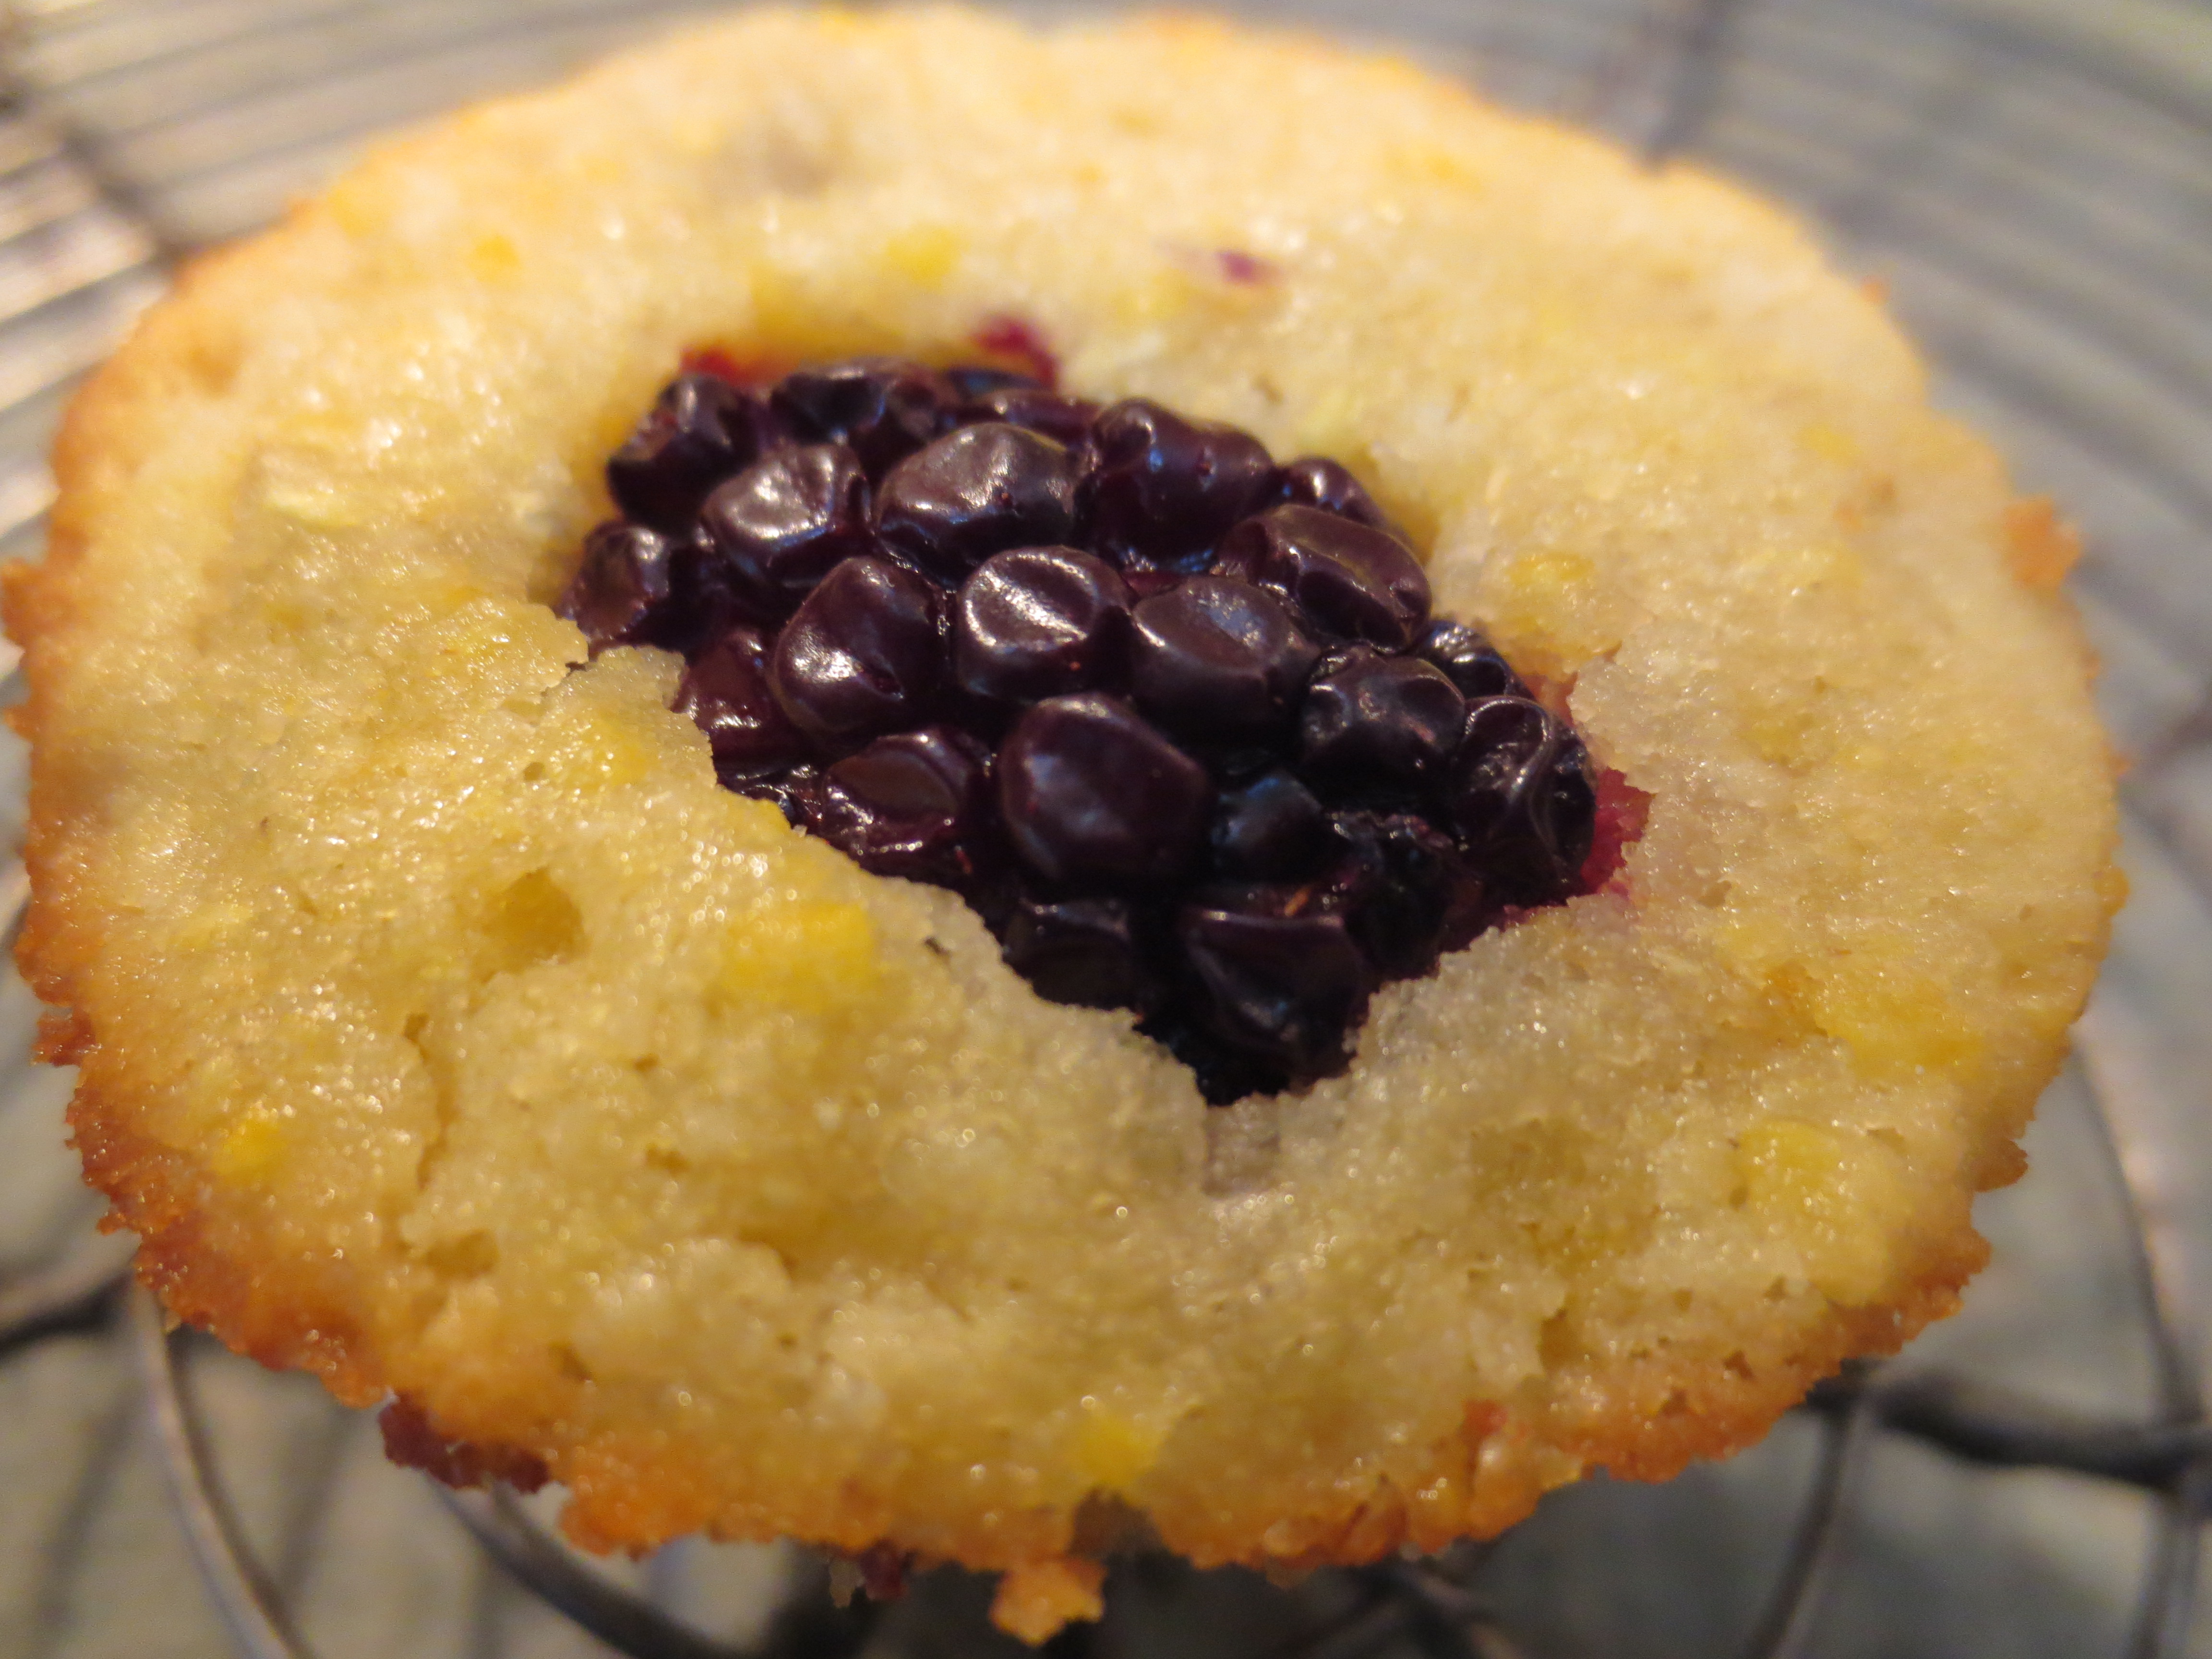
Corn Berry Muffins

It all started with a book my five year old brought home from school, a modern day version of Little Red Riding Hood “a new fangled prairie tale”, in my opinion, a truly terrible version of a classic, but it ended with grandma opening a muffin shop for the wolf to work in to keep him busy enough to stop terrorizing the neighborhood AND a recipe for Wheat Berry Muffins. Upon first reading I assumed it was muffins made with wheatberries, which as much as I love wheatberries, did not sound so tasty to me mixed into a muffin. But, then I realized it was whole wheat muffins with blueberries and “grandma’s” secret ingredient, sunflower seeds, now that didn’t sound too bad. Evan asked for days to make the Wheat Berry Muffins, but I had an open carton of buttermilk in the fridge that needed a purpose, so I decided Little Red’s grandma’s recipe needed some tweaking and the more I thought about it, I realized how yummy corn muffins are with berries and why not just for fun try to make a gluten free version….hmmm, now I was on to something. So I spent the morning scouring through recipes and ended up with four different ones I took a little from this one, a little from that one and so on until I came up with the tastiest little morsels, moist and delicious. There’s a hint of coconut, but not overwhelmingly so (in fact, Skyler, who despises all things coconut, upon tasting these for the first time, exclaimed “delicious” and then asked “is there coconut in these?” and then continued to devour the rest and ask for more), a really nice crunch from the coarse cornmeal and a bit of texture from the sunflower seeds, lightly sweet, unbelievably moist and so very yummy. These little gems are my current muffin obsession.
Corn Berry Muffins
Author: Sweet Green Kitchen’s Jen Jones
Makes about 15 muffins or 12 plus 12 minis
Ingredients:
1 cup Brown Rice Flour
1/2 cup Coarse Cornmeal **
1/2 cup Almond Flour
3/4 cup Granulated Natural Cane Sugar
1 Tablespoon Baking Powder
3/4 teaspoon Salt
1 cup Buttermilk
2 extra large Eggs
1 teaspoon Vanilla Extract
1/2 teaspoon Almond Extract
1/3 cup Coconut Oil – liquefied ***
1 – 1 1/2 cups Blueberries (or Blackberries) – about 1 -2 6 ounce containers of berries
1/4 cup Sunflower Seeds
Directions:
Preheat oven to 350 F.
In a large bowl, add in all the dry ingredients; Brown Rice flour, Cornmeal, Almond flour, Sugar, Baking Powder and Salt. Whisk together to combine.
In a small bowl or liquid measuring cup, add in the Buttermilk, Eggs, Vanilla and Almond Extract. Stir thoroughly to combine.
Add the liquids to the dry ingredients and stir to fully combine. Mix in the Coconut Oil.
Gently stir in the Blueberries and Sunflower Seeds.

Prepare muffin tins with cooking spray. Pour in about ¼ cup of batter into each muffin cup.
Bake at 350 F, about 20-23 minutes for regular size muffins or 16-18 minutes for minis.

Recipe Notes: As an alternative to Blueberries these muffins are also delicious with big juicy Blackberries. I actually really like making mini muffins with 1 big Blackberry in each one. 

**A note on Cornmeal – the cornmeal adds a nice little crunch to these muffins that I just adore. Alternatively, you could use finer corn flour, but you’d lose out on the crunch. I have also used corn flour with a few tablespoons of the ½ cup subbed out with polenta or corn grits.
***One other note, if Coconut Oil is not available, I think your best bet on substitution would be butter, but I would probably up it to 1/2 cup.
Click here for Printable version
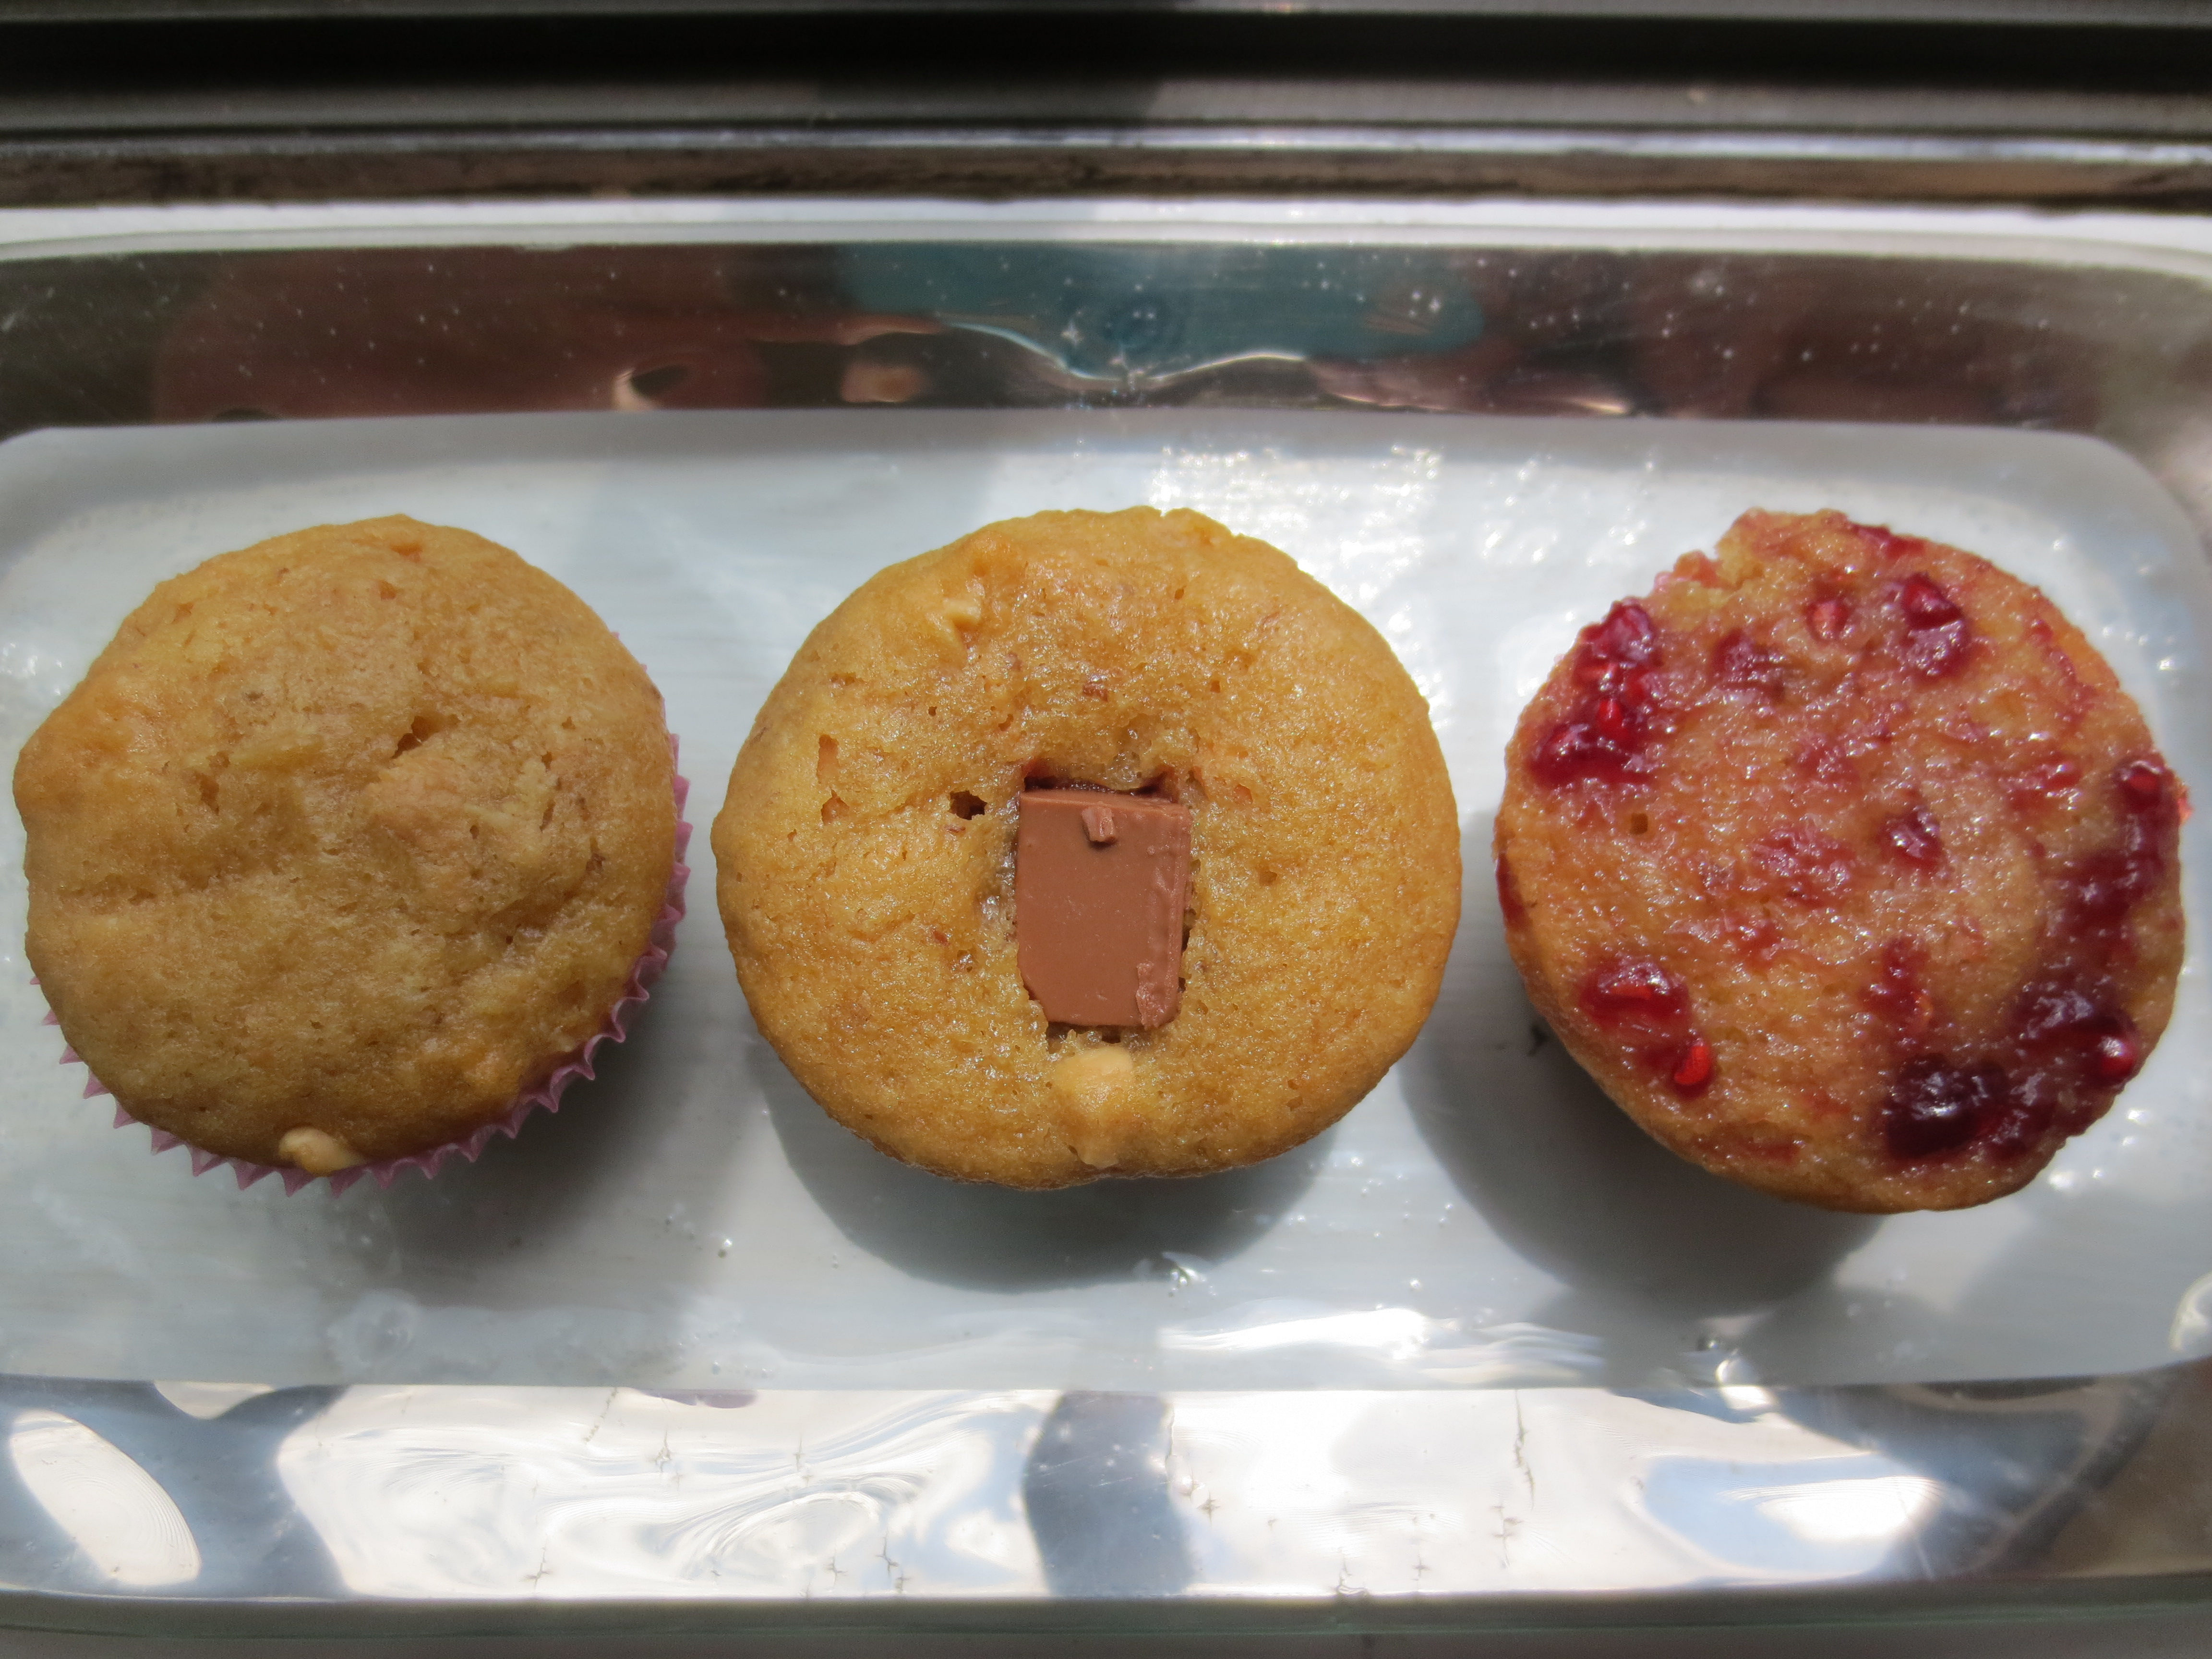
Peanut Butter Cupcakes – Three Ways

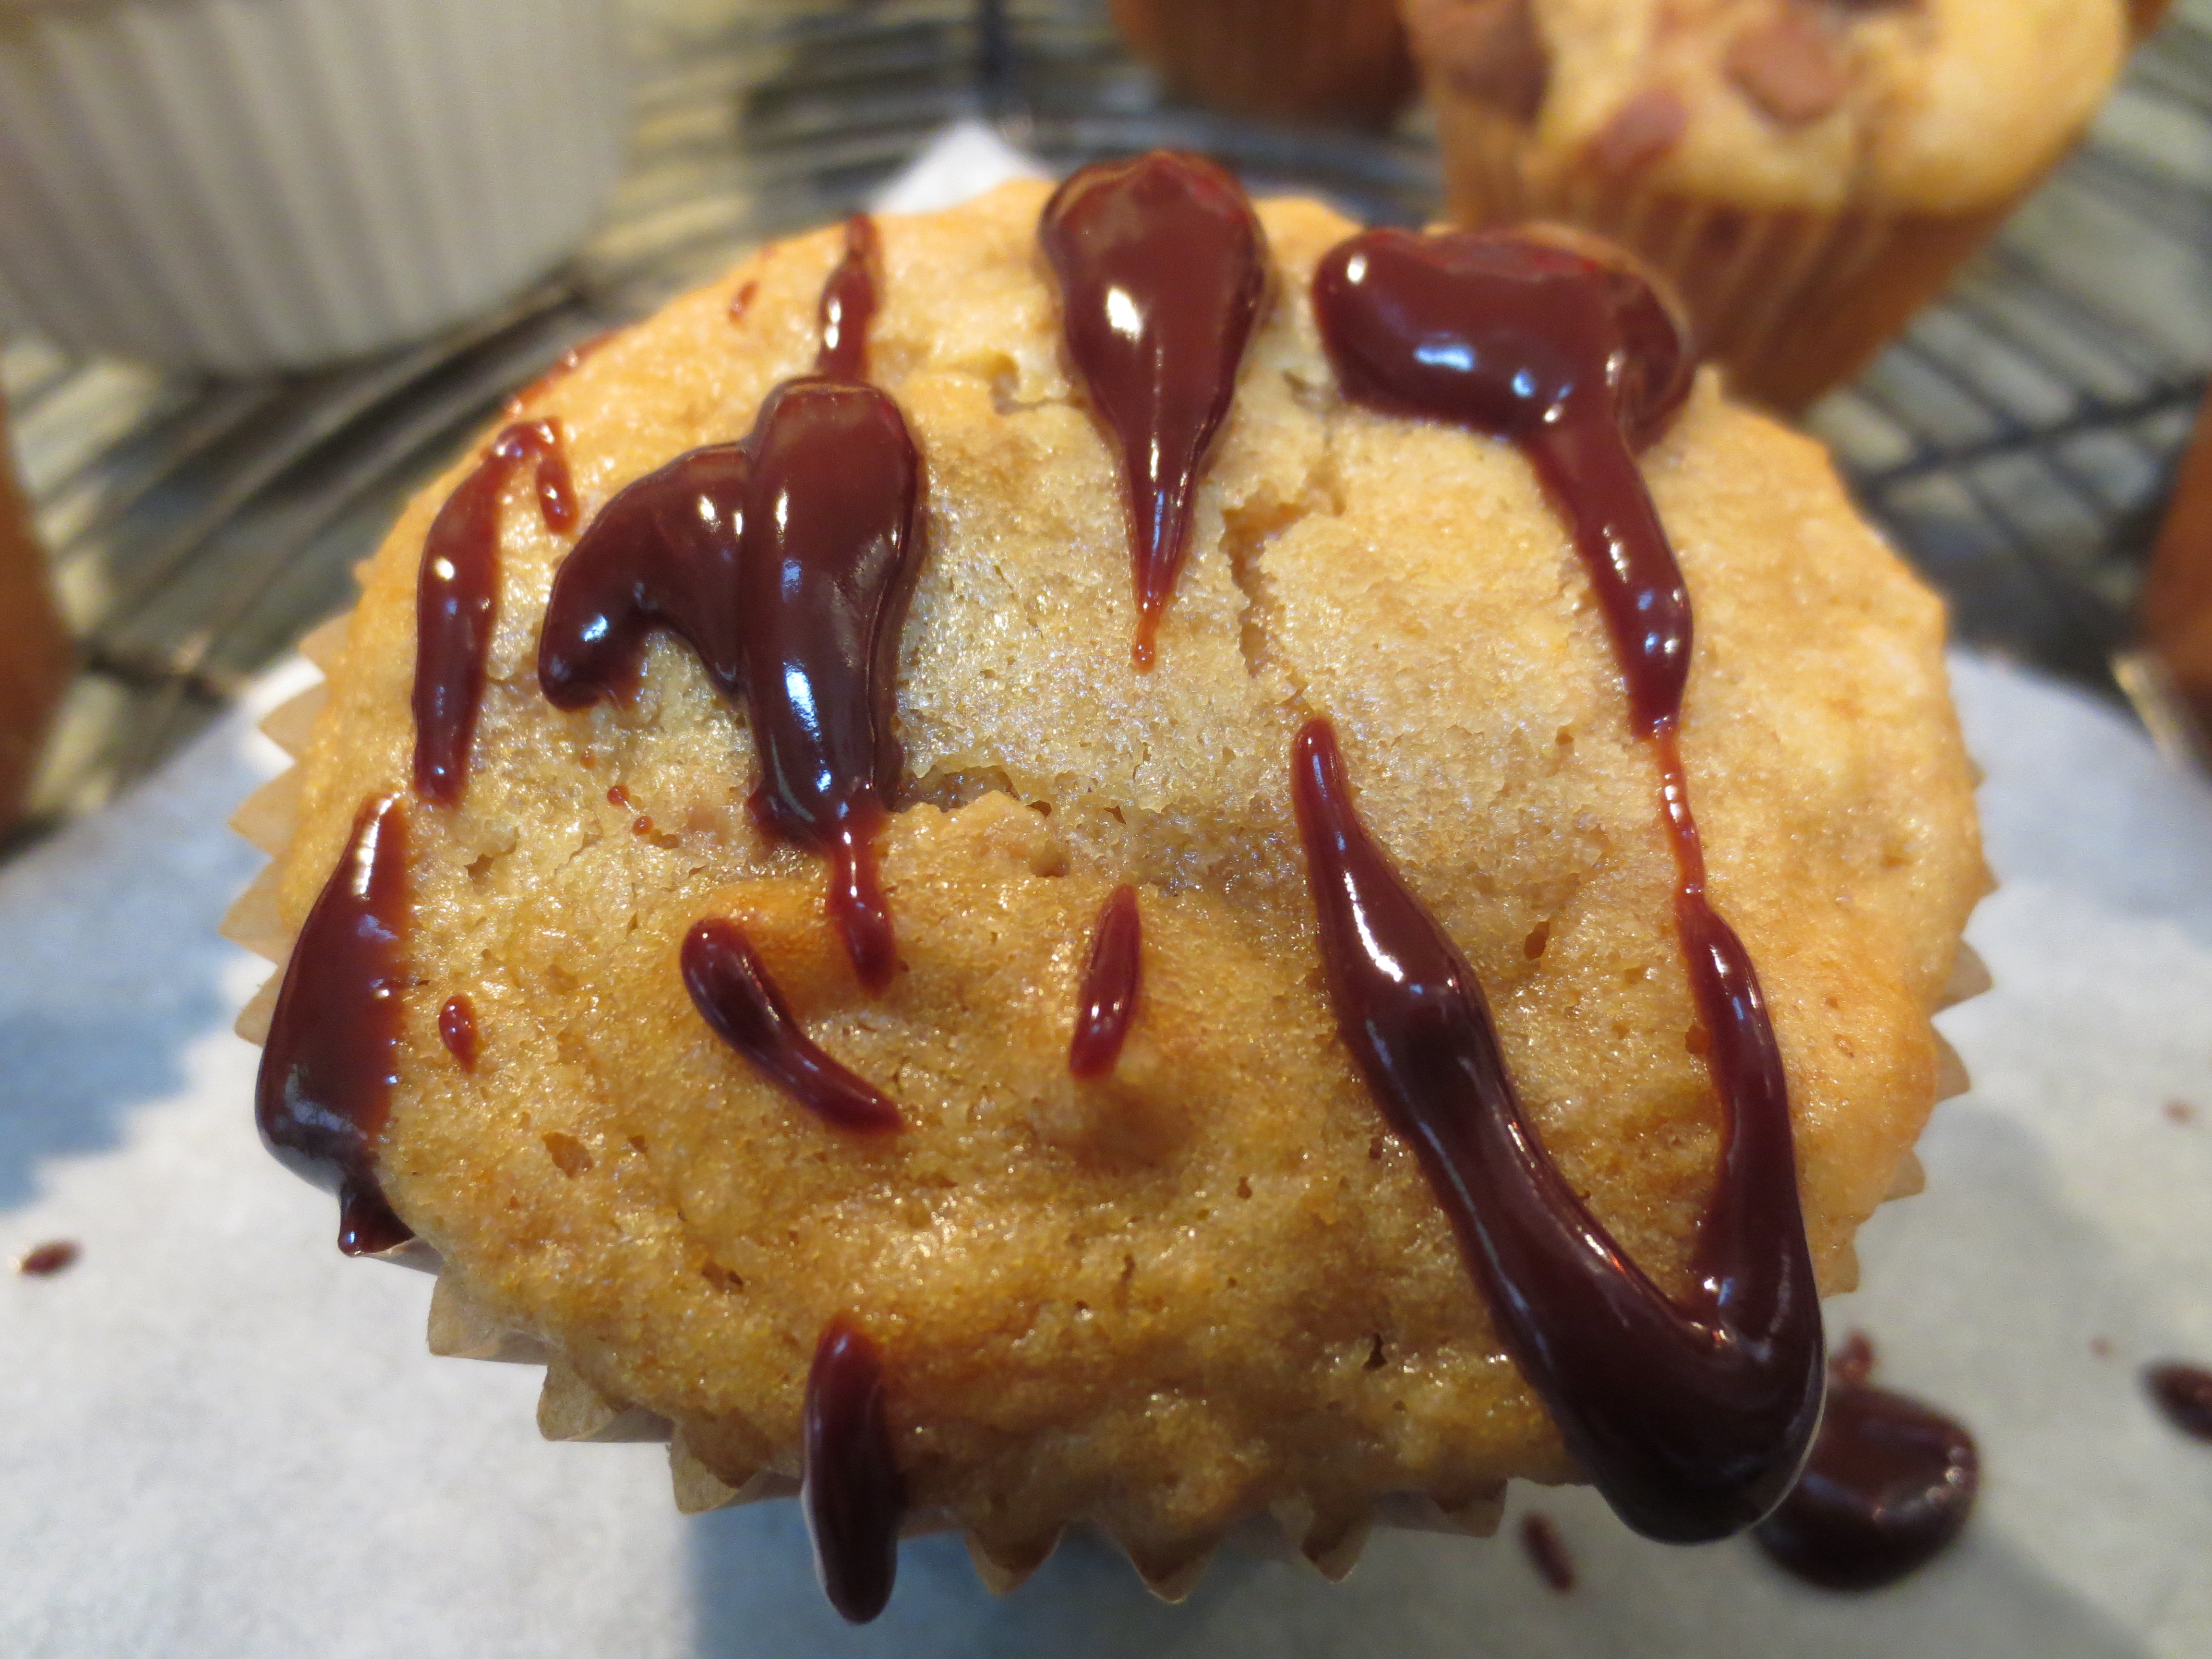
Peanut Butter Cupcakes
3 ways – Naked, Chocolate Chunk & Raspberry Jam
Author: Sweet Green Kitchen’s Jen Jones
A birthday blog for Skyler, my extraordinary daughter, who on the day she was born, forever transformed my life in the most amazing way. These cupcakes are most especially for YOU…..HAPPY BIRTHDAY…..and Enjoy – xo –

Strangely enough, I adapted this recipe from “Vegan Cupcakes Take Over the World” and made them most decidedly NOT vegan. They are oh so delicious, moist and peanut buttery and of course I make them three ways to satisfy all tastes and demands. With that said they are perfect just as they are, naked if you will or adorned with just a light drizzle of melted chocolate or topped with a dollop of fresh barely sweetened whipped cream or the frosting of your choice. BUT, if you’d like to take them to the next level, I like to top each individually (rather than mixed throughout the batter) with a few broken pieces or just one big chunk of the best milk chocolate I can find. Or for the jam lovers in your life (hello Evan!), a swirl of your favorite jam or preserve mixed into the batter of each individual cupcake just before baking, yum, yum, yum…. 
Makes about 15 cupcakes (is it just me, or is it impossible to create a recipe that actually makes exactly 12 cupcakes?) OR 12 regular size cupcakes plus about 6 minis.
Ingredients:
3/4 cup Buttermilk
1/2 cup Natural Unsweetened Chunky Peanut Butter
2-3 extra Tablespoons Natural Unsweetened Chunky Peanut Butter
1/3 cup Canola Oil
2/3 cup granulated Natural Cane Sugar
2 Tablespoons Maple Syrup
1 teaspoon Vanilla Extract
1 Egg
1 cup All Purpose Flour
1 teaspoon Baking Powder
1/2 teaspoon Baking Soda
1/4 teaspoon Salt
Optional:
A few ounces milk chocolate chunks (I use Lindt)
and/or
A few Tablespoons Jam of your choice (I prefer Raspberry)
Directions:
Preheat oven to 325 degrees F. Line muffin tin with paper liners.
In a large mixing bowl, cream together the 1/2 cup of Peanut Butter, Oil, Sugar, Maple Syrup and Egg until well combined. Add the Buttermilk and stir until fully incorporated.
 Sift in the Flour, Baking Powder, Baking Soda and Salt. Stir to combine. Then drop in the remaining 2-3 Tablespoons of Peanut Butter a little bit at a time to gently swirl through the batter.

Fill the cupcake liners about two thirds full.
Now if you like your peanut butter cupcakes straight up and simple, pop them in the oven and bake for about 22-25 minutes, until a toothpick inserted comes out clean.

OR, if you’d like to have a little fun, break up a few ounces of chocolate, leaving big pieces and then drop a piece on top of each muffin cup filled with batter. Bake as above.

OR, swirl a small spoonful of jam (about 1/4-1/2 teaspoon) into the top of each cupcake. Note, the jam topped cupcakes may take a touch longer to bake.
Allow cupcakes to cool a bit on a rack before removing them from the pan. Cool completely before topping with anything. Enjoy! 
Click here for printable version
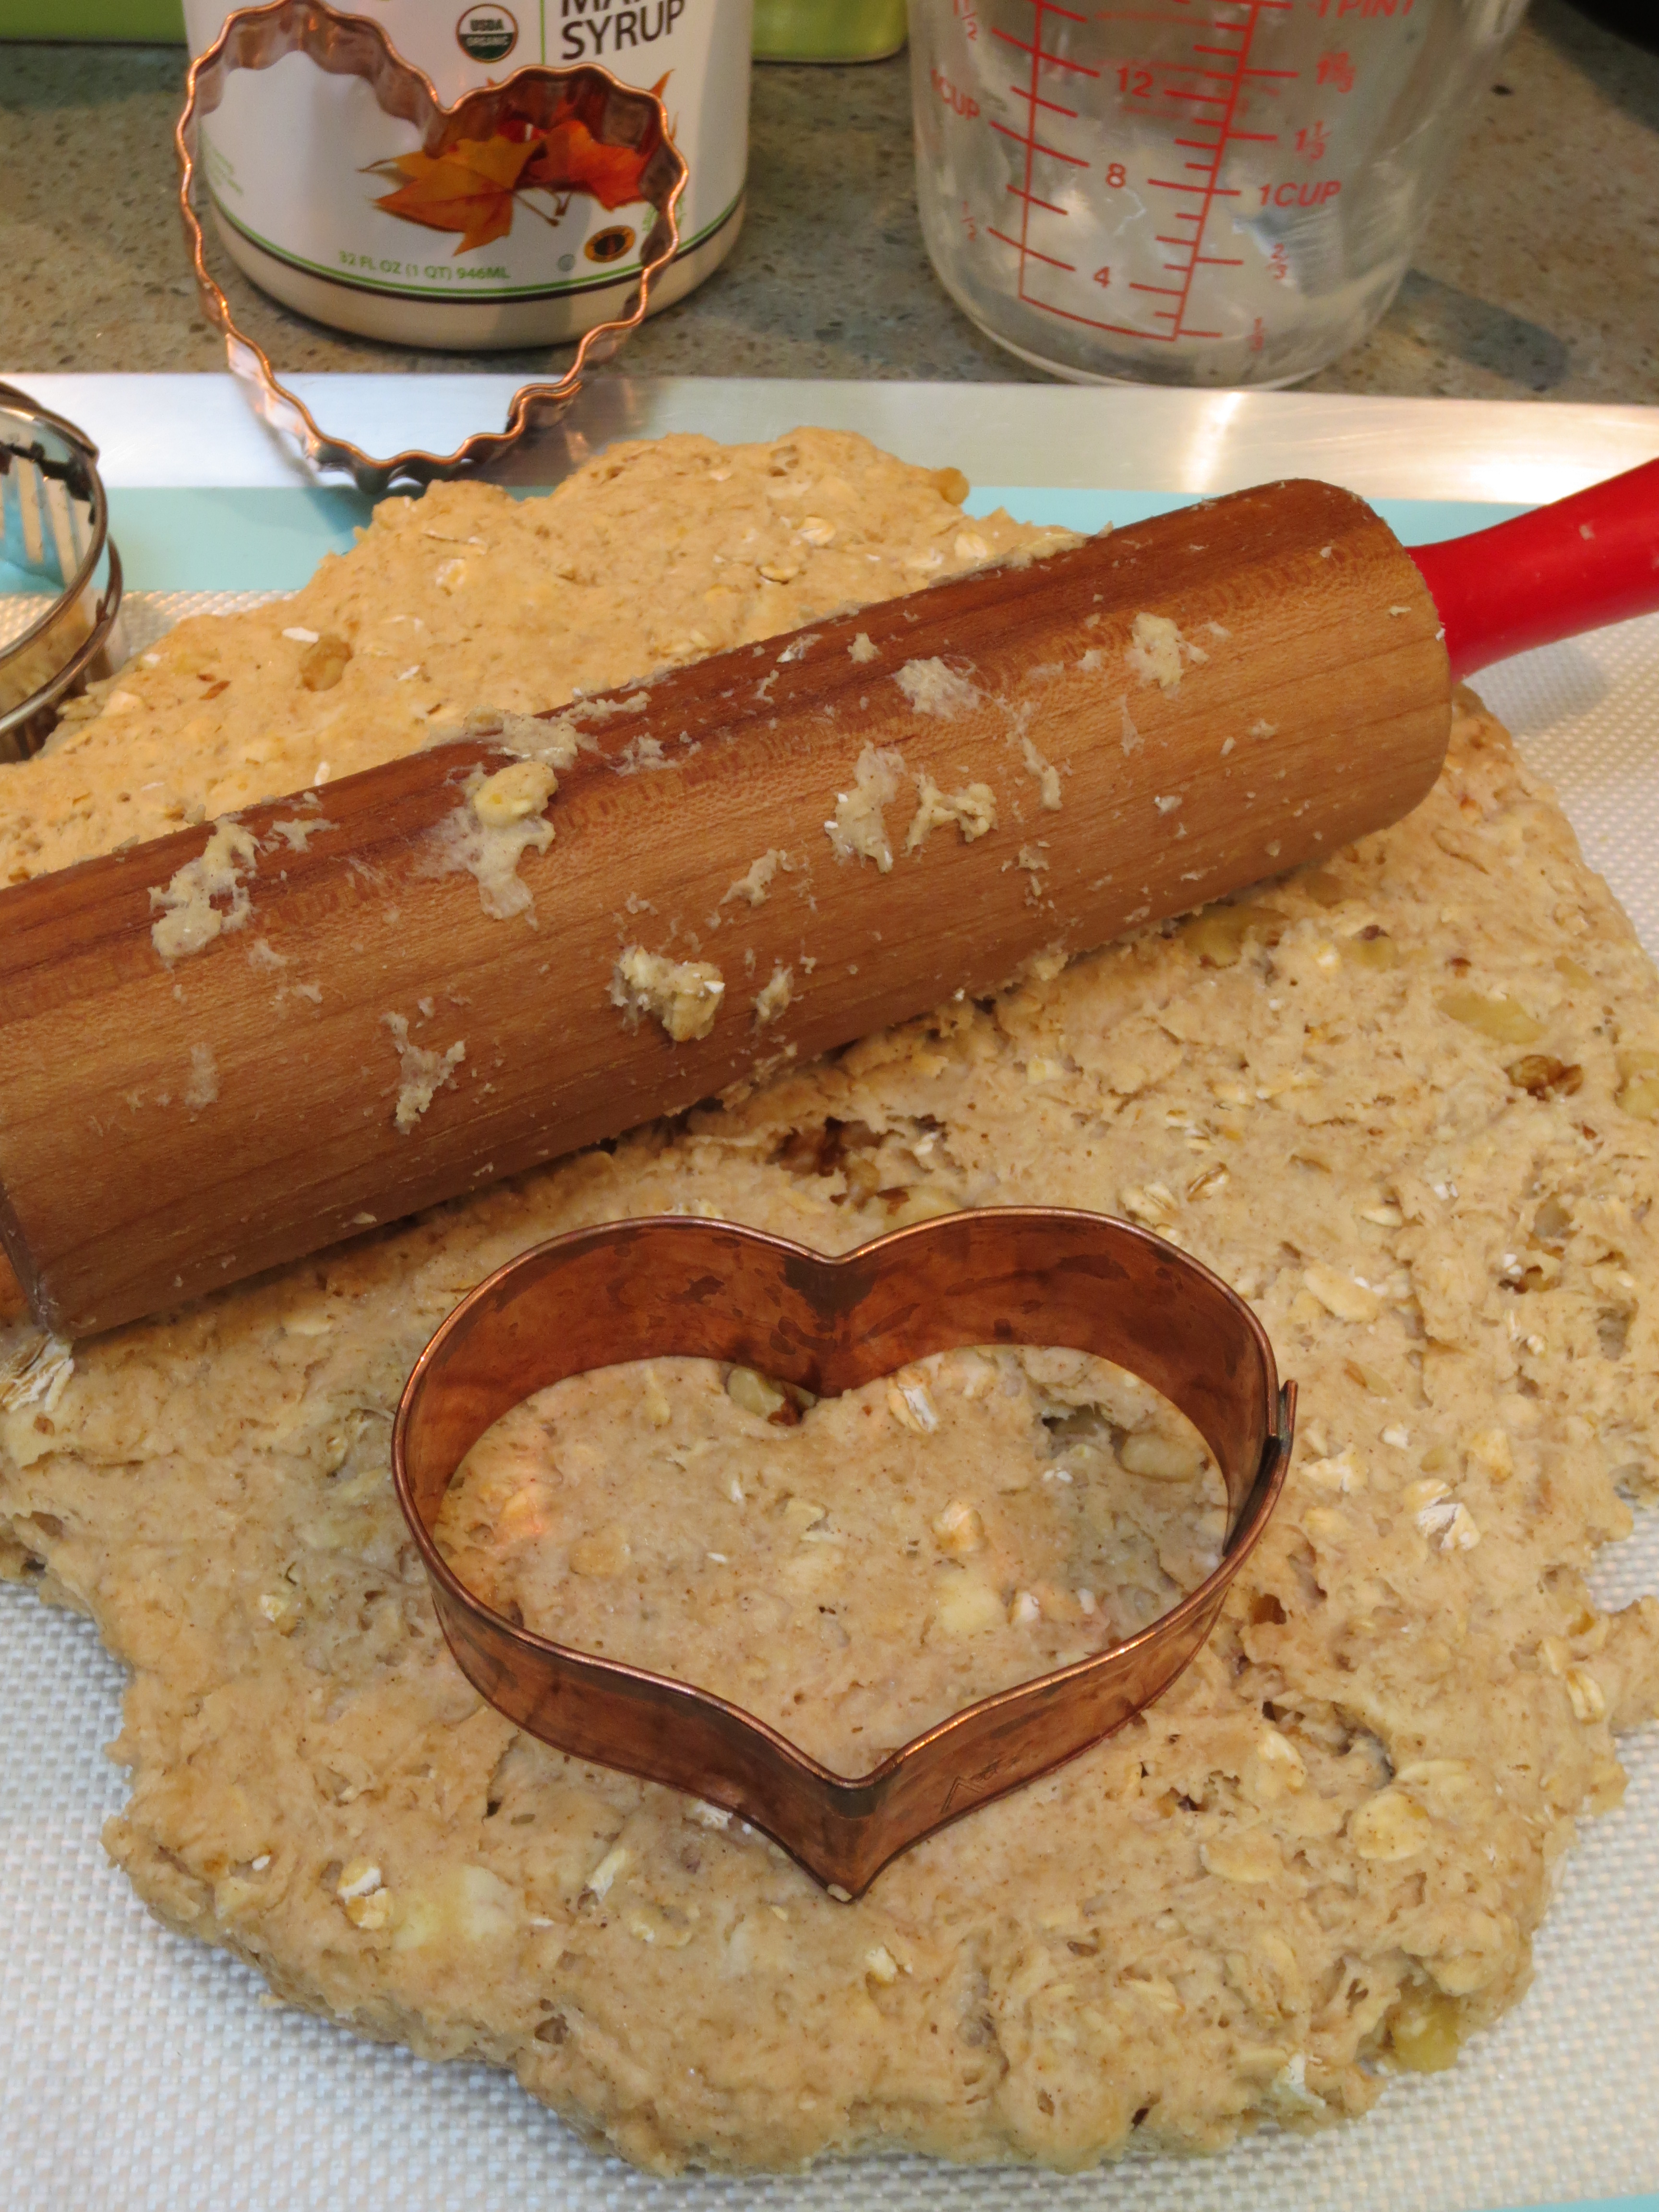
Oatmeal Maple Scones

Oatmeal Maple Scones
inspired by the Barefoot Contessa
Author: Sweet Green Kitchen’s Jen Jones
Inspired by the Barefoot Contessa’s Maple-Oatmeal Scones, but with a whole LOT less butter, Ina also tops her scones with a maple glaze while I do not. I’m personally not a big fan of glazes as they tend to be a little too sweet for me, instead I chose to make a little maple mascarpone spread based on the idea of a traditional British scone being served with clotted cream, but totally different. If you like the idea of a glaze, you can find it here http://www.foodnetwork.com/recipes/ina-garten/maple-oatmeal-scones-recipe.html , you could also skip the mascarpone spread and just use a little butter on the warm from the oven scones or jam of your choice. This recipe bakes just as scones should (in my opinion at least), a little bit dense, a little bit moist and (preferably eaten) a little bit warm from the oven. If Goldilocks were here in the kitchen, I think she might feel compelled to utter “just right”.
Ingredients:
1 1/2 cups Unbleached Flour
1/2 cup Whole Wheat Pastry Flour
1 cup Old Fashioned Rolled Oats (regular Oatmeal not instant)
2 Tablespoons Brown Sugar
1 Tablespoon Baking Powder
1 teaspoon Cinnamon
1/4 teaspoon Salt
4 Tablespoons cold unsalted Butter (1/2 stick)
2/3 cup Plain Greek Yogurt (I use non fat)
1/4 cup Maple Syrup (the real stuff)
1/4 cup Low Fat Milk (I used unsweetened Almond Milk, since that’s what I have)
1 large Egg
1 tsp Vanilla Extract
1/4 heaping cup chopped Walnuts
Directions:
Preheat oven to 400 F. Lightly butter or spray a large baking sheet, or cover with parchment.
 In a large bowl stir together dry ingredients (flours through salt). Cut the butter into 1/2 inch cubes and cut them into the flour mixture, until the mix resembles coarse crumbs.


In a small bowl stir together yogurt, egg, maple syrup, milk and vanilla extract. Add to the flour & butter mixture. Stir to combine. Mix in the nuts. The dough should come together to form a slightly sticky ball.


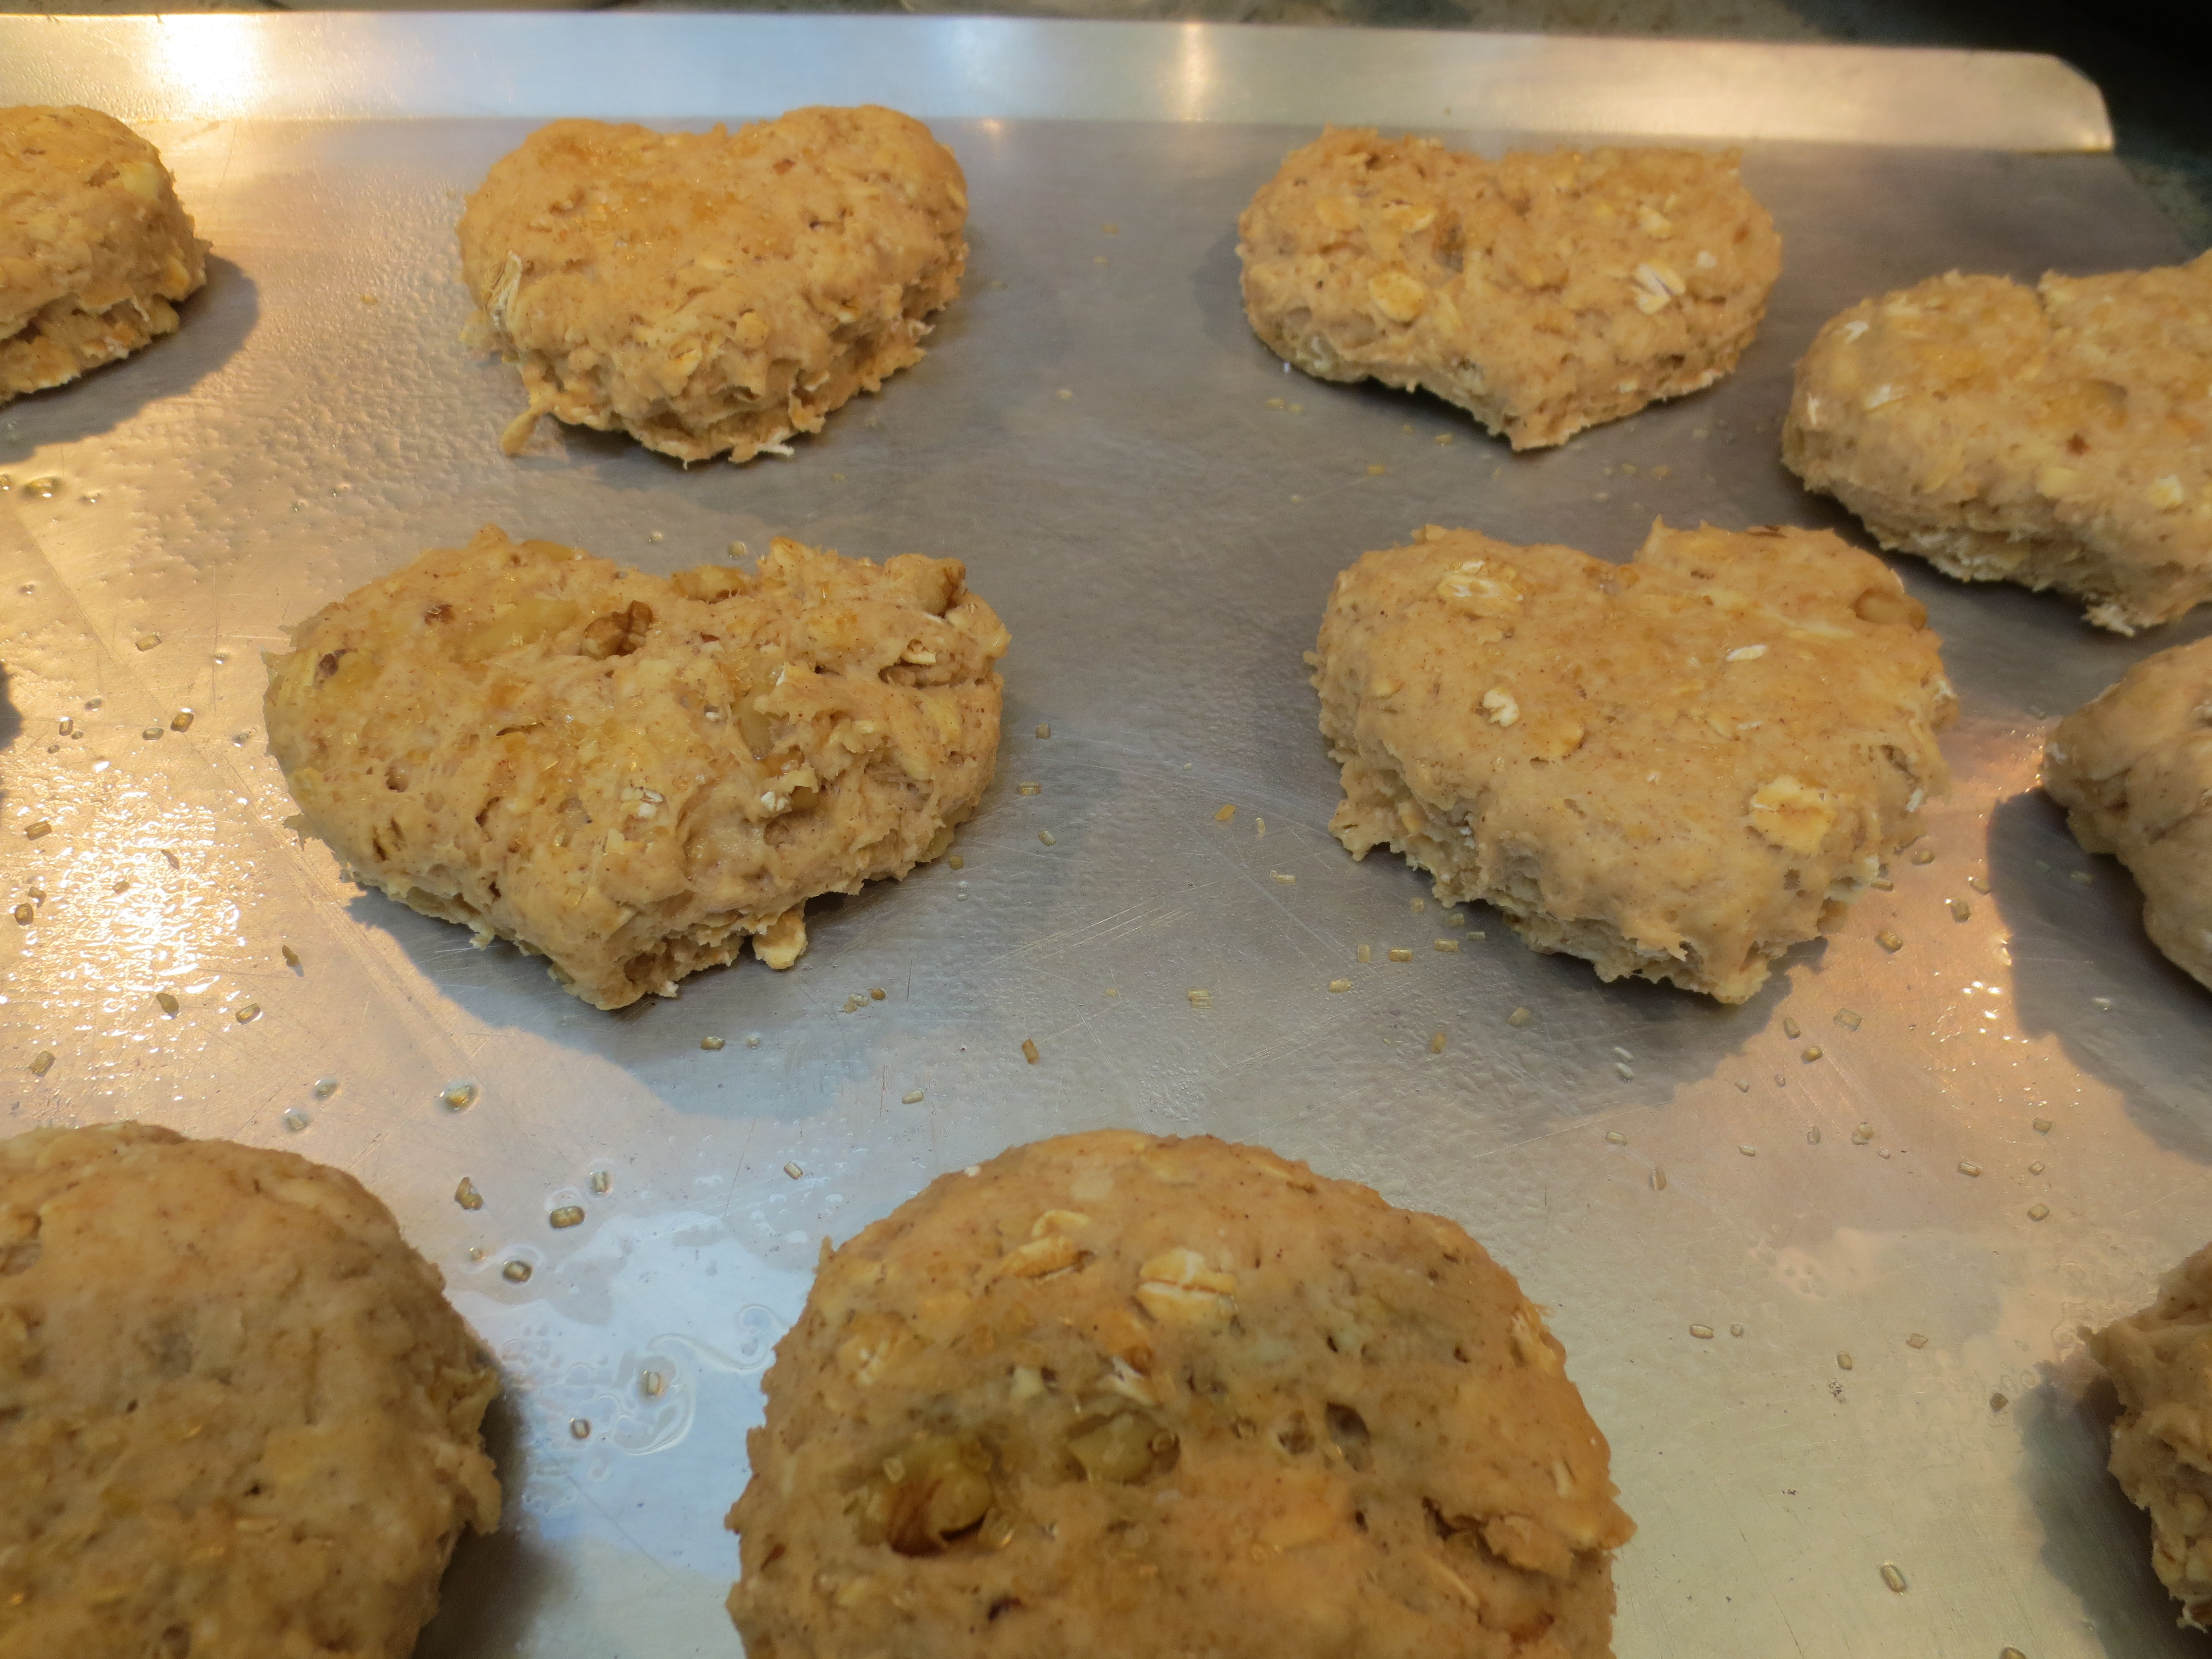
 Gently roll out the dough to about 3/4 to 1 inch thick. Cut dough into whatever shape you like. I used heart shaped and round fluted cutters about 3 inches across, because when your baking assistant is a tyrannical/terribly sweet not quite 5 year old, mama does not get to choose and why use one shape when three are better (for the record I insisted on the fluted edge heart cutters).
 Place scones on prepared baking sheet. Sprinkle with a little coarse raw sugar if you like.
Bake for 12-14 minutes, or until top is lightly browned and toothpick comes out clean.
Remove baking sheet from oven and allow to cool a few minutes, before transferring scones to a wire rack. Enjoy!
Makes about 12 – 15 or maybe even 18, scones depending on the size.
Click here to view printable version

Recipe Notes: I served my scones with both Blueberry Mascarpone and Maple Mascarpone Spreads. For the blueberry version, I simply stirred together a few tablespoons of mascarpone with some really good blueberry preserves and then for the maple version, just a little maple syrup and a sprinkle of cinnamon into the mascarpone, amounts to your desired taste and stirred until creamy. 

A Note on Shapes: I rolled out my dough and used a combination of fluted edge round and heart shaped cutters measuring about 3 inches across and also a smaller 2 inch heart shaped cutter. If you don’t have cutters of this size on hand, you can use the open end of a juice glass or tea mug as makeshift cutters or if you like simply free cut squares out of the shaped dough with a sharp knife. I would stick to shapes that are fairly uniform across and steer clear of pointed edges such as stars or trains with their pesky smoke stacks (if you have a young boy at home you’ll know just what I’m talking about).
Additional Notes: A recipe for Baking Powder
So on my last test of this recipe, I found myself in the very unfortunate situation of reaching into my baking powder container and coming up with a Tablespoon measure only 2/3 of the way full. My baking powder was empty! Now my policy is to always stock up on sale and never ever ever not have a backup of frequently used (and some not so frequently used) items and this is especially the case in the kitchen. Plus I was so certain that I had an extra container of baking powder hidden away which is probably why I ignored the fact that it was nearing empty on my recent trips to the market. I searched and searched through my overstocked pantry, the baskets on top of the fridge and everywhere else I could think of, to only come up empty on the baking powder front. Mind you this was all taking place early on a Sunday morning when I sometimes like to spend a little alone time in the kitchen before the family chaos begins and my time before my four year old invaded my world was ticking by fast. After a bit of panic, I remembered that my brother-in-law Josh had sent me a link to an article about the difference between baking powder and baking soda a month or two ago. So I went to my computer, waited for it to wake up (this actually takes awhile, as I’m repeatedly told by my husband and daughter that it’s old and it sucks and it desperately needs to be replaced, but that’s a story for another day), and then searched through all my old emails for the one in question, the one that would hopefully save the day.
So according to the link sent by Josh, http://shine.yahoo.com/shine-food/what-s-the-difference-between-baking-soda-and-baking-powder-144950994.html,one can make baking powder using a recipe of baking soda and cream of tartar, great! One problem, I had no cream of tartar, in fact my dad had given me some not too long ago for a cake decorating class I was taking (don’t even remember what it was supposed to be used for), but then I gave it back to him, d’oh! But, then I read on and discovered that in the absence of cream of tartar, lemon juice could be used, and lemon juice is one thing I am never out of, woo hoo, my morning and my scones were saved!. I’m not going to get into the science of it all and the exact ratios, for that you can go to the link above, but long story short, for my missing 1 teaspoon of baking powder, I replaced it with ½ teaspoon of baking soda plus 2 teaspoons of lemon juice. I added the baking soda in with my dry ingredients and the lemon juice in with my wet. The recipe worked, I noted no discernible difference between this batch of scones and previously tested batches using the full Tablespoon of baking powder. So now you know, no need to panic if out of baking powder, but if you end up with an empty box of baking soda, you’re on your own. : – )
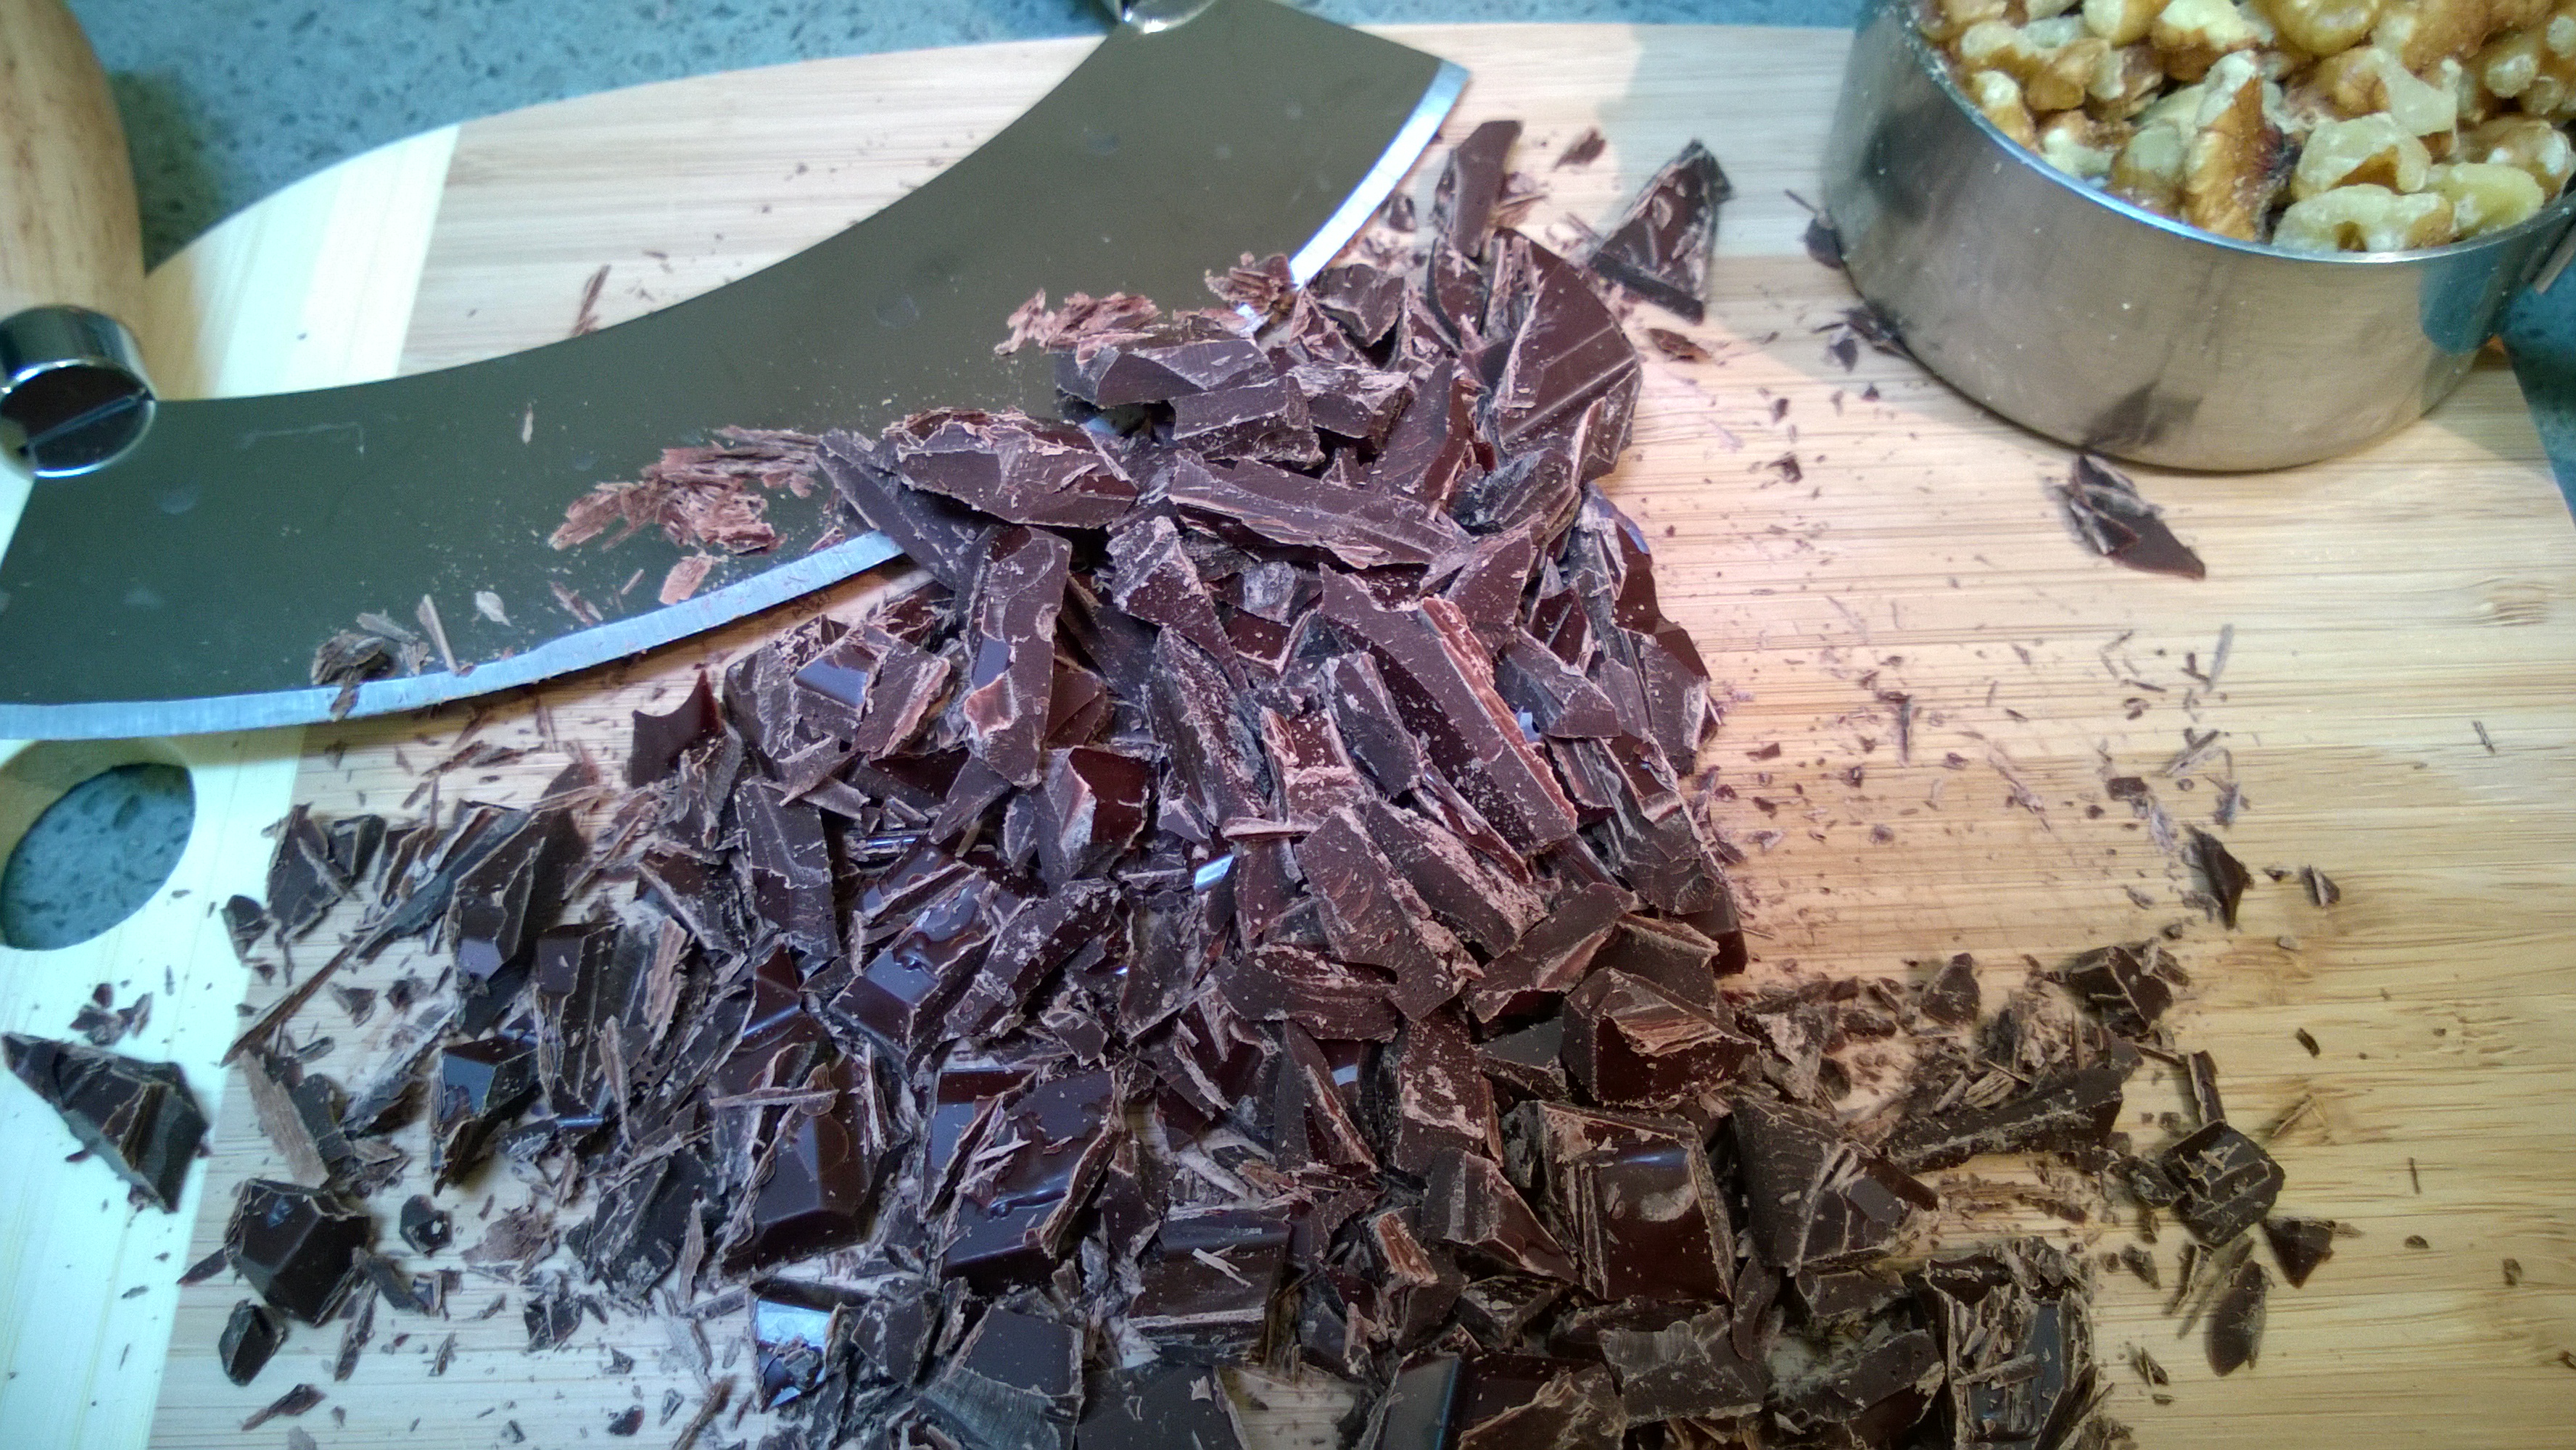
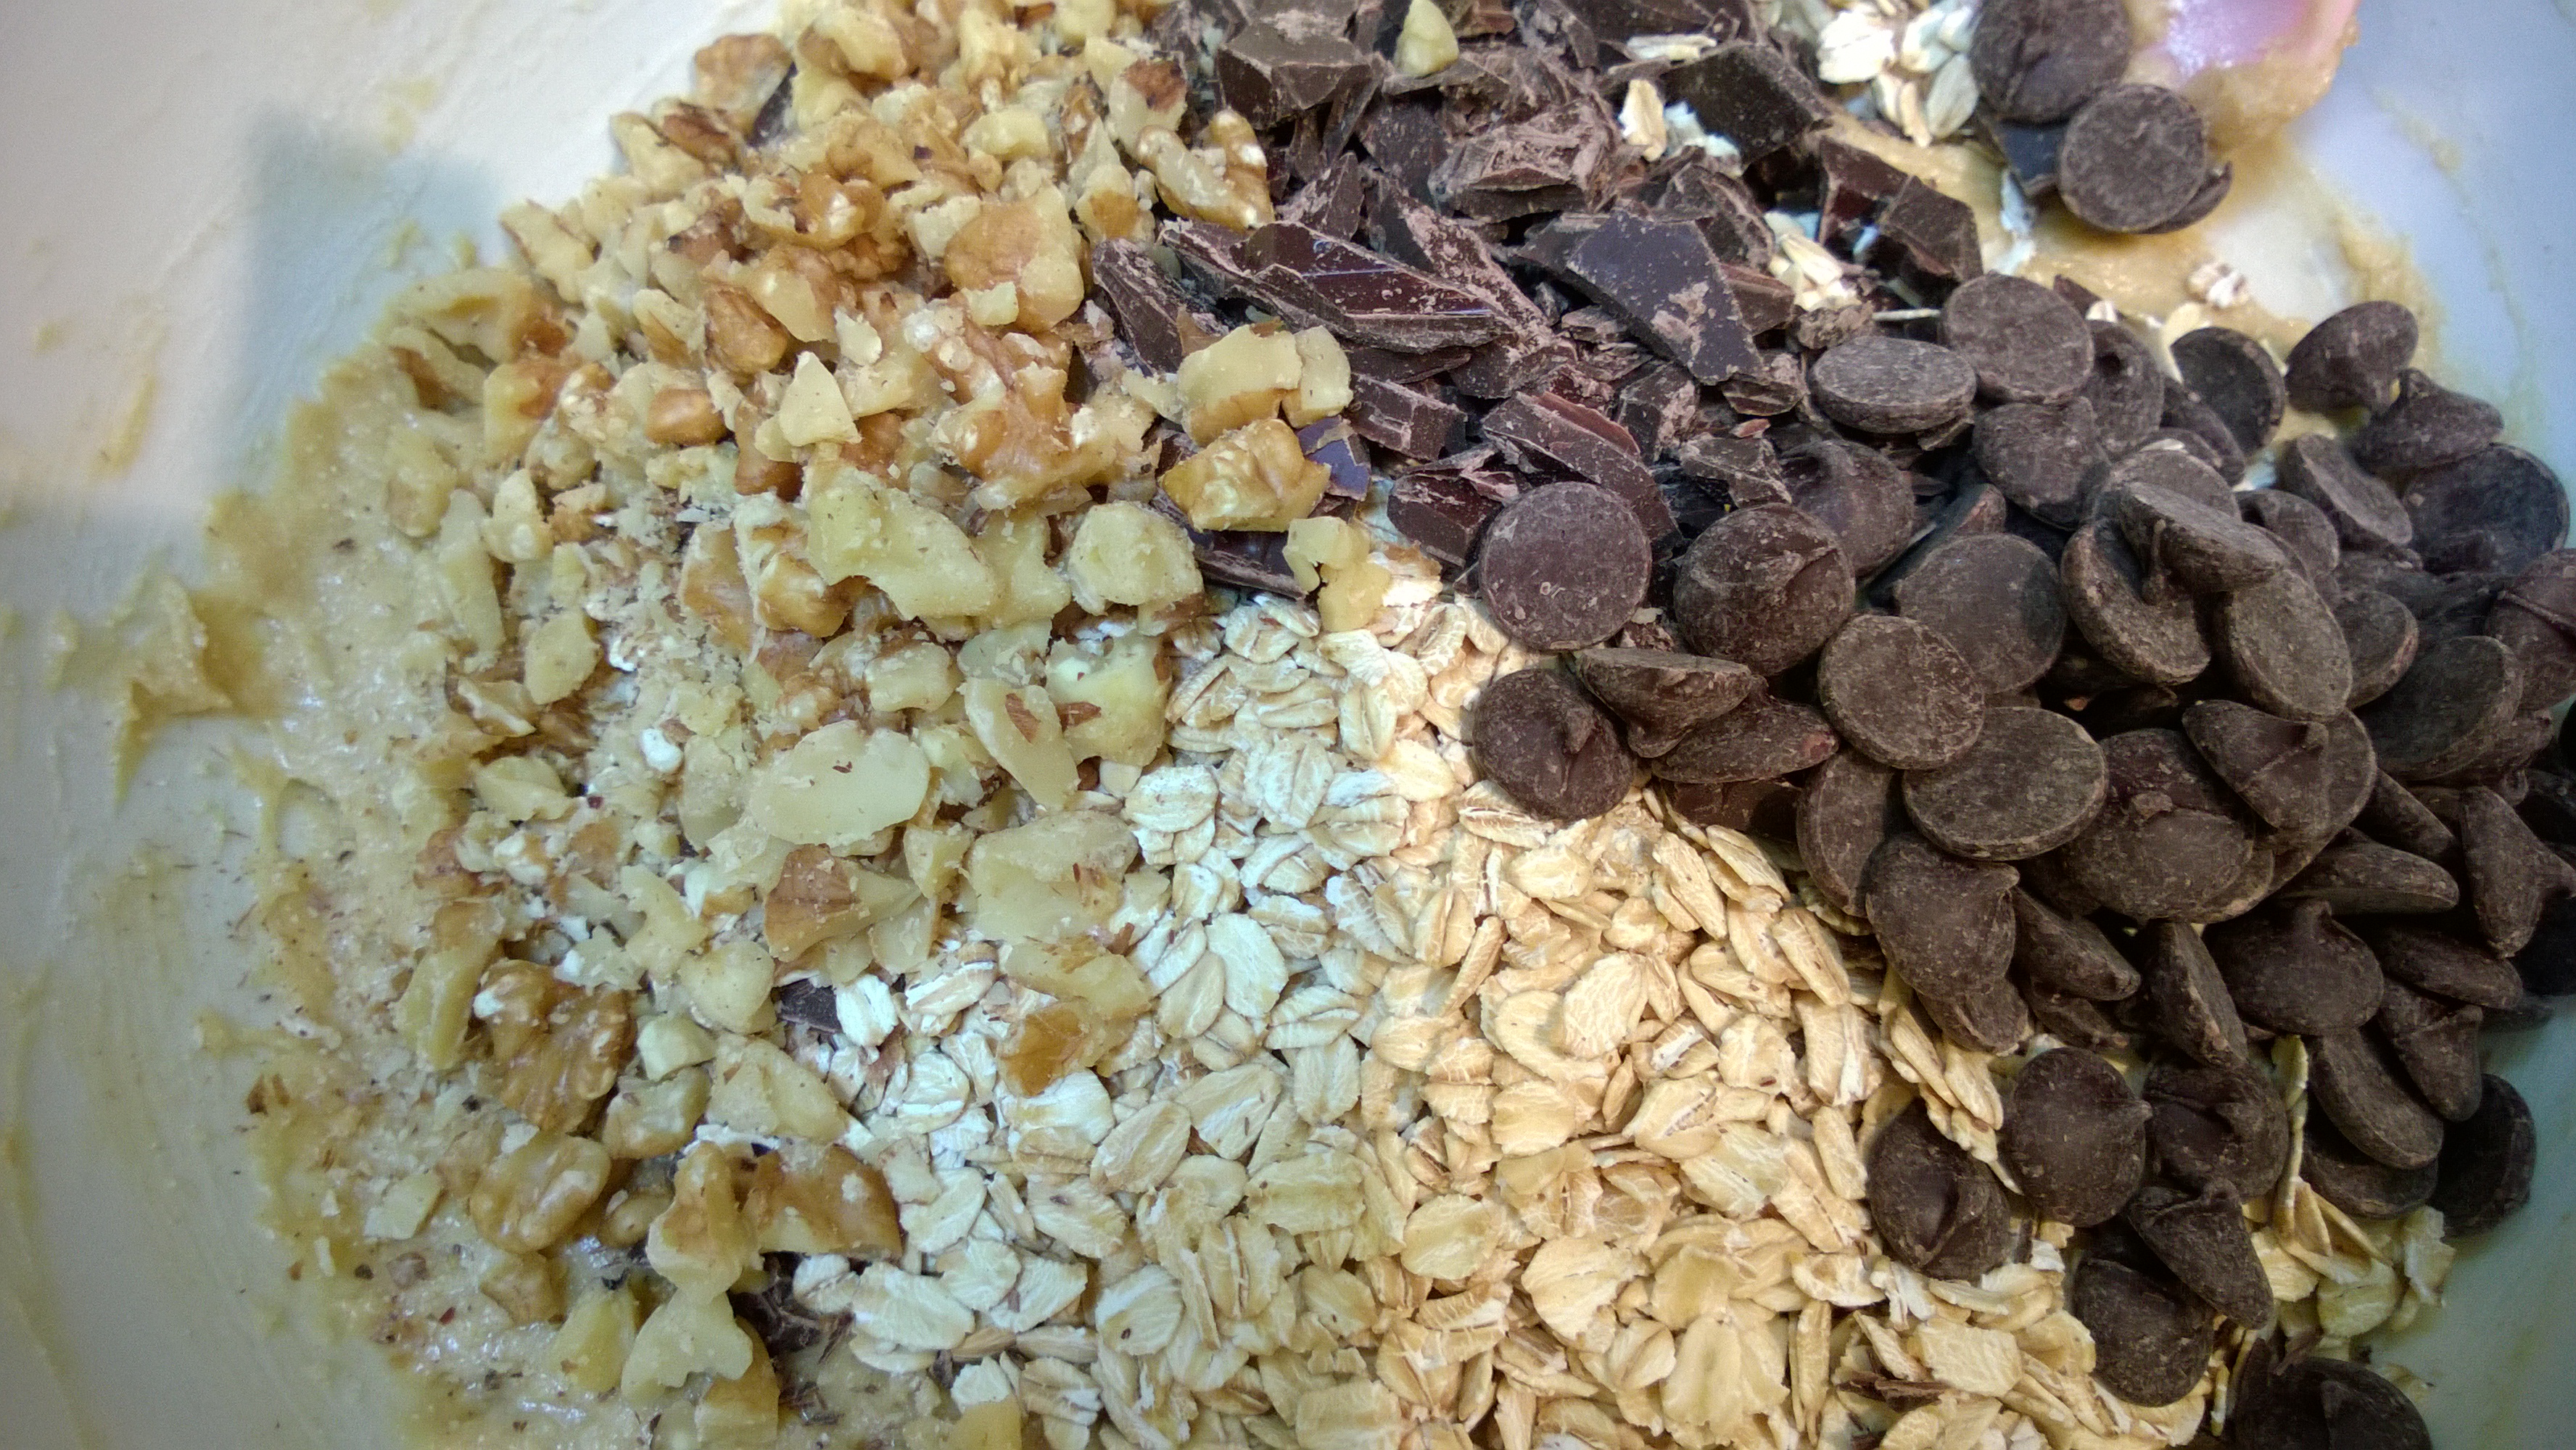
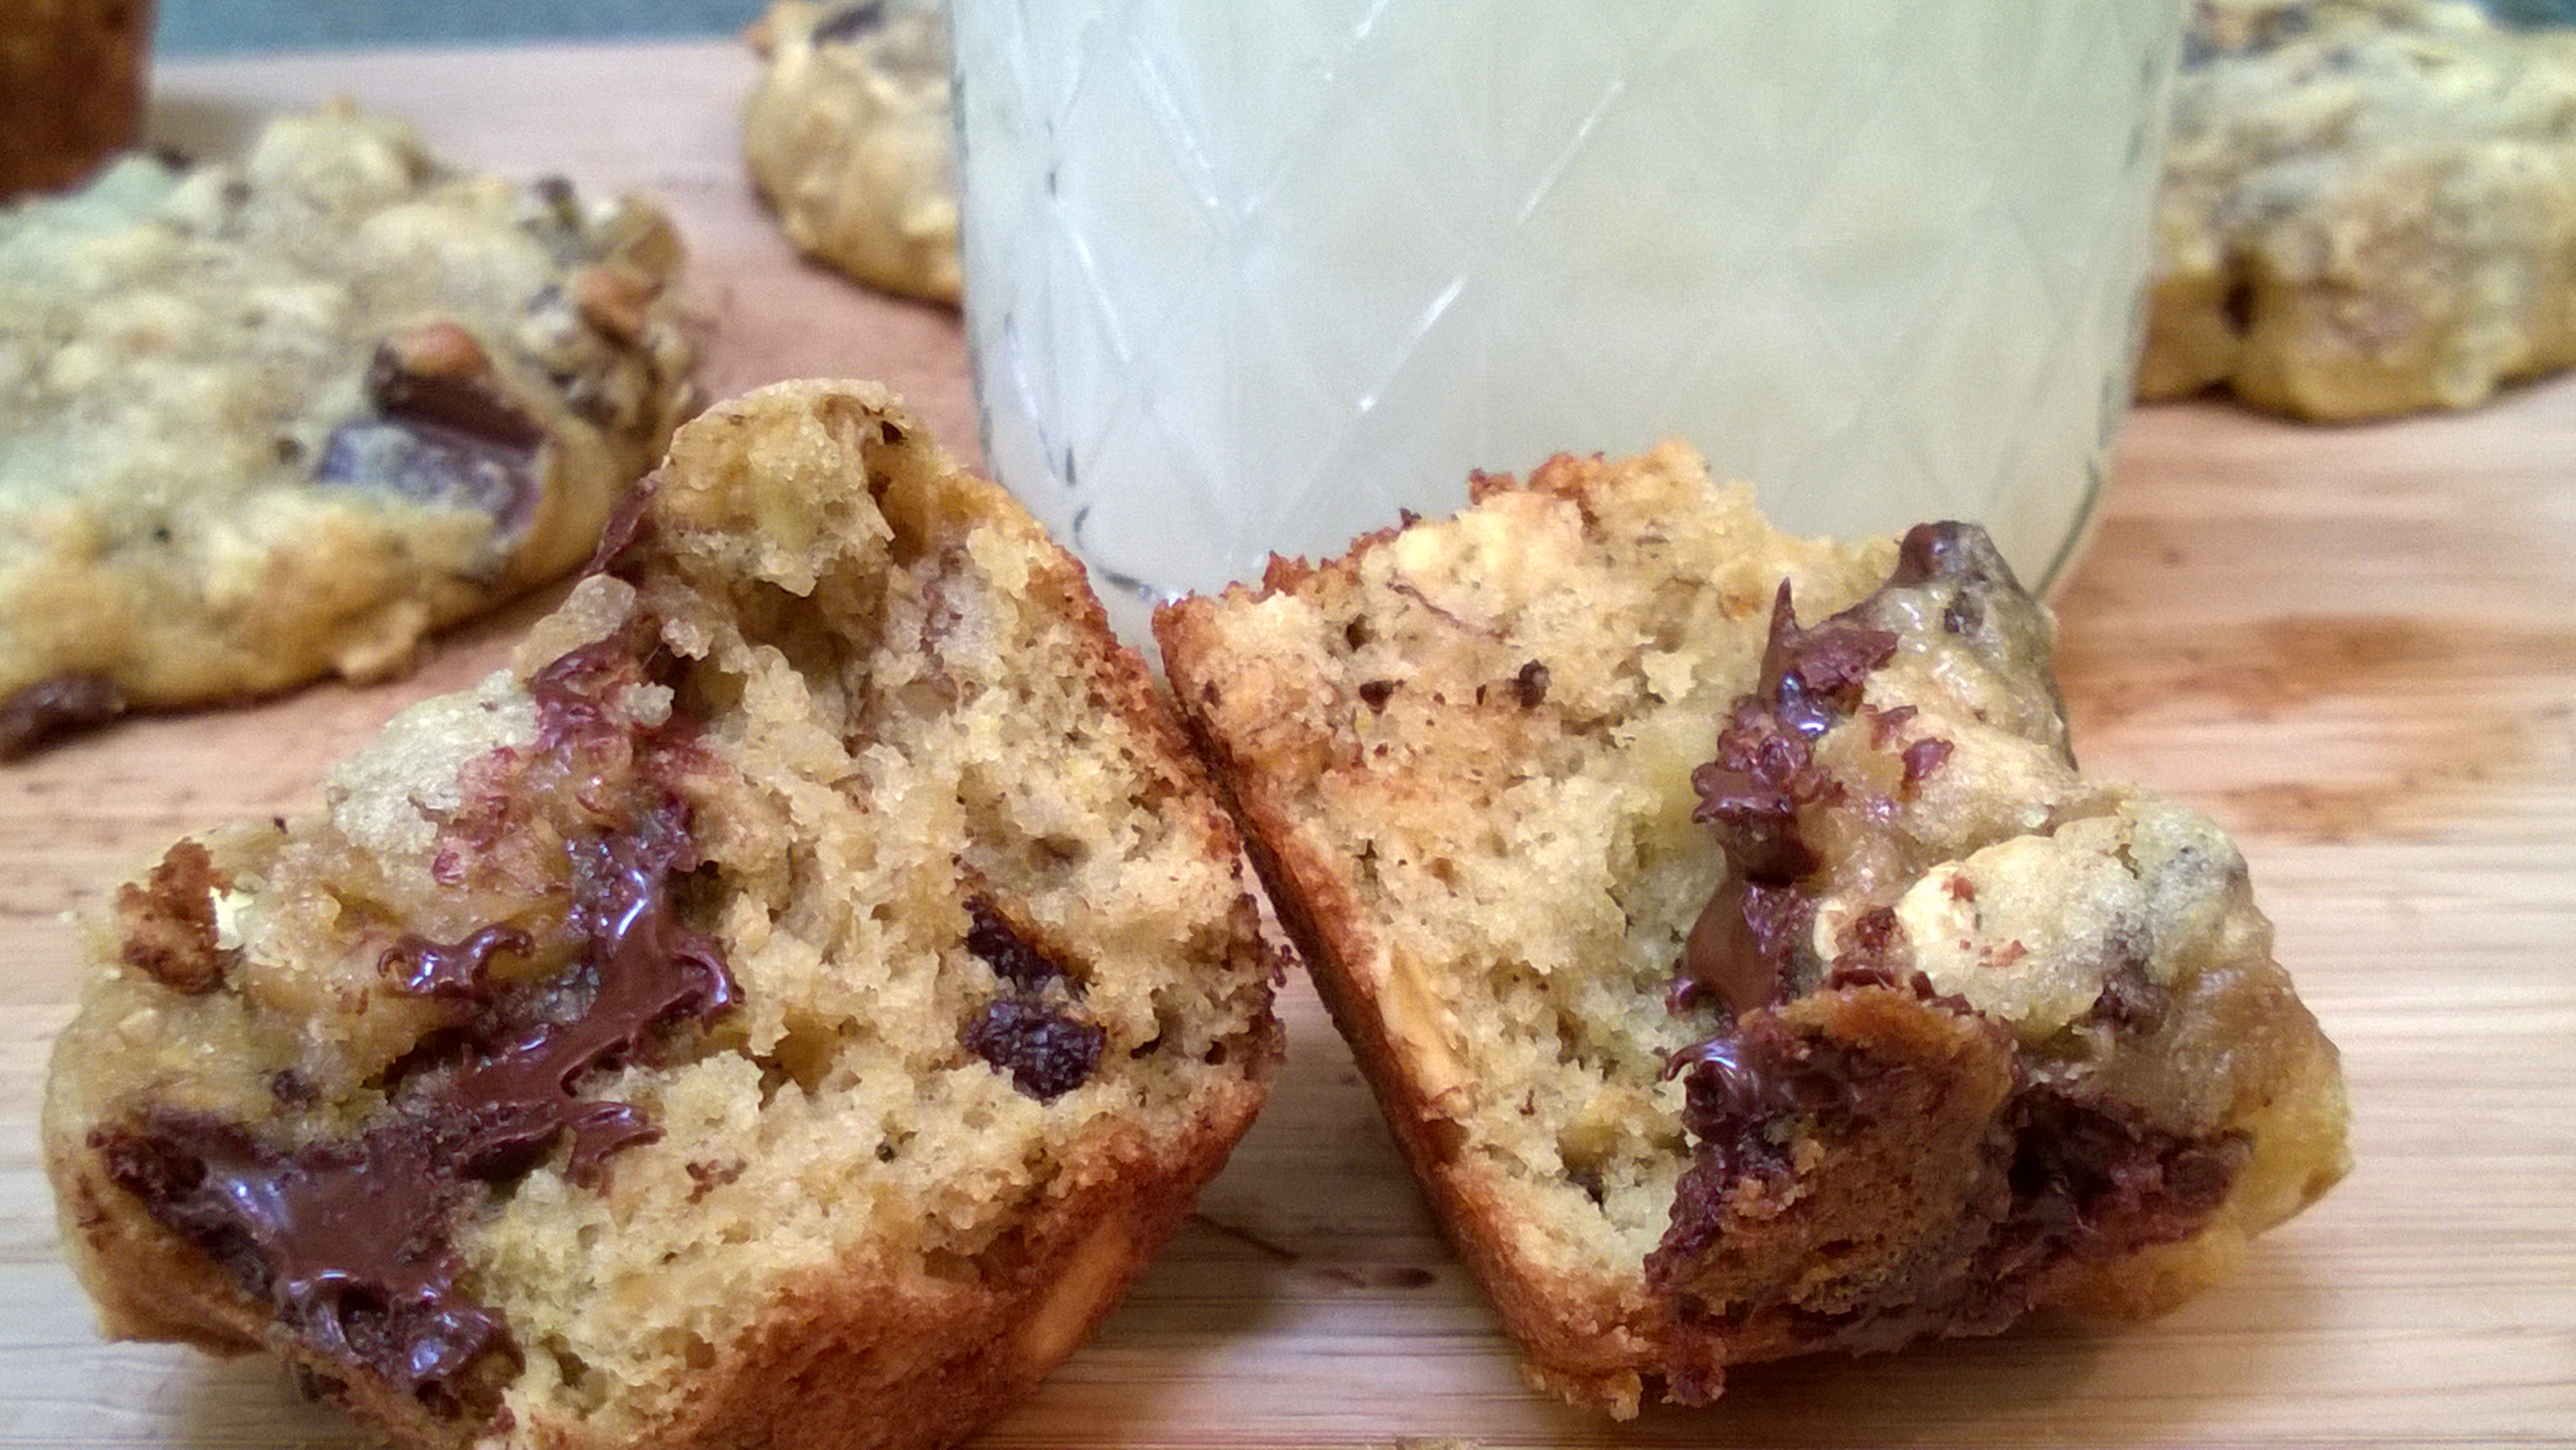
Chewy Banana Oatmeal Cookies with Chocolate and Walnuts

Chewy Banana Oatmeal Cookies with Chocolate and Walnuts
Author: Sweet Green Kitchen’s Jen Jones
I am deeply ashamed to admit it, but somehow I let National Oatmeal Cookie Day come and go without even knowing it existed! It’s true, it was March 19 according to Teresasfamilykitchen, admittedly I did not research this to see if it’s true or not, but really who needs an excuse to make chewy gooey oatmeal cookies anyway, certainly not me. I cut down some of the butter in this recipe and replaced it with Neufchatel cheese, which yields a lovely light, soft and chewy texture to this cookie. I also decided to have a little fun and baked up half the batch in mini muffin tins, this kept the dough from spreading while it baked to lend even more to the already perfect cookie texture.
Ingredients:
1 cup Unbleached Flour – preferably organic
1 cup Whole Wheat Pastry Flour
1 teaspoon Salt
1 teaspoon Baking Soda
¾ stick of unsalted Butter
4 ounces Neufchatel Cheese
½ cup granulated Natural Cane Sugar
½ cup Brown Sugar – I use organic (for pretty much every ingredient here)
2 Eggs – I use X-large
2 teaspoons pure Vanilla Extract
1 large ripe Banana – mashed – about ½ cup
1 ½ cups Old Fashioned Rolled Oats
1 cup Bittersweet Chocolate – from about 6 oz chopped chocolate OR chocolate chips or a combination of the two – I used 3 oz chopped chocolate and ½ cup 60% cocoa chocolate chips
½ cup chopped Walnuts

Directions:
Preheat oven to 375 F.
In a small bowl, whisk together flours, salt and baking soda. 

In a larger bowl, cream together (by hand) Butter, Neufchatel Cheese and Sugars, until light and fluffy. Add Eggs and Vanilla, mix until combined. Mix in the mashed Banana.
Add the flour mixture into the butter mixture and mix until just combined. Stir in the Oats, Chocolate Chunks and Walnuts.


Scoop out 1 slightly heaping Tablespoon of dough and place it on a cookie sheet  or alternatively drop the dough into each cup of a mini muffin tin.
  Bake for 8-10 minutes at 375 F. Err on the side of undercooked and allow the cookies to rest on the baking sheet out of the oven for a few minutes before transferring to a cooling rack.


This recipe makes about 3 dozen (36 cookies) give or take. Enjoy!
Recipe Note: A strange thing happens to these cookies when you let the batter rest for a little while, say between baking batches. The resulting cookie, bakes up a bit thicker and denser, while the unrested version bakes a bit flatter and gooeyer. Now, I have never claimed to understand much about baking science, but I suspect it has something to do with the baking soda’s reaction evolving. Either way the end result is oh so very yummy.
Click here for printable version


i love getting feedback, here are some of your most recent comments…