Category Archives: Desserts

Double Chocolate Mini Muffins

IMG_4009

Double Chocolate Mini Muffins

Author: Sweet Green Kitchen’s Jen Jones

This recipe is adapted from “Giada’s Feel Good Food” Chocolate Muffins.  Not only are they gluten free, they’re oil free too, plus super chocolatey and delicious!  I’ve replaced Giada’s oil, apple sauce and maple syrup with non fat Greek yogurt, secret ingredient Avocado and Natural Cane Sugar.  Plus I reduced the amount of chocolate chips, while still maintaining a ton of chocolate flavor. The yogurt adds protein and calcium while the avocado contributes healthy mono unsaturated fat and fiber, both keep the muffins nice and moist.  It’s a nice way to give my kids (and myself) a special treat, while not filling us full of empty calories.


Ingredients:

1 Cup Brown Rice Flour

½ Cup Almond Flour

½ Cup Unsweetened Cocoa Powder

½ teaspoon fine Sea Salt

½ teaspoon Baking Soda

½ teaspoon Baking Powder

½ Cup Sugar – Natural Cane Sugar is what I use


½ Cup Plain Non Fat Greek Yogurt

½ Avocado – mashed

2 Extra Large Eggs

2 teaspoons pure Vanilla Extract


½ Cup + a little extra Semi Sweet Mini Chocolate Chips


Directions:

Preheat the oven to 350 F. Spray mini muffin tins with cooking spray.

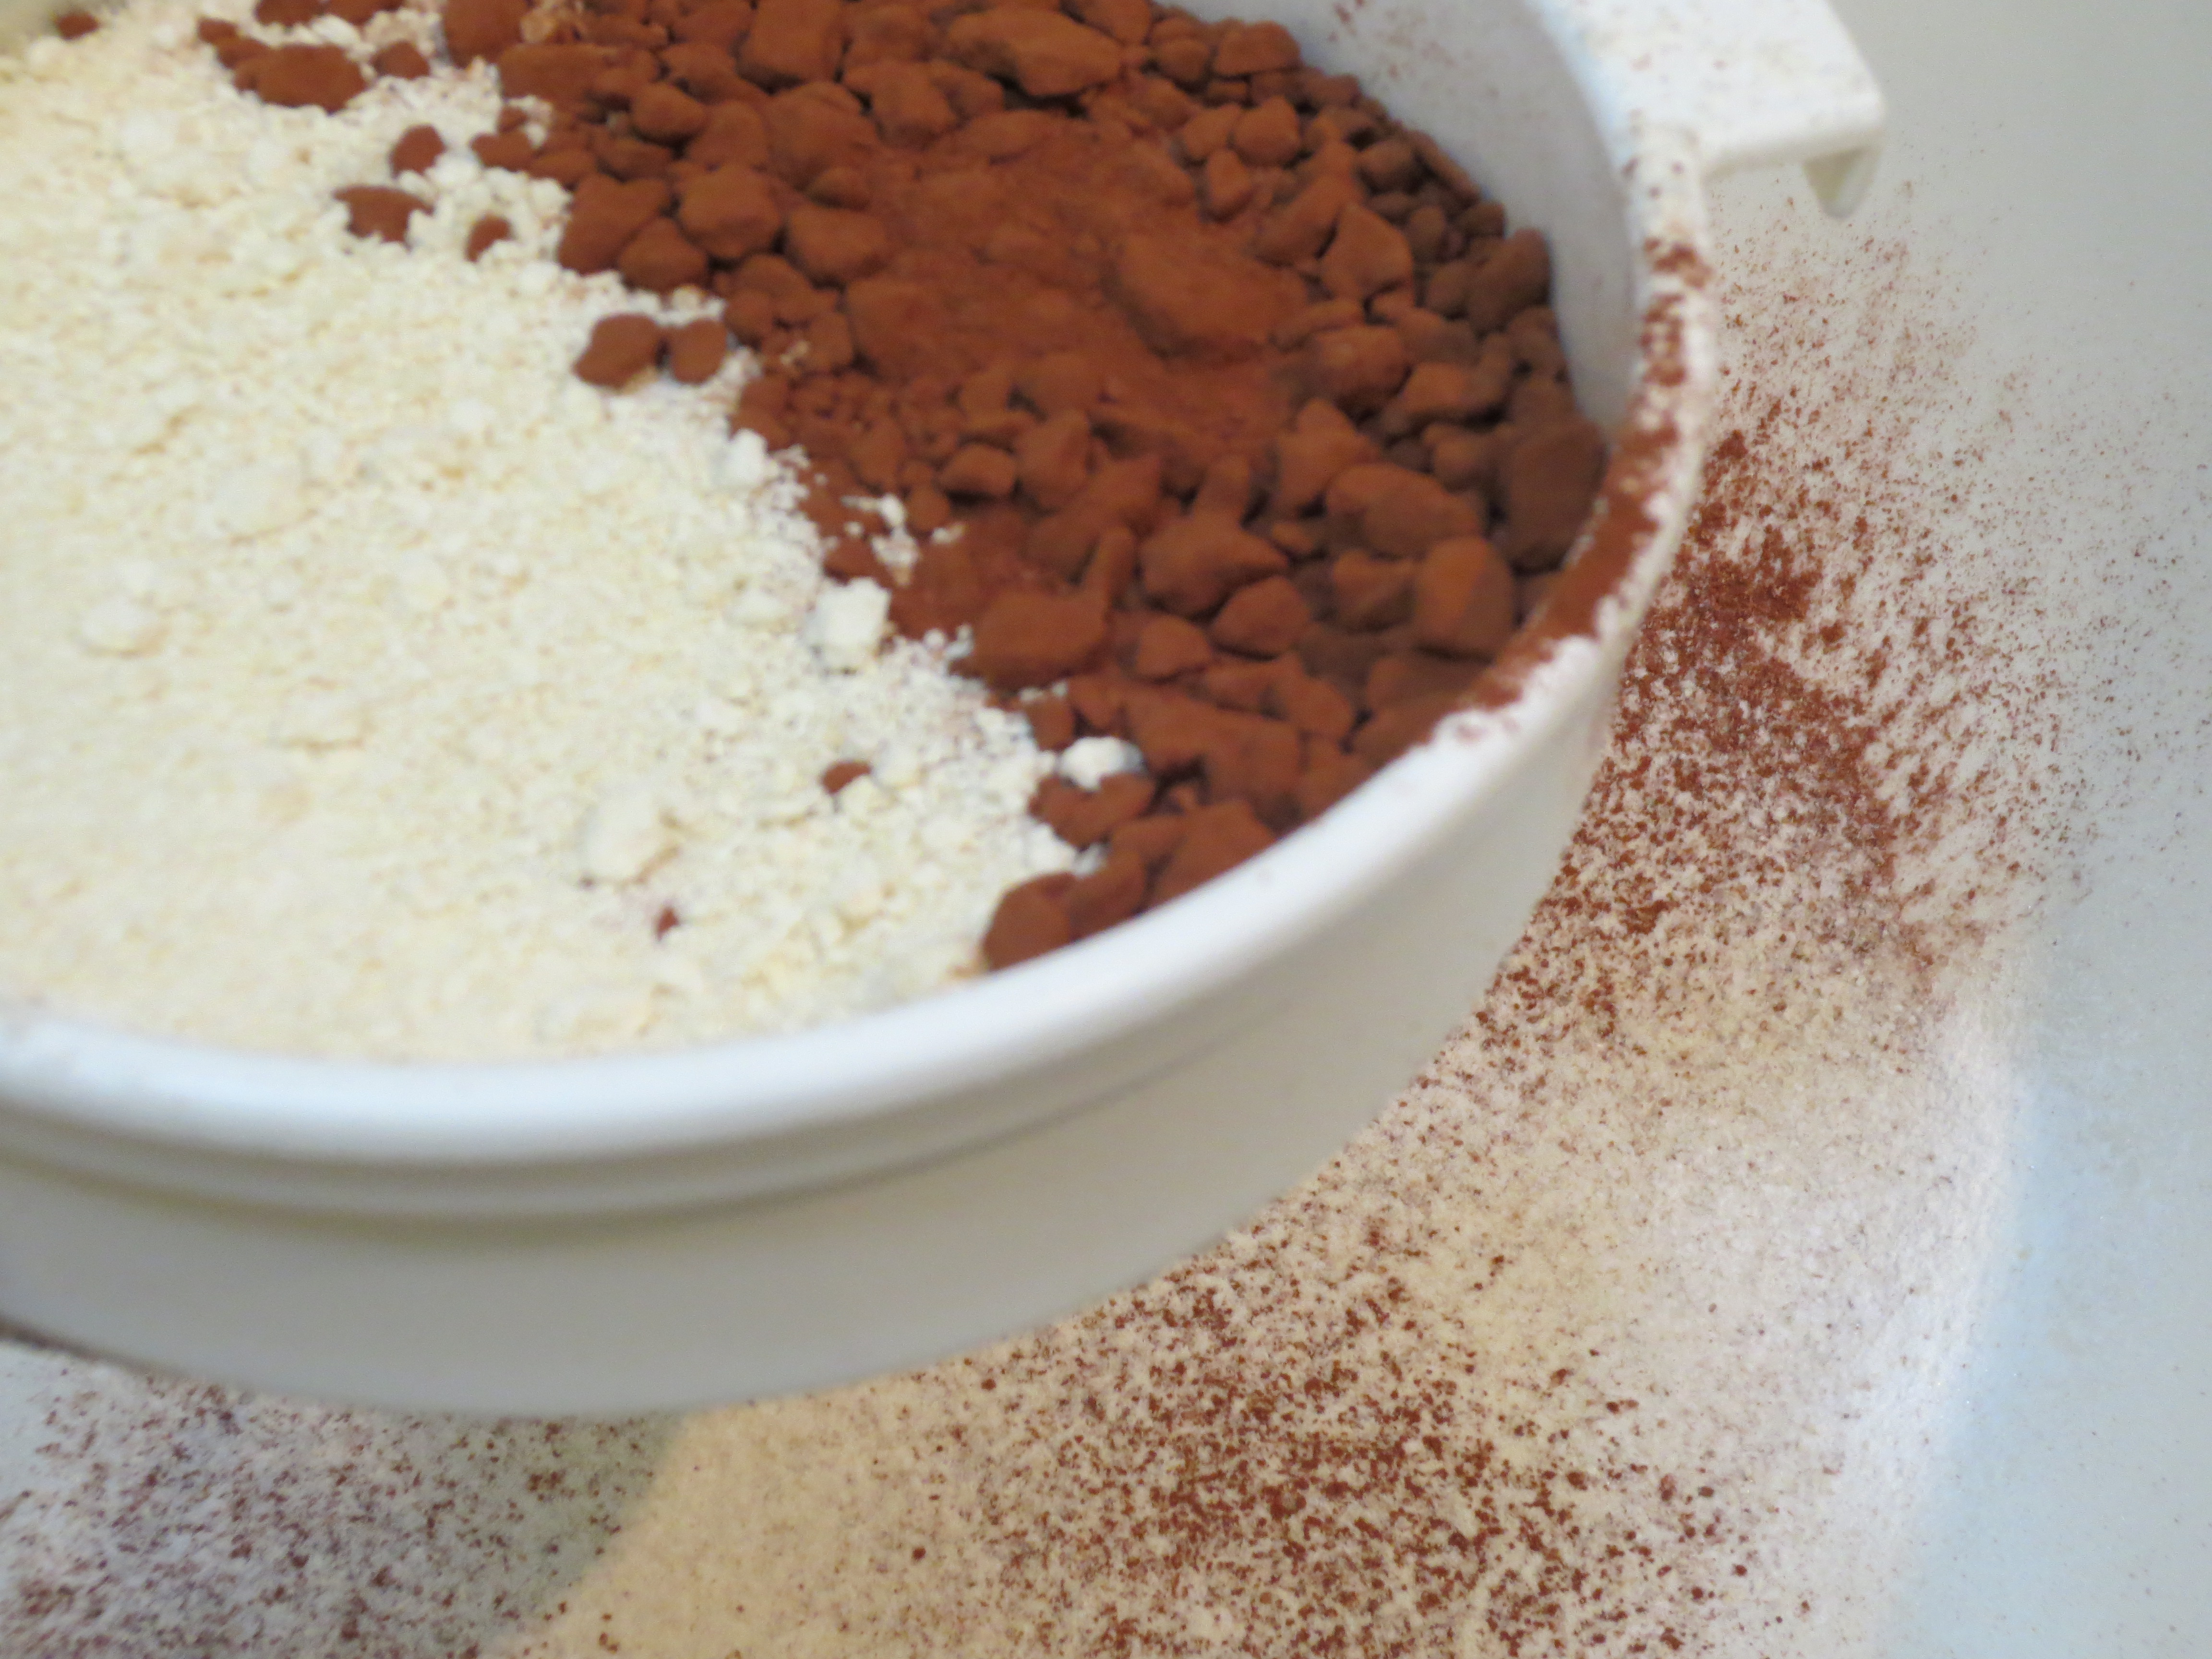
In a large bowl, sift in the Brown Rice Flour, Almond Flour, Cocoa Powder, Salt, Baking Powder and Baking Soda and Sugar.  Whisk it all together. 

IMG_3975 Sifting Double Chocolate Mini Muffins

IMG_3984

In a small bowl mash the Avocado, then add in Yogurt, Eggs and Vanilla.  Mix together with a fork or electric hand mixer until no lumps of Avocado remain and the mixture is smooth.  Add the Avocado mixture to the flour mixture and stir just until blended.  Stir in 1/2 cup of the Chocolate Chips.

Using a mini ice cream scoop or Tablespoon measure, scoop the batter into the sprayed muffin tins.   Sprinkle a few extra mini chocolate chips on top of each muffin if you like. IMG_3996

Bake in the middle of the oven for about 15 minutes.  Unmold and repeat with remaining batter if needed.  If baking in batches, spray the pans again before adding more batter.  Remove from the muffin tins and cool on a wire rack.  Muffins can be stored at room temperature in an air tight container for a few days.  Enjoy!

Makes about 32-34 mini muffins.

IMG_4001 

Recipe Notes:

A note about sifting – I am usually not one to take extra steps, I’m a little bit lazy and don’t really like creating extra dishes to wash, But in this case it really is worth the extra effort.  Almond flour, cocoa powder and sometimes even natural cane sugar can get a little bit lumpy.  Sifting will remove any chance of lumps in your finished product.  When you get towards the end of your dry ingredients in the sifter where the lumps remain, press them through as much as you can, breaking them up with either your fingers or the back of one of the measuring cups you’ve already used. 

IMG_4038 Double Chocolate Mini Muffins with Raspberry Mascarpone


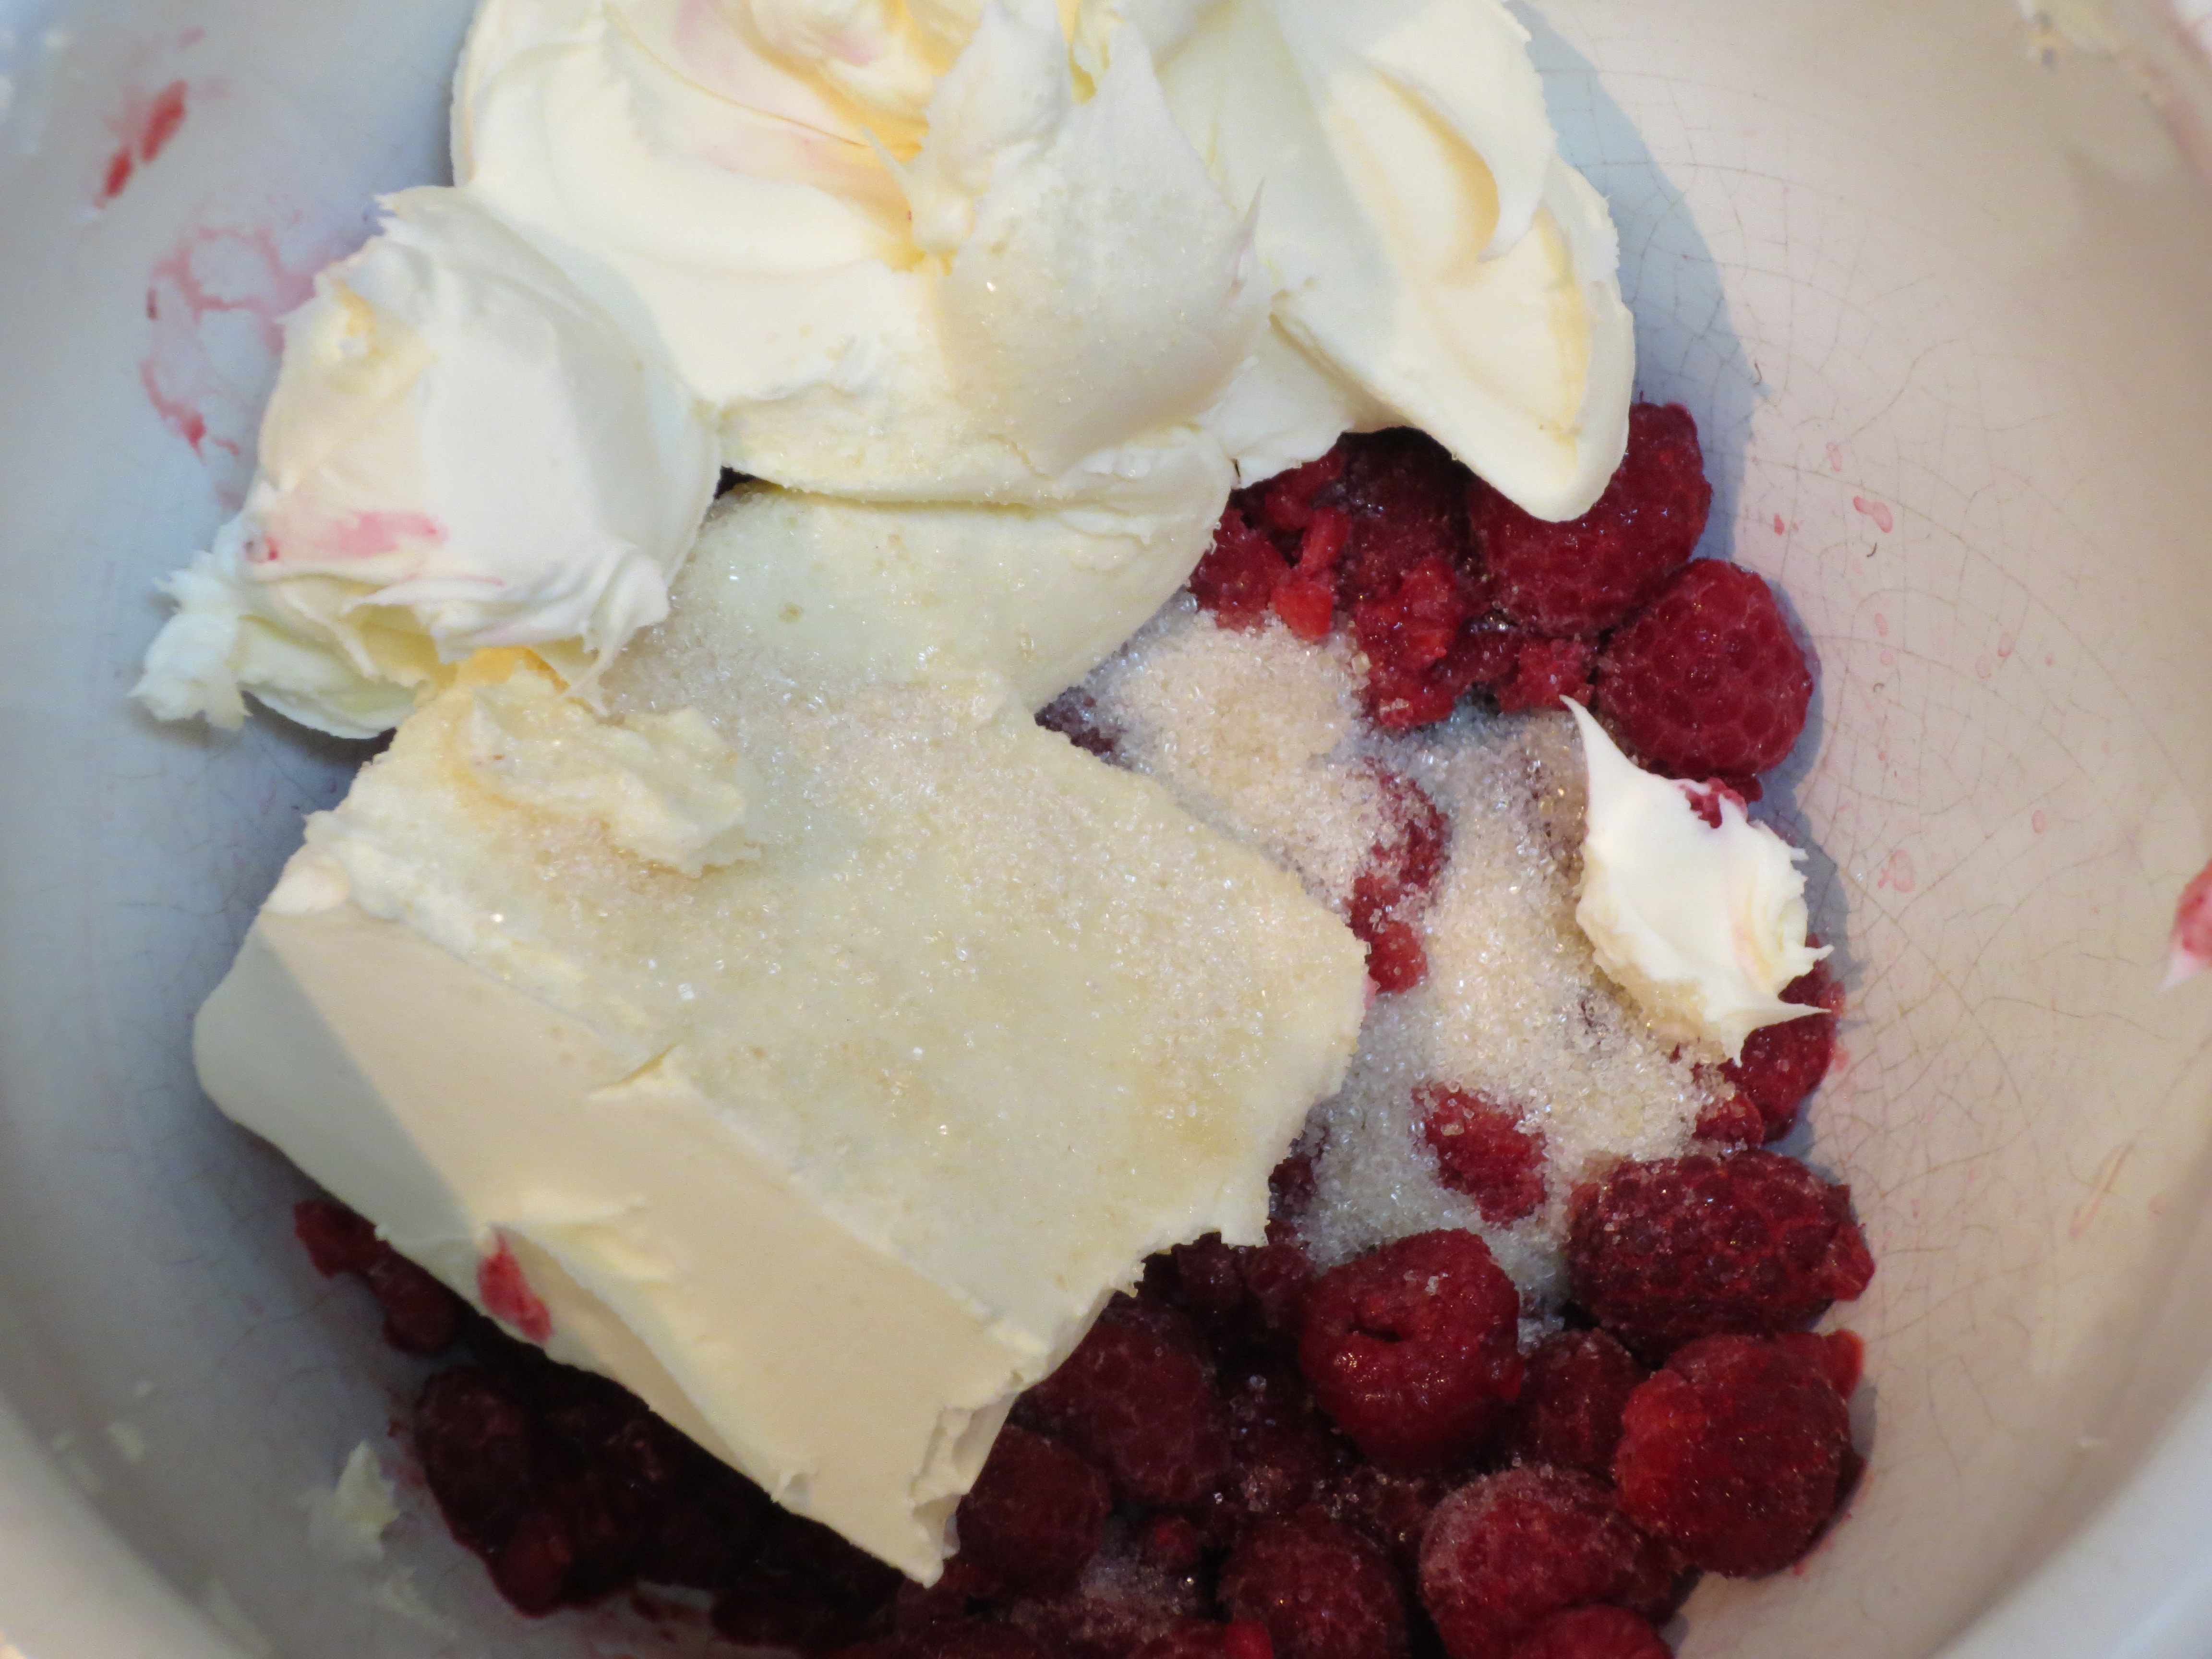
These muffins taste great just as they are, BUT, if you want to go over the top and make them extra special, top with this easy Raspberry Mascarpone topping.  In a medium bowl, add 1 cup defrosted frozen Raspberries, 4 ounces each low fat Cream Cheese/Neufchatel Cheese and Mascarpone Cheese, about 1-3 Tablespoons Sugar (depending upon how tart your raspberries are and how sweet you like things) and a splash of Lemon Juice.  Blend together with an electric hand mixer. Note, there will be a bit of crunch from the raspberry seeds, if that bothers you try straining the seeds out before blending with the other ingredients. I like to top each muffin to order, keeping extra topping in the refrigerator until needed.  This is also a really tasty topping for pancakes and other muffins.

 IMG_4021IMG_4027 Raspberry Mascarpone Topping


Chocolate Raspberry and Peanut Butter Cups

Happy Valentine's Day

Happy Valentine’s Day

Chocolate Raspberry and Peanut Butter Cups

Author: Sweet Green Kitchen’s Jen Jones

IMG_3496

This is one for all the fans of chocolate and peanut butter (and isn’t almost everyone a fan of that perfect combo).  This recipe is inspired by and adapted from Sprouted Kitchen’s (www.sproutedkitchen.com) Sara Forte (her blog is one of my favorites, creative, healthy and deliciously inventive recipes).  I started making her chocolate peanut butter cups with just a few minor changes and they were absolutely spectacular, but then a little blue birdie I know politely requested, “I WANT JELLY CUPS!”, so a little raspberry jam was added to the mix and we haven’t looked back since.  These are so simple to make, but oh so sinfully delicious.  Your friends will be amazed that you made them from scratch and thank you profusely for sharing this delightful treat.

I originally made these with semi sweet chocolate, but then I tried a version with milk chocolate (really good milk chocolate) and my die hard dark chocolate loving family all preferred the milk chocolate version.  But then…I went really wild and layered them with dark chocolate as the bottom and milk chocolate on top, it’s the best of both worlds and they look like they were purchased from an expensive chocolatier.

It’s important to use Natural Peanut Butter without any added sugar or hydrogenated oils and of course really good quality chocolate.  I like Ghiradelli 60% cocoa for the semi sweet and Lindt milk chocolate, Ghiradelli milk is an acceptable substitute.  Of course, you’ll use what you want, but this is what I suggest.

Makes 24, using mini muffin tins

Ingredients:  

1 cup Semi Sweet Chocolate Chips or 2 Semi Sweet Chocolate Bars (about 7 – 8 ounces)

1 cup Milk Chocolate Chips or 2 Milk Chocolate Bars (about 7 – 8 ounces total)

Or use 2 cups of either Milk or Semi Sweet Chocolate only, if you prefer


½ cup Natural Peanut Butter without any added sugar

2 Tablespoons Honey (I use Raw Honey)

1 Tablespoon Powdered Sugar

½ teaspoon real Vanilla Extract

¼ teaspoon fine grain Sea Salt

Raspberry Jam (I don’t know the exact amount, I spoon it straight from the jar)


Plus extra flaked Sea Salt or Pink Sea Salt for sprinkling on top


Prepare 24 mini muffin cups with paper liners.


Prepare 2 double boilers for melting chocolate.  Add about 1 inch of water to each of two small pots and place on stove over medium to low heat.  Place a bowl on top of each pot, being sure that the bottom of the bowl does not come in contact with the water.  Add Milk Chocolate to one bowl and Dark Chocolate to the other bowl, occasionally stirring with a silicone spatula or other heat proof spoon, until the chocolate has melted.  The Milk Chocolate will take a little longer to melt down completely. 


In another bowl, add the Peanut Butter, Honey, Powdered Sugar, Vanilla Extract and Fine Sea Salt.  Stir to combine. 


Now it’s time to assemble.IMG_2621


Spoon 1 teaspoon of melted Dark Chocolate into the bottom of each paper lined cup.  When all cups are filled, tap and shake the pan a bit to evenly distribute the chocolate.


Next, scoop a rounded/heaping ½ teaspoon of peanut butter and roll it into a ball and place on top of the chocolate in each cup.


Third, Spoon a ¼ teaspoon of Raspberry Preserves into each cup.


Lastly, top each cup with 1 teaspoon of melted Milk Chocolate.  You may need a little more than the 1 teaspoon each to fully cover the Peanut Butter and Jam.  Again, tap and shake the pan to evenly distribute and smooth out the chocolate.


If you like, top each Chocolate PB and Jam cup with a sprinkle of flaked Sea Salt or Pink Salt. 


Place the muffin tins in the refrigerator for about 15 minutes to set up.


One more thing, once the chocolate has set, to give your treats that final gourmet touch, I like to take the tip of a butter knife and dip it into a little of the leftover melted Dark Chocolate and add a little swirl on top of each cup.  Completely unnecessary, but it adds a little something extra special to the final product.  Enjoy!

 IMG_2633_Chocolate Peanut Butter & Jelly Cups


Note: As I stated earlier, these are delicious with or without the jam, I just think the jam takes it to another level, but if jam doesn’t suit you, by all means make them without or make some of each.  Also, we’re definitely partial to Raspberry here and I do think Raspberry and Chocolate is one of the most perfect combinations, but again if Raspberry is not your thing, I don’t doubt that these would be delicious with Strawberry or Apricot or even Blackberry Jam.


To make larger versions, use about 1 ½ times each ingredients, like I did in my Valentine’s Day version featured at the top here.  For these, I used a silicone heart shaped muffin mold.  I didn’t use paper liners or even spray the mold and they came out of the silicone perfectly.

Raspberry Sauce for Pancakes or Waffles

Pancakes and waffles while being served semi frequently in our home are still always a special treat for the family.  All I have to do is merely mention the idea of making either and Evan immediately requests (demands) Raspberry Sauce!  It’s an easy but oh so tasty addition to the weekend brunch and I highly recommend you add it to yours.  Your family will thank you (hopefully with squeals of delight, smiles and great big hugs)!

IMG_2533

Raspberry Sauce for Pancakes and Waffles

Author: Sweet Green Kitchen’s Jen Jones


Ingredients:

1 bag defrosted Frozen Raspberries (about 10 ounces)

1 – 2 Tablespoons Sugar

1 – 2 Tablespoons Raspberry or Blackberry Jam

A little Fresh Squeezed Lemon Juice

A little Water, if needed


Directions:


In a small saucepan, add the raspberries, sugar and jam.  Cook over low to medium heat, occasionally stirring and breaking up the raspberries with the back of the spoon.  Add a little water if the sauce is too thick.  Just before serving add a bit of fresh squeezed lemon juice. 


The sauce comes together rather quickly as it’s merely a matter of heating up the raspberries enough to break them down and warm through.  Start it as you begin cooking your pancakes and waffles and just leave on the stove to stay warm until ready to serve.


Remove from heat and pour sauce into a small pitcher to serve.  Enjoy! IMG_2526

Banana Avocado Muffins with Chocolate Chips and Walnuts

IMG_2054

Banana Avocado Muffins with Chocolate Chips & Walnuts

Makes about 20-22 regular size muffins OR 15 regular size muffins plus 12 mini muffins

This recipe makes A LOT of muffins, definitely enough to share or for a party (unless you have a very hungry muffin loving husband/family).  I know the avocado may sound a bit strange, but you won’t taste it all, it replaces other less healthy fats with good for you fats.  Just make sure you really mash the heck out of it, or you may end up with flecks of green in your finished product.  This is a muffin you can feel good about giving to your kids for breakfast or an afternoon snack and not have to feel guilty about eating a few yourself.  Of course, the chocolate adds just a bit of indulgence.

Preheat Oven to 325

Line muffin tin with liners OR spray lightly with oil.

In a medium bowl, whisk the following Ingredients together:

1 1/2 cups whole wheat flour (I use whole wheat pastry flour)

1 1/2 cups unbleached white flour

1 tsp baking soda

1 tsp salt

1/2 tsp baking powder

1/2 tsp cinnamon

In a large bowl, beat together the following Ingredients with an electric mixer:

1 cup sugar (I use organic, it’s less refined, maintaining some minerals and I just think it tastes better)

2 Jumbo Eggs (or 3 large)

1/2 Avocado – mashed completely

8 oz yogurt (I use a combination of 4 oz vanilla  + 4 oz Fat Free Plain Greek Yogurt, but any vanilla, banana or plain will work well here, always use a natural yogurt without any gelatins or artificial ingredients) – you can also substitute soy yogurt or other non dairy to make this dairy free

To the Wet Ingredients, Add in:

3 very ripe Bananas – mashed

1 Tbsp vanilla extract

1 tsp almond extract (optional)

Add Dry ingredients to Wet and Stir together, scraping down sides of bowl with a rubber spatula.

Mix in to muffin batter:

3/4 Bittersweet Chocolate Chips (I use Ghiradelli 60% cocoa chips, mini chips would also work)

1/4 cup (or more if desired) Chopped Walnuts OR leave out to make this nut free

Pour batter into prepared muffin tins, filling about 3/4.

Bake at 325 – about 25 minutes for regular size and about 18 minutes for mini muffins.

Cool on wire rack.

Enjoy! IMG_2816

IMG_2817