
Chocolate Ganache Raspberry Tart

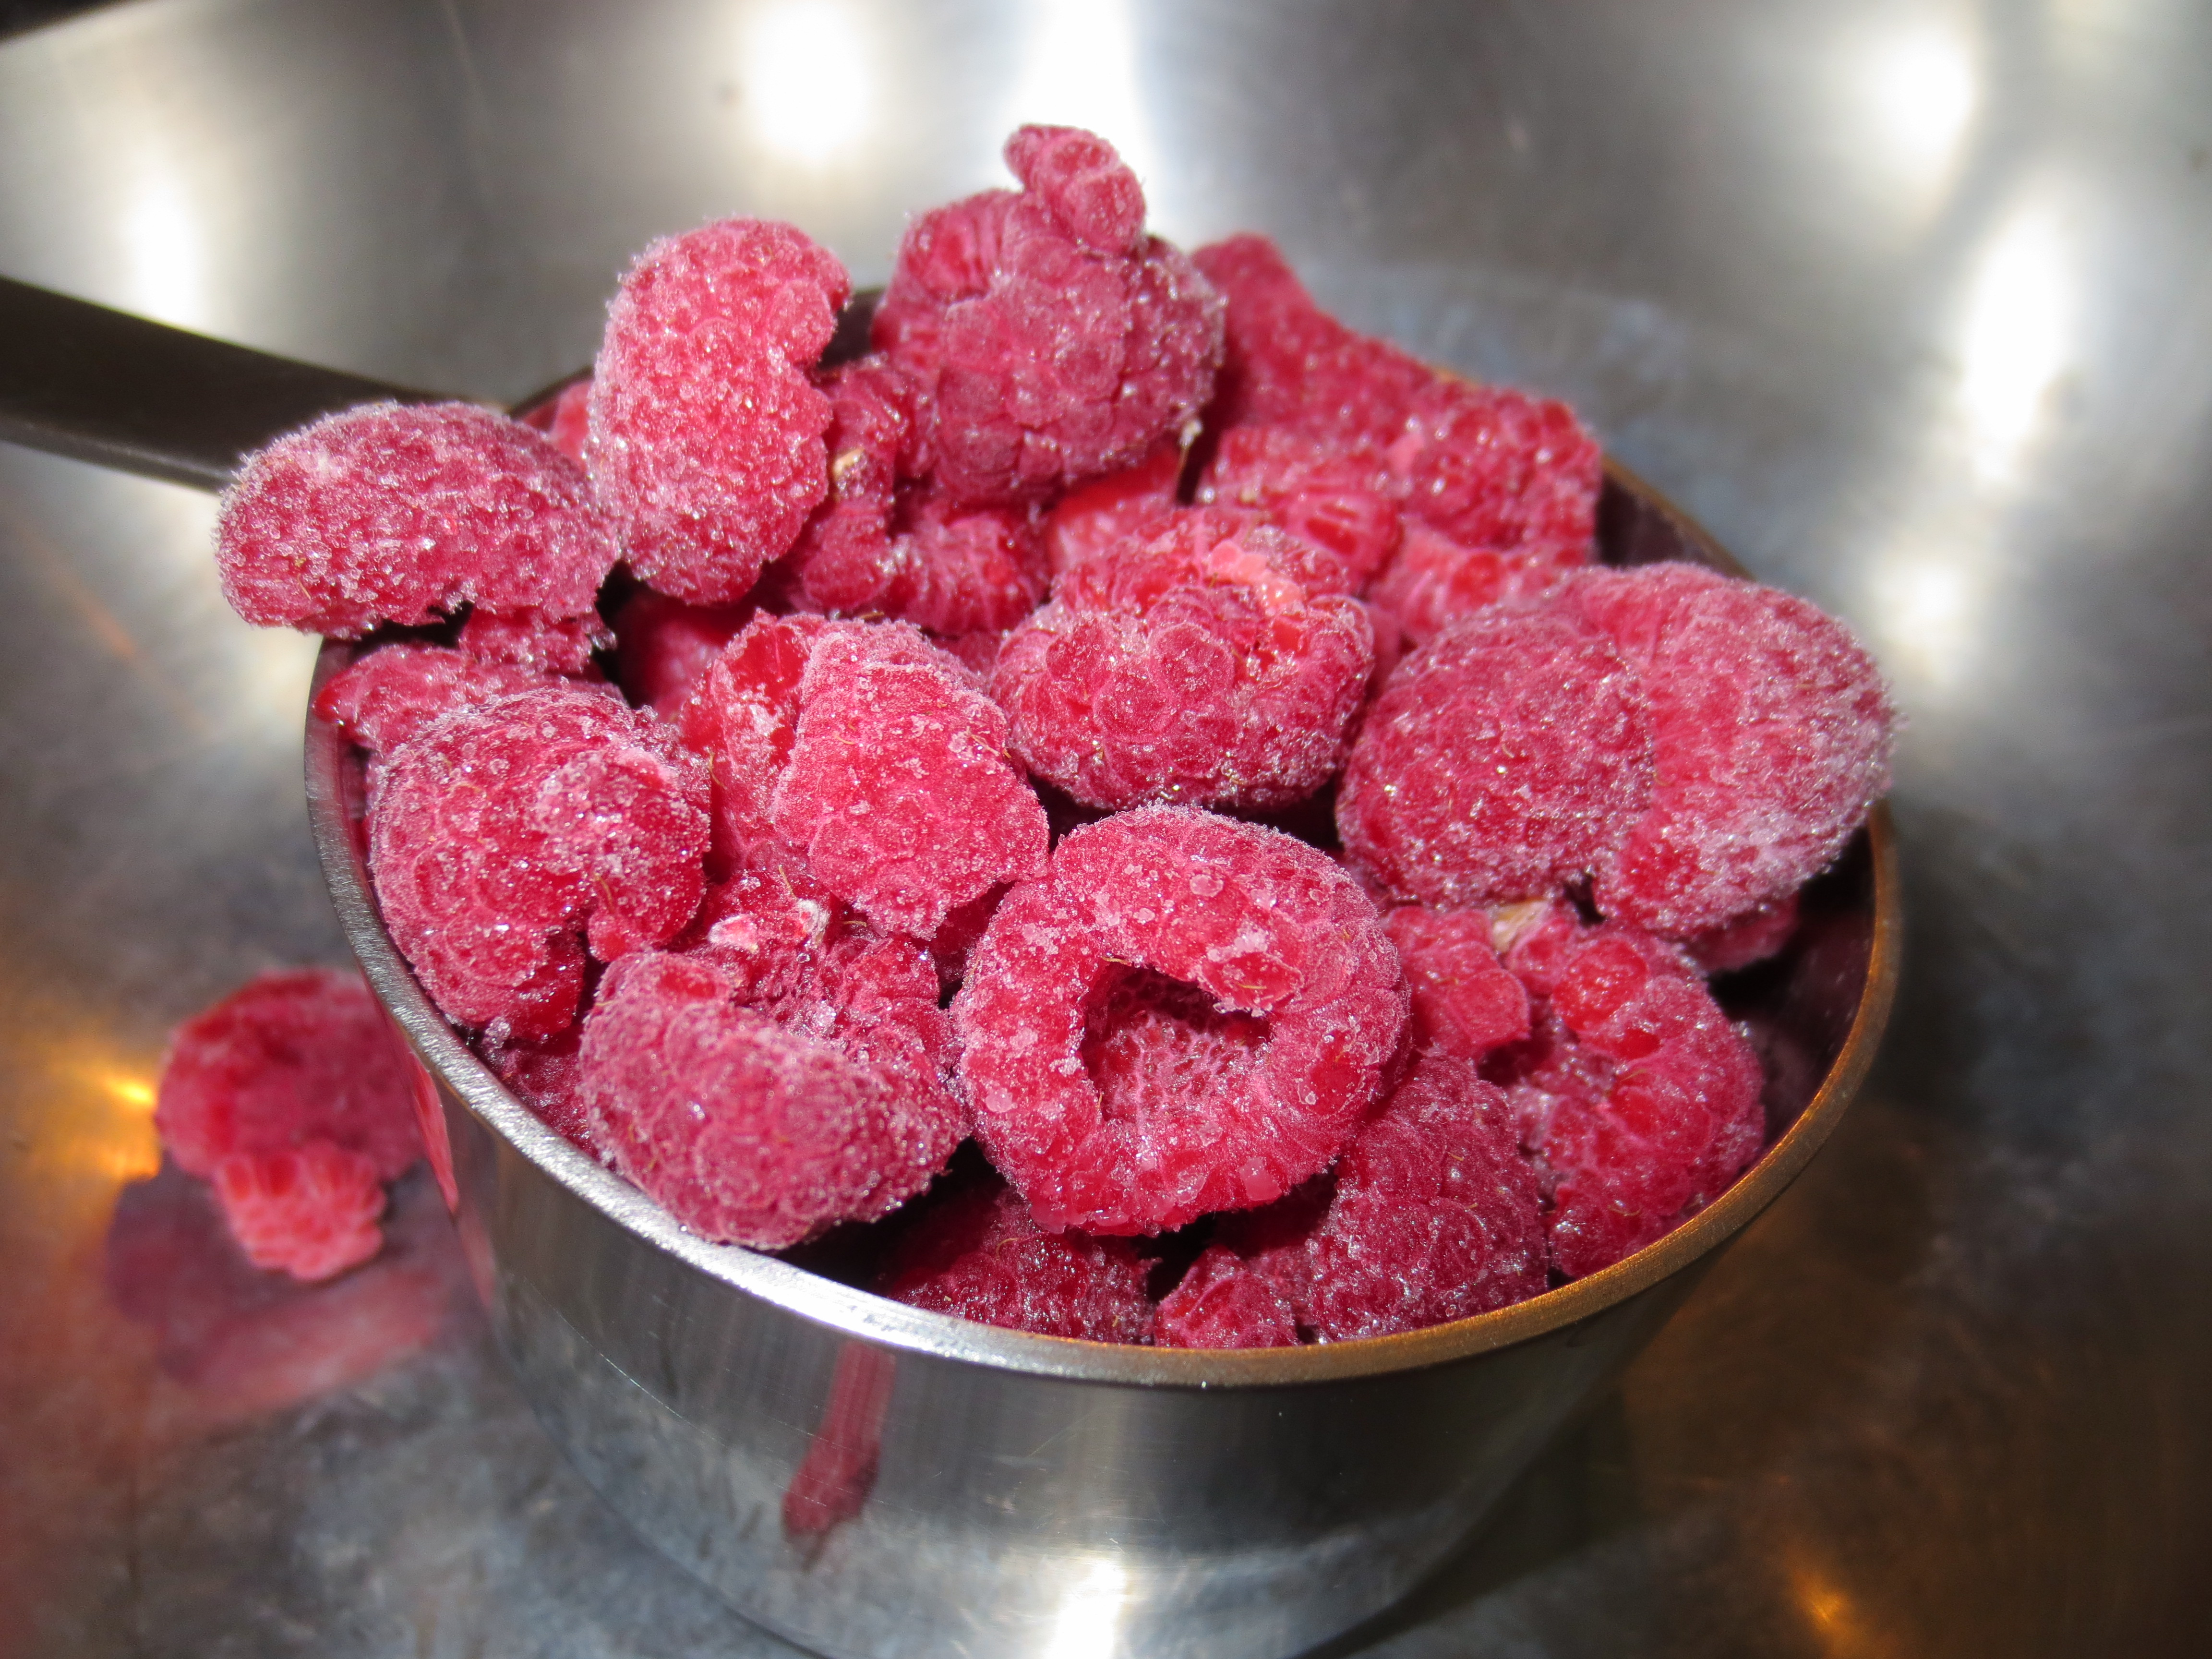
Last Thanksgiving, my sister-in-law Megan requested that I contribute something chocolaty and decadent for dessert, for which I made a slightly adapted version of vegan chocolate truffles from Giada’s latest cookbook “Giada’s Feel Good Food”. Homemade cashew cream replaced the traditional heavy cream in the truffles and they were a huge hit! So, when I was planning Colin’s birthday treat, I decided to use the same recipe but transform it into a tart. The cashew cream recipe creates more than is needed for the chocolate ganache, so I decided to mix up some of the extra cream with frozen raspberries and a little raspberry jam to sandwich between two layers of the ganache, the result was good enough to share and then some.

In a medium bowl combine, Almond Meal, ½ cup of the Oat Flour and salt. Next add in Coconut Oil, Maple Syrup and Vanilla. Mix completely with a fork, then add in the remaining half cup of Oat Flour and the water. Continue to mix with a fork until the mixture resembles wet sand.


Finally to assemble the tart: (really the recipe comes together pretty quickly)


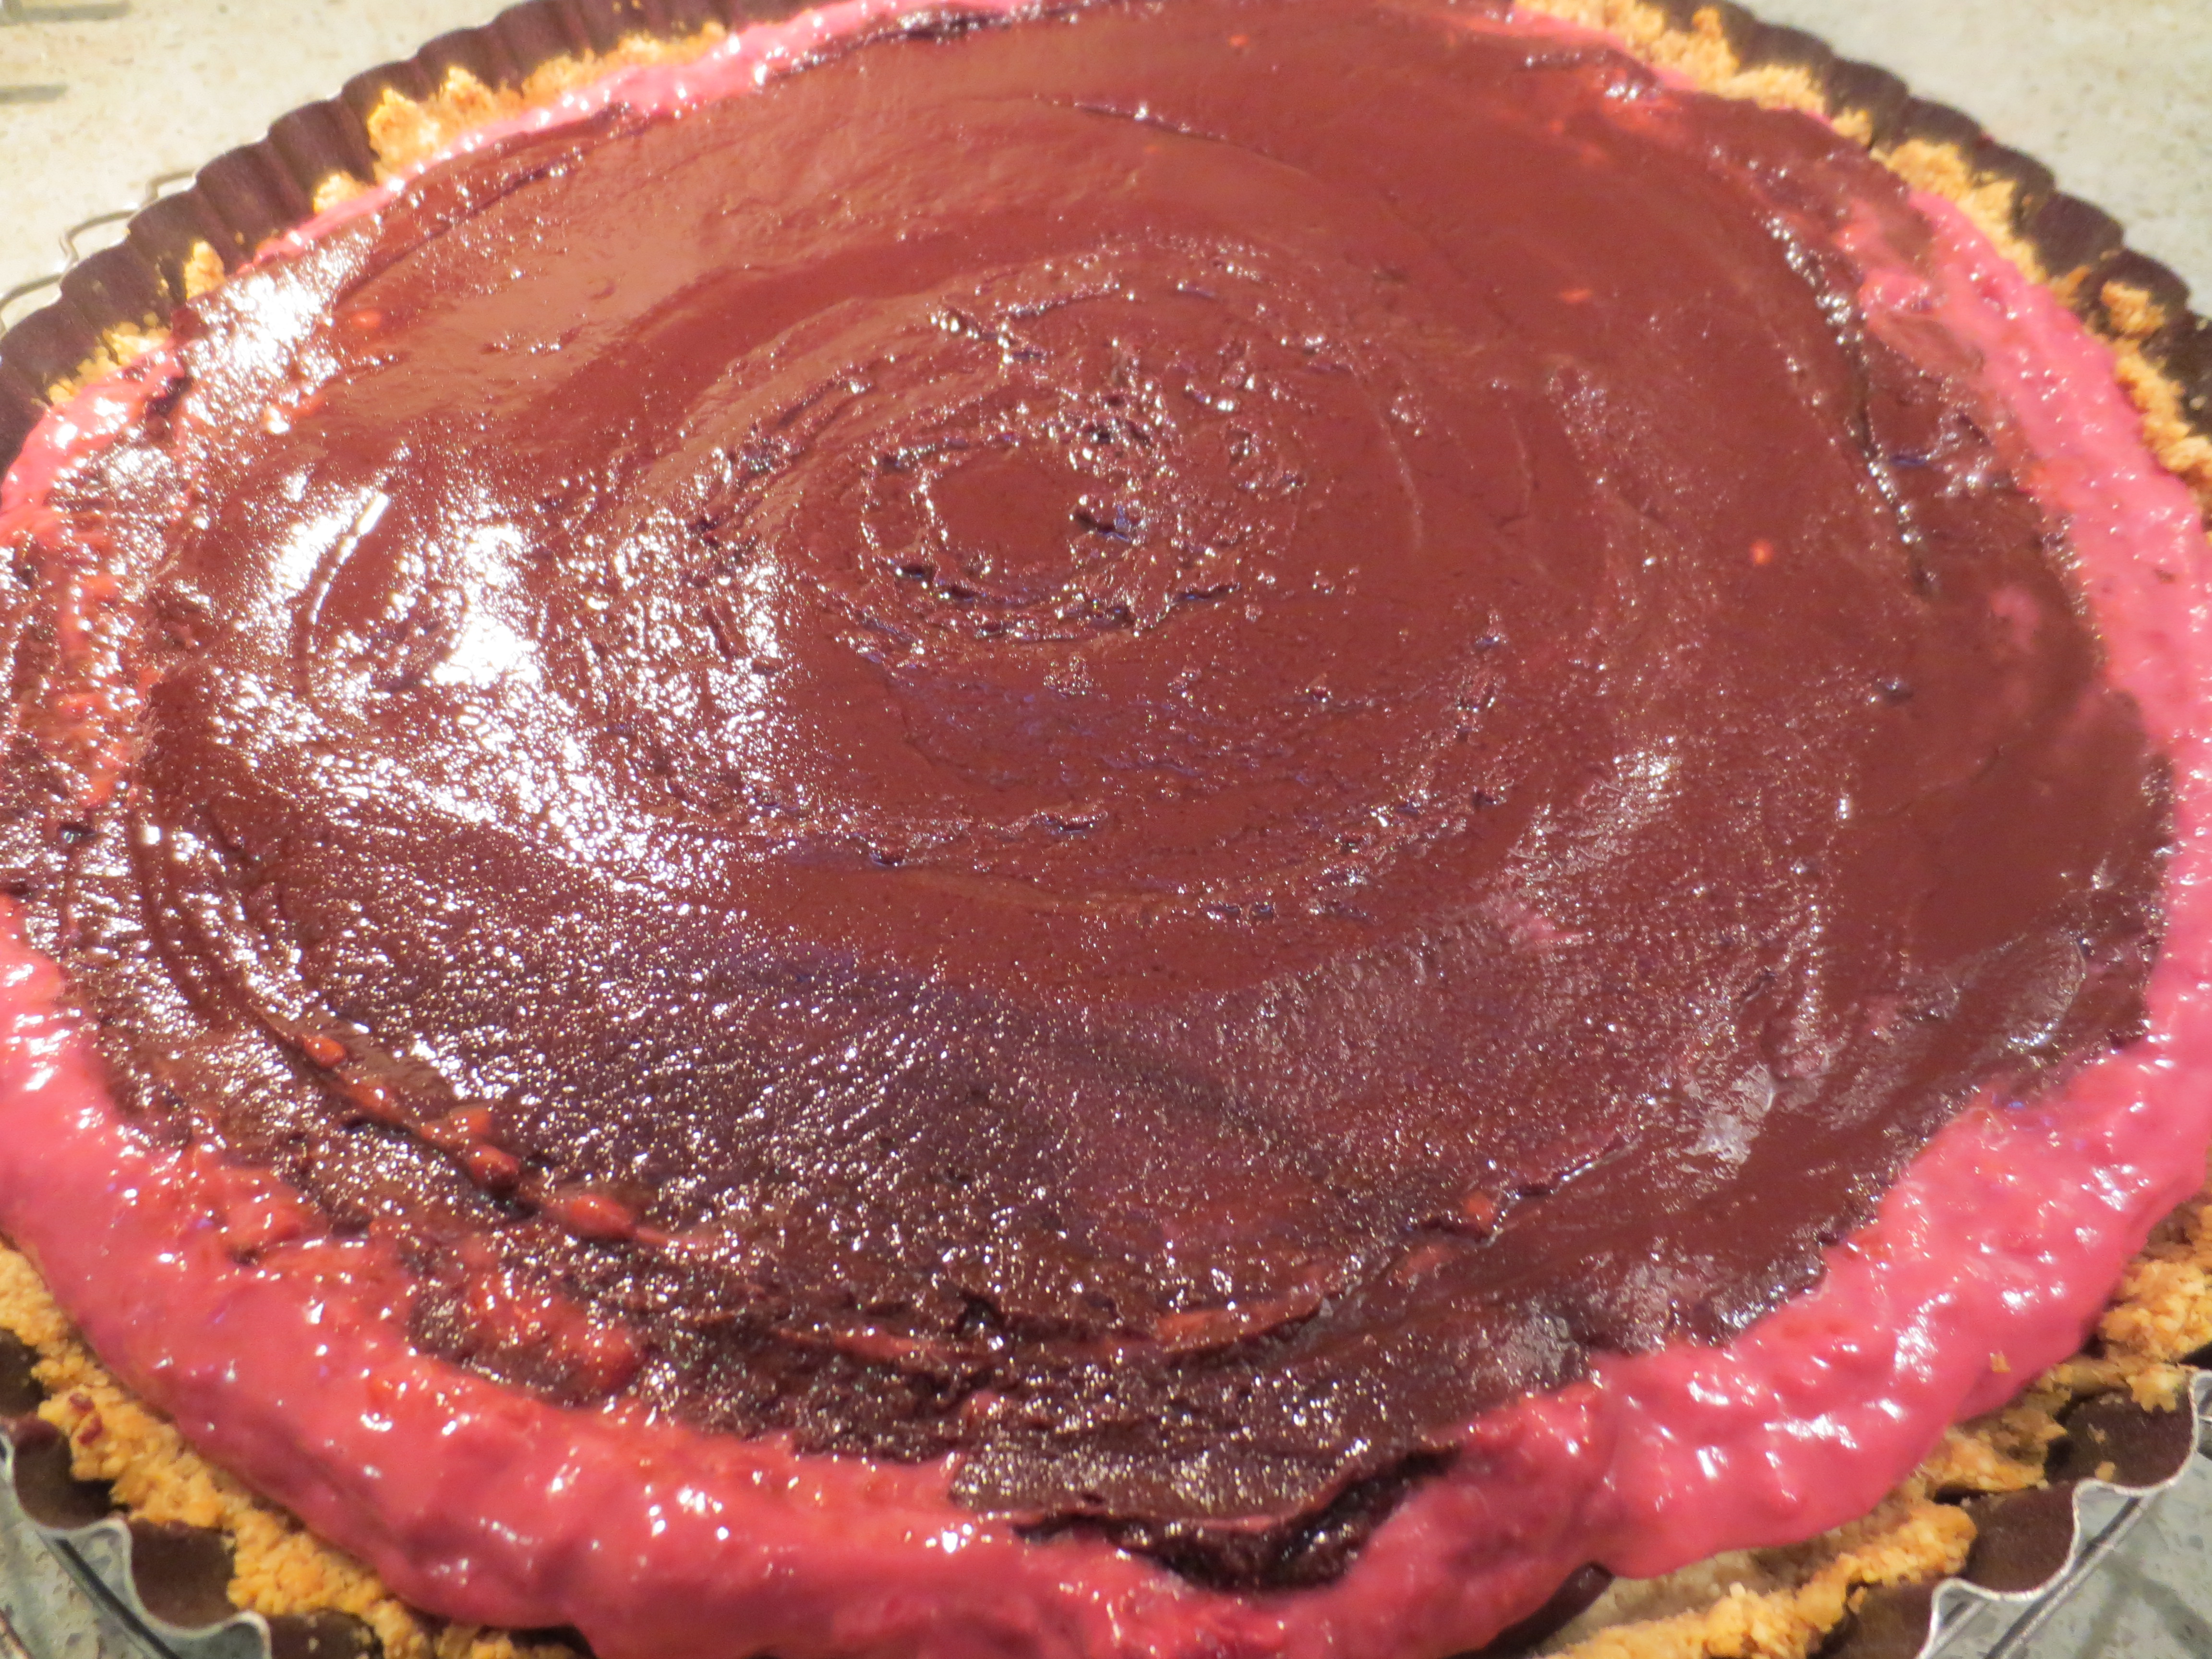
Chill again in the refrigerator, this time for at least an hour to allow the ganache to fully firm up.
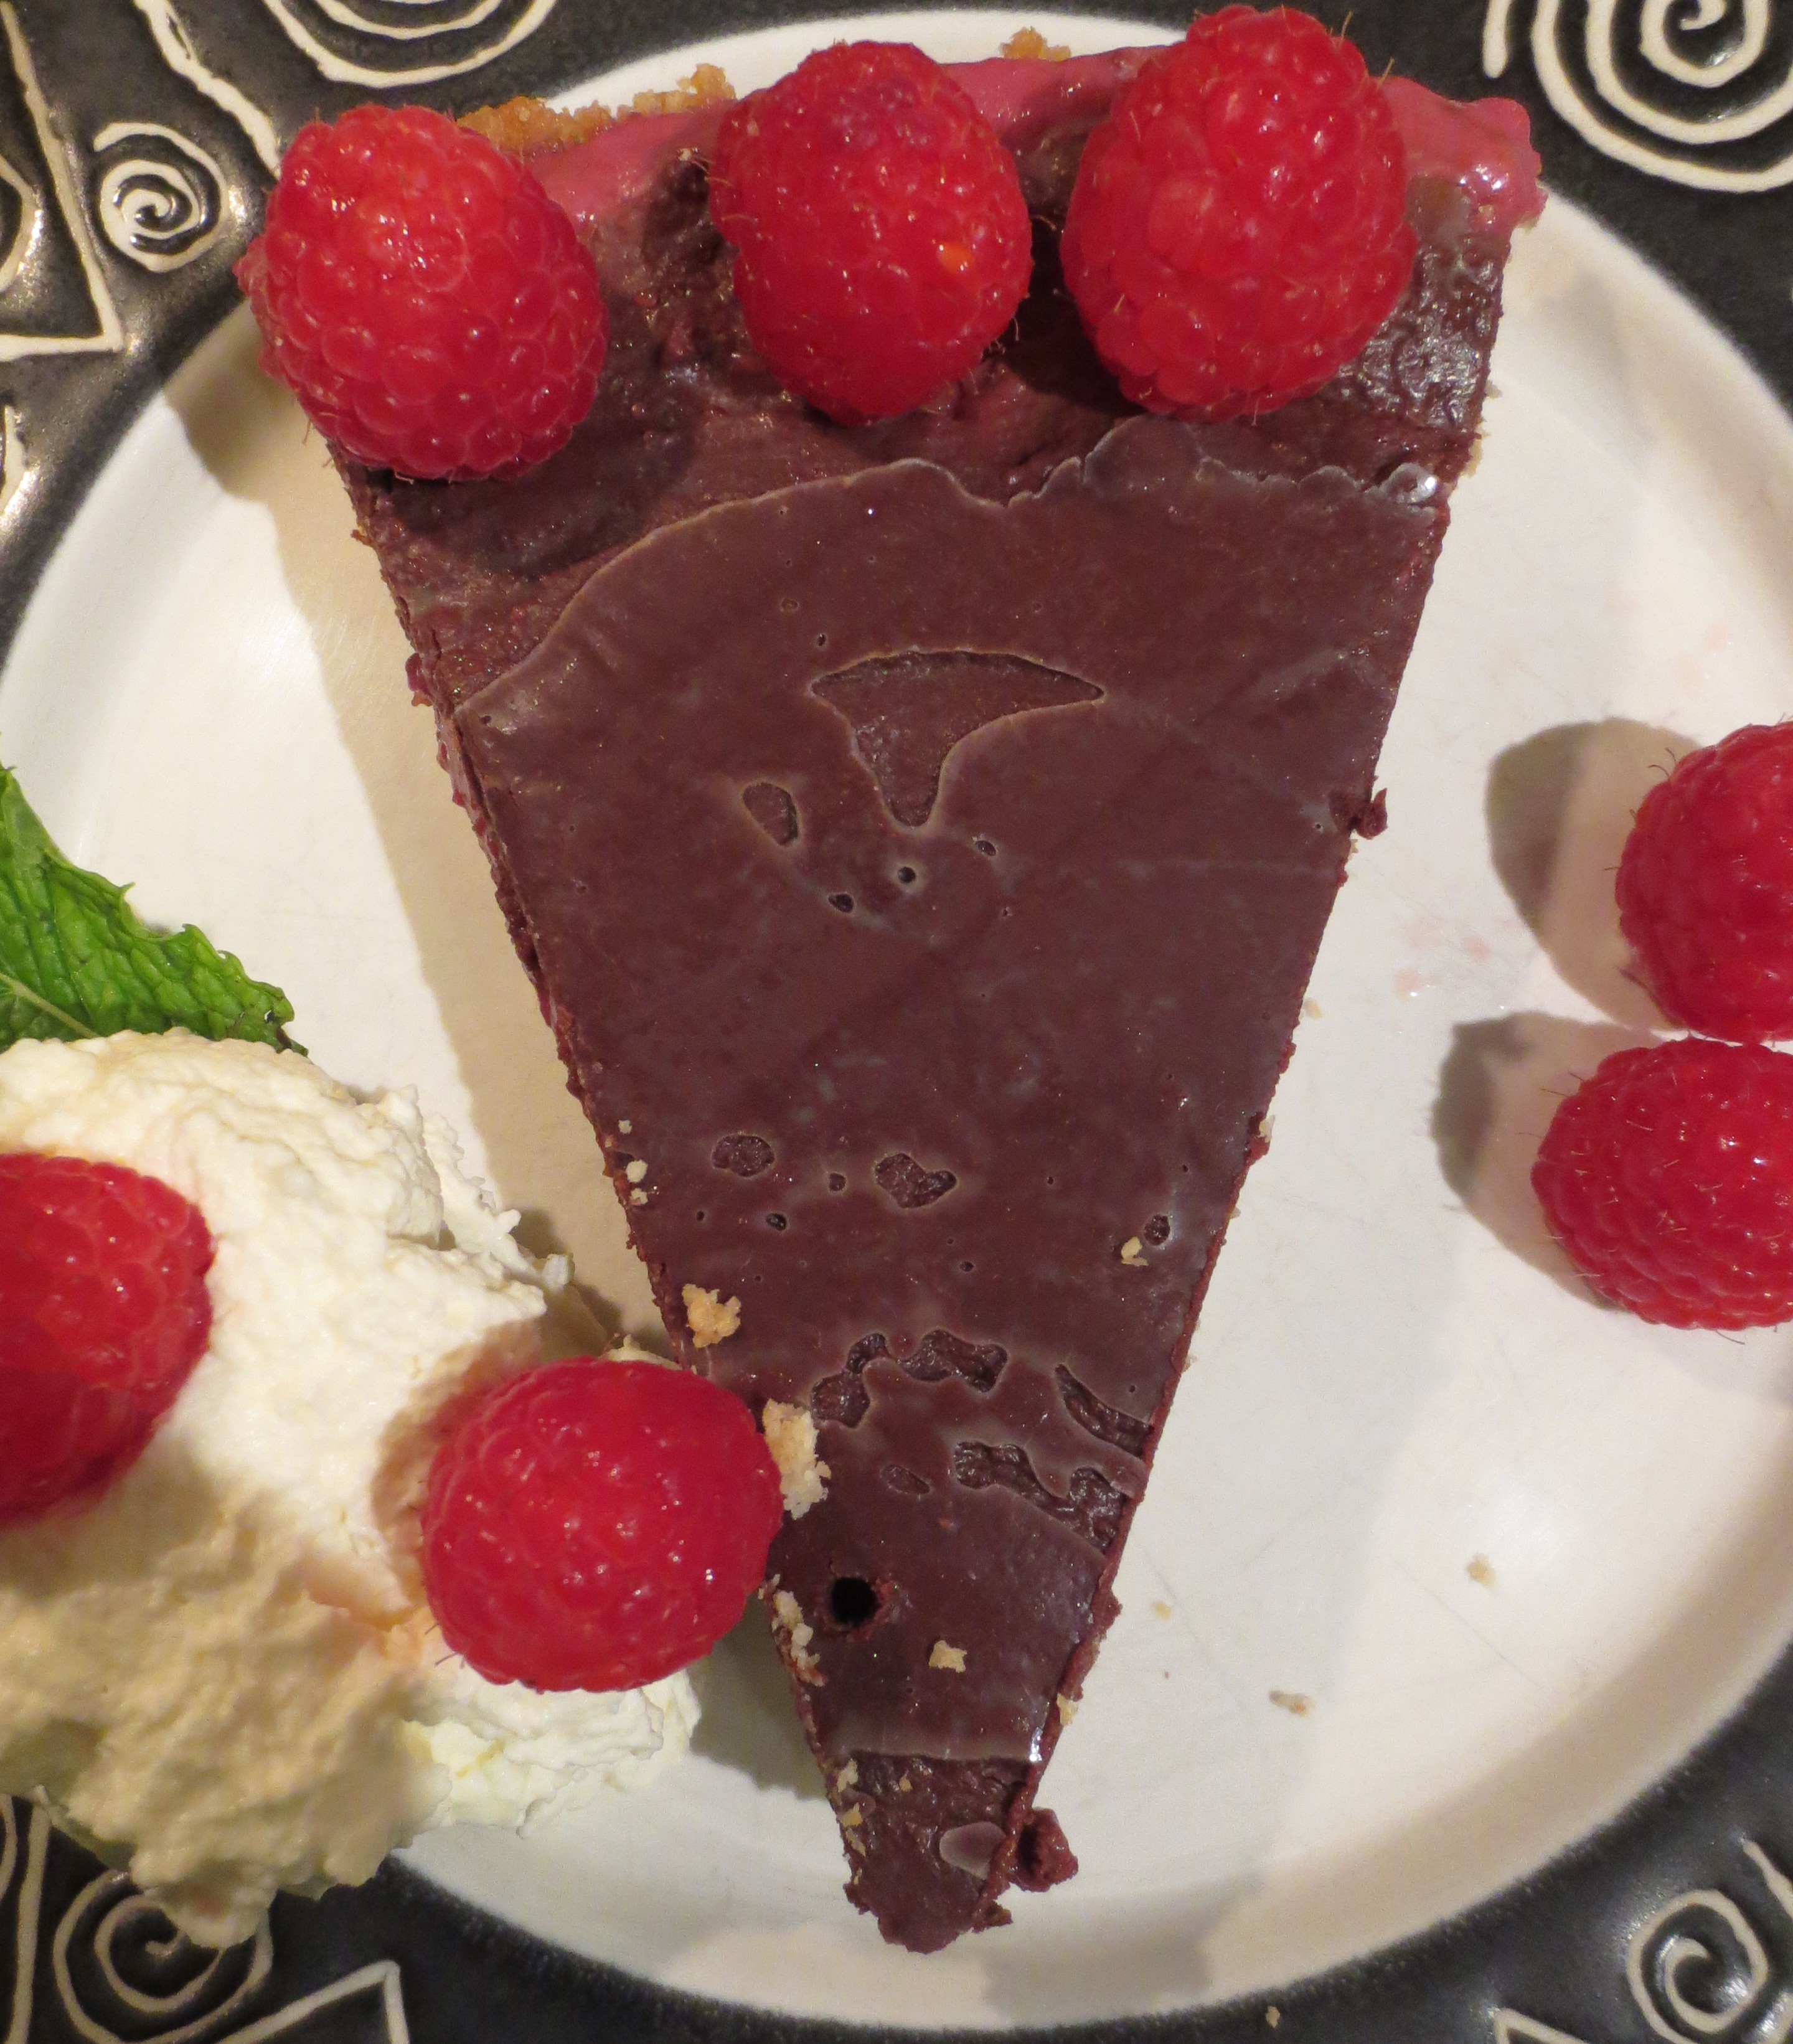
Serve the tart with fresh raspberries and cream. If you don’t need to keep your dessert vegan or dairy free, lightly sweetened fresh whipped cream is a perfect accompaniment. Otherwise, whip up the remaining cashew cream (you should still have about 1/3 to ½ cup left) with a bit of maple syrup and serve that alongside the finished tart OR double the raspberry cashew cream recipe and use the leftover as a topping. Raspberry sorbet would also be really good.

Farmer’s Market Frittata with crisp shitake mushrooms, spring onions & goat cheese

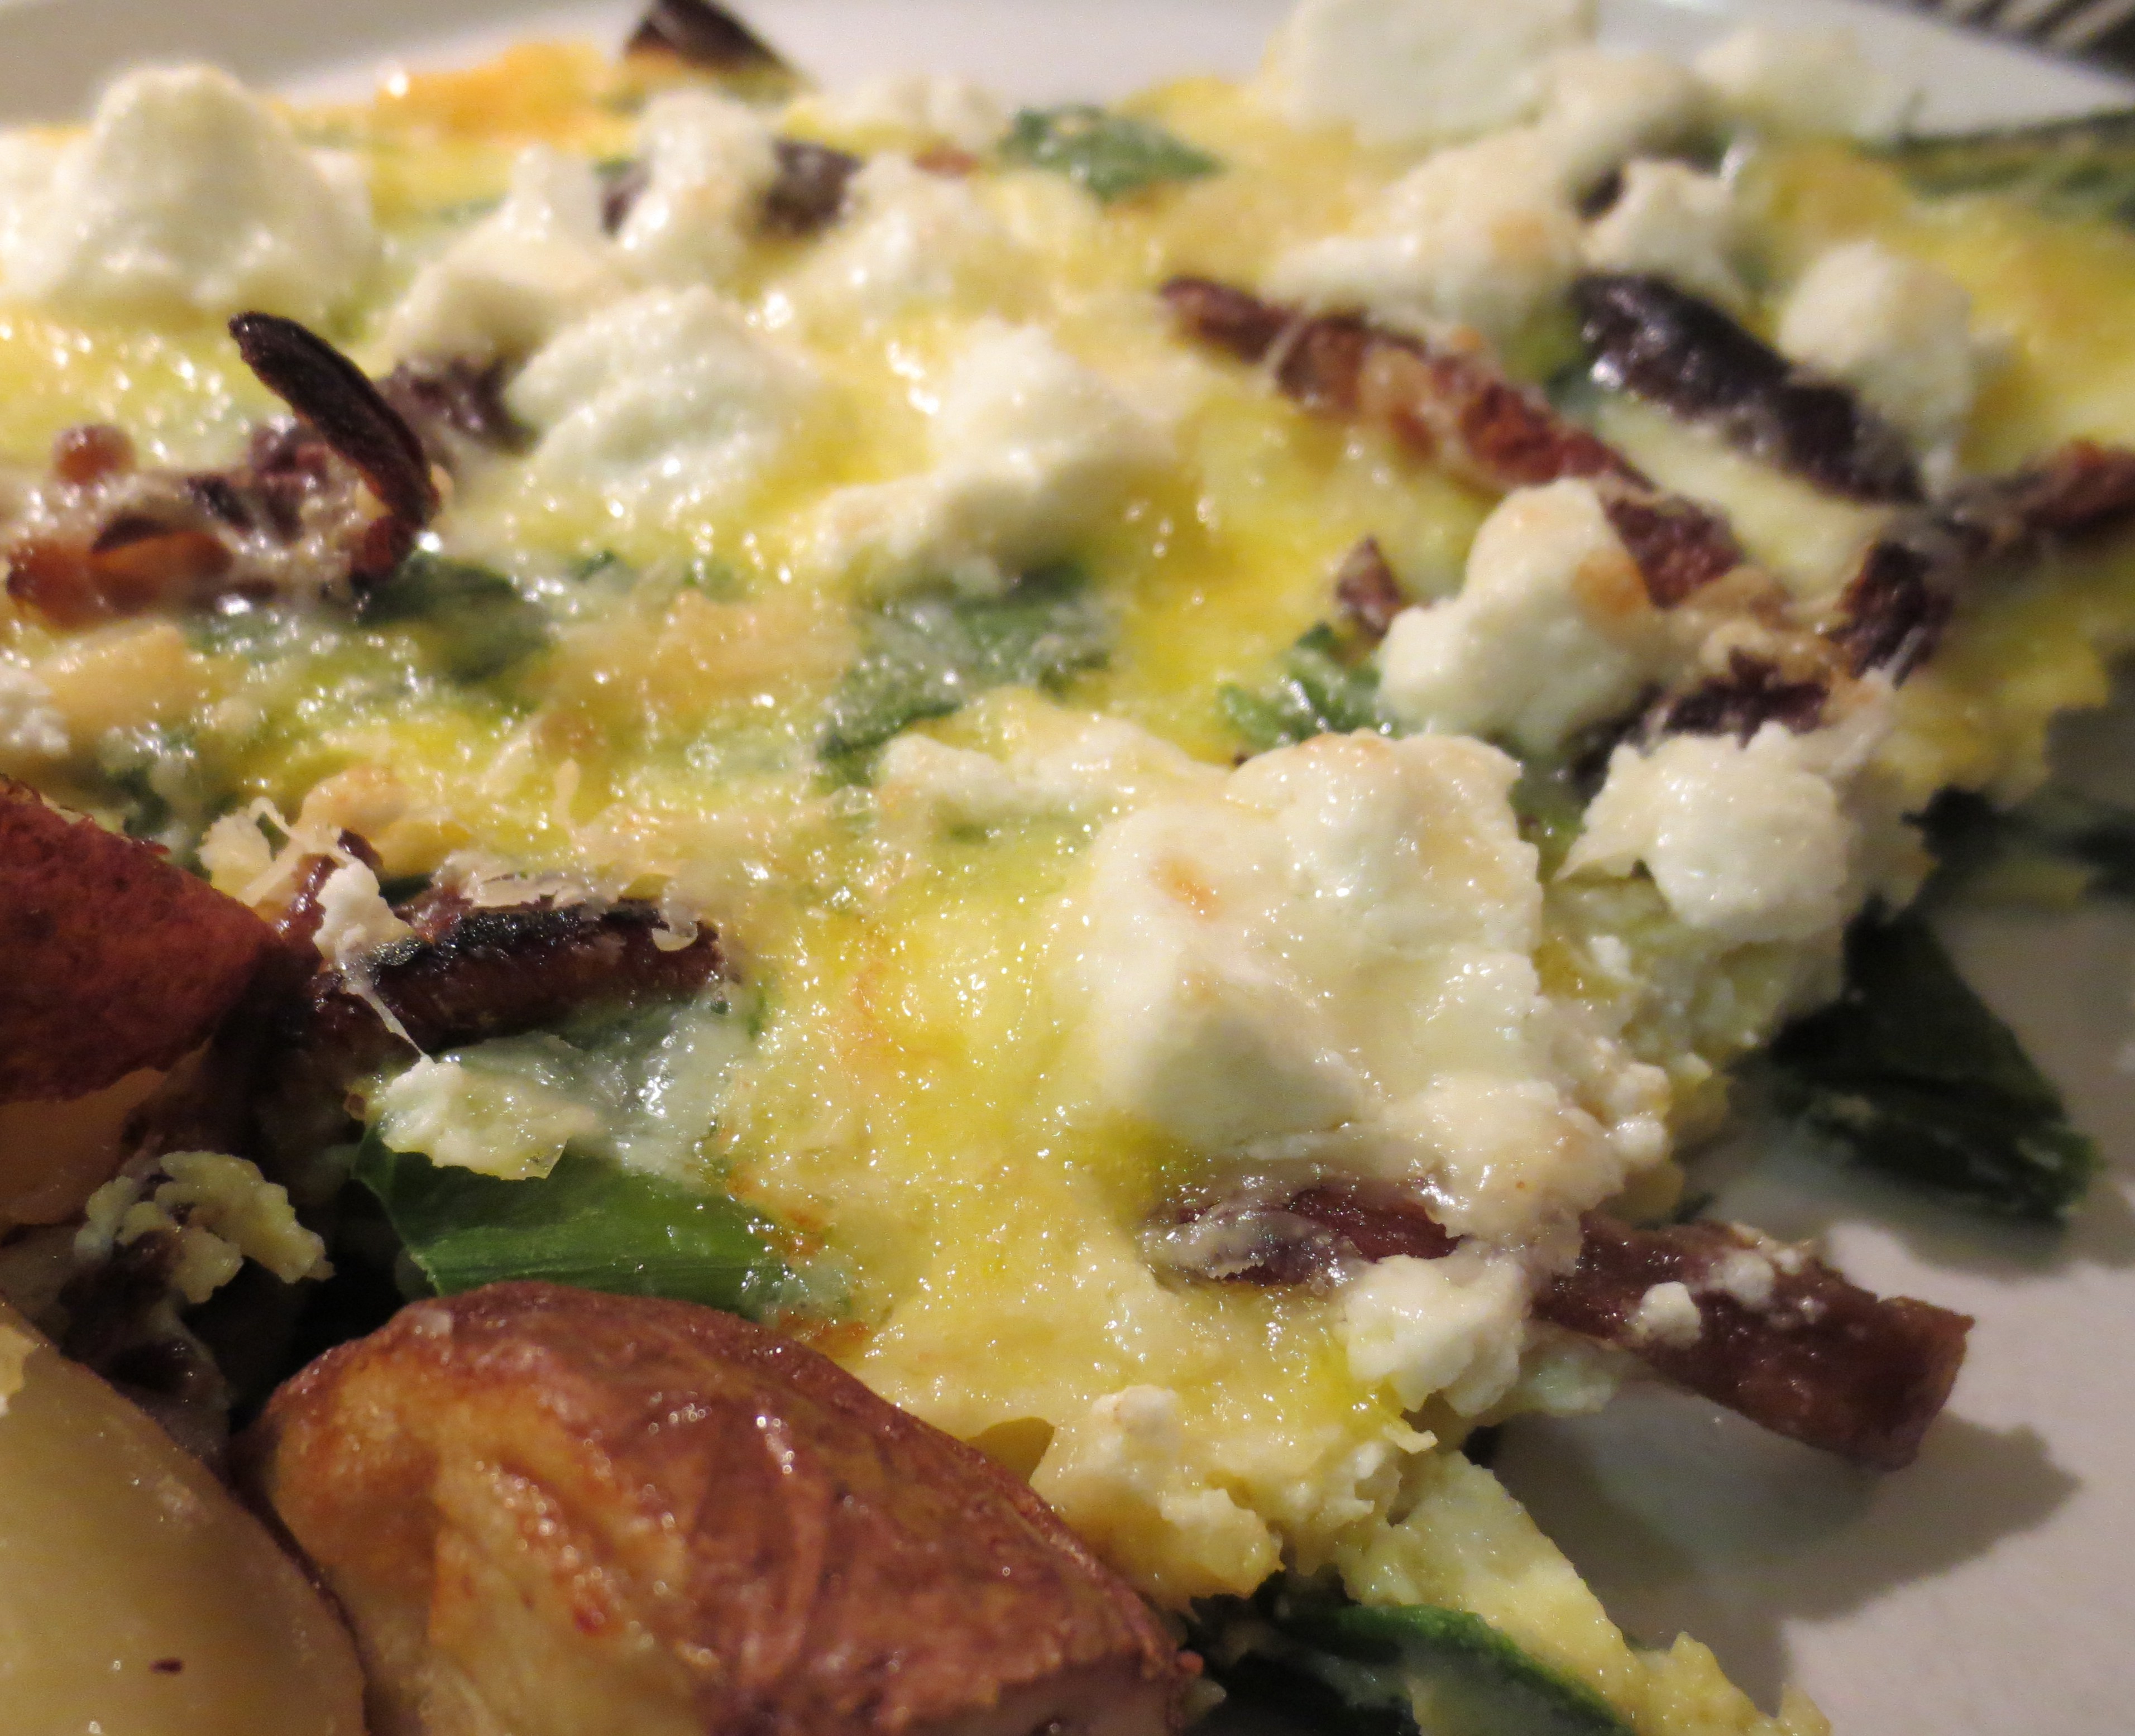
I love this time of year, when our local farmers markets are in full bloom. I find the offerings of fresh and beautiful veggies so inspiring, I often get carried away and buy way too much! Leaving with my bags loaded with more than we can usually eat in the week, happily planning meals in my head as I drive home.

Farmer’s Market Bounty
This week I brought home spring onions with long green tops, more than a foot in length from Taliaferro Farms, shitake mushrooms from Madura Farms and herbed goat cheese from Acorn Hill, plus gorgeous eggs in shades of browns and blue from Wrights Farm which even inspired my five year old Evan to try “oval eggs” (hard boiled) for the first time ever! 
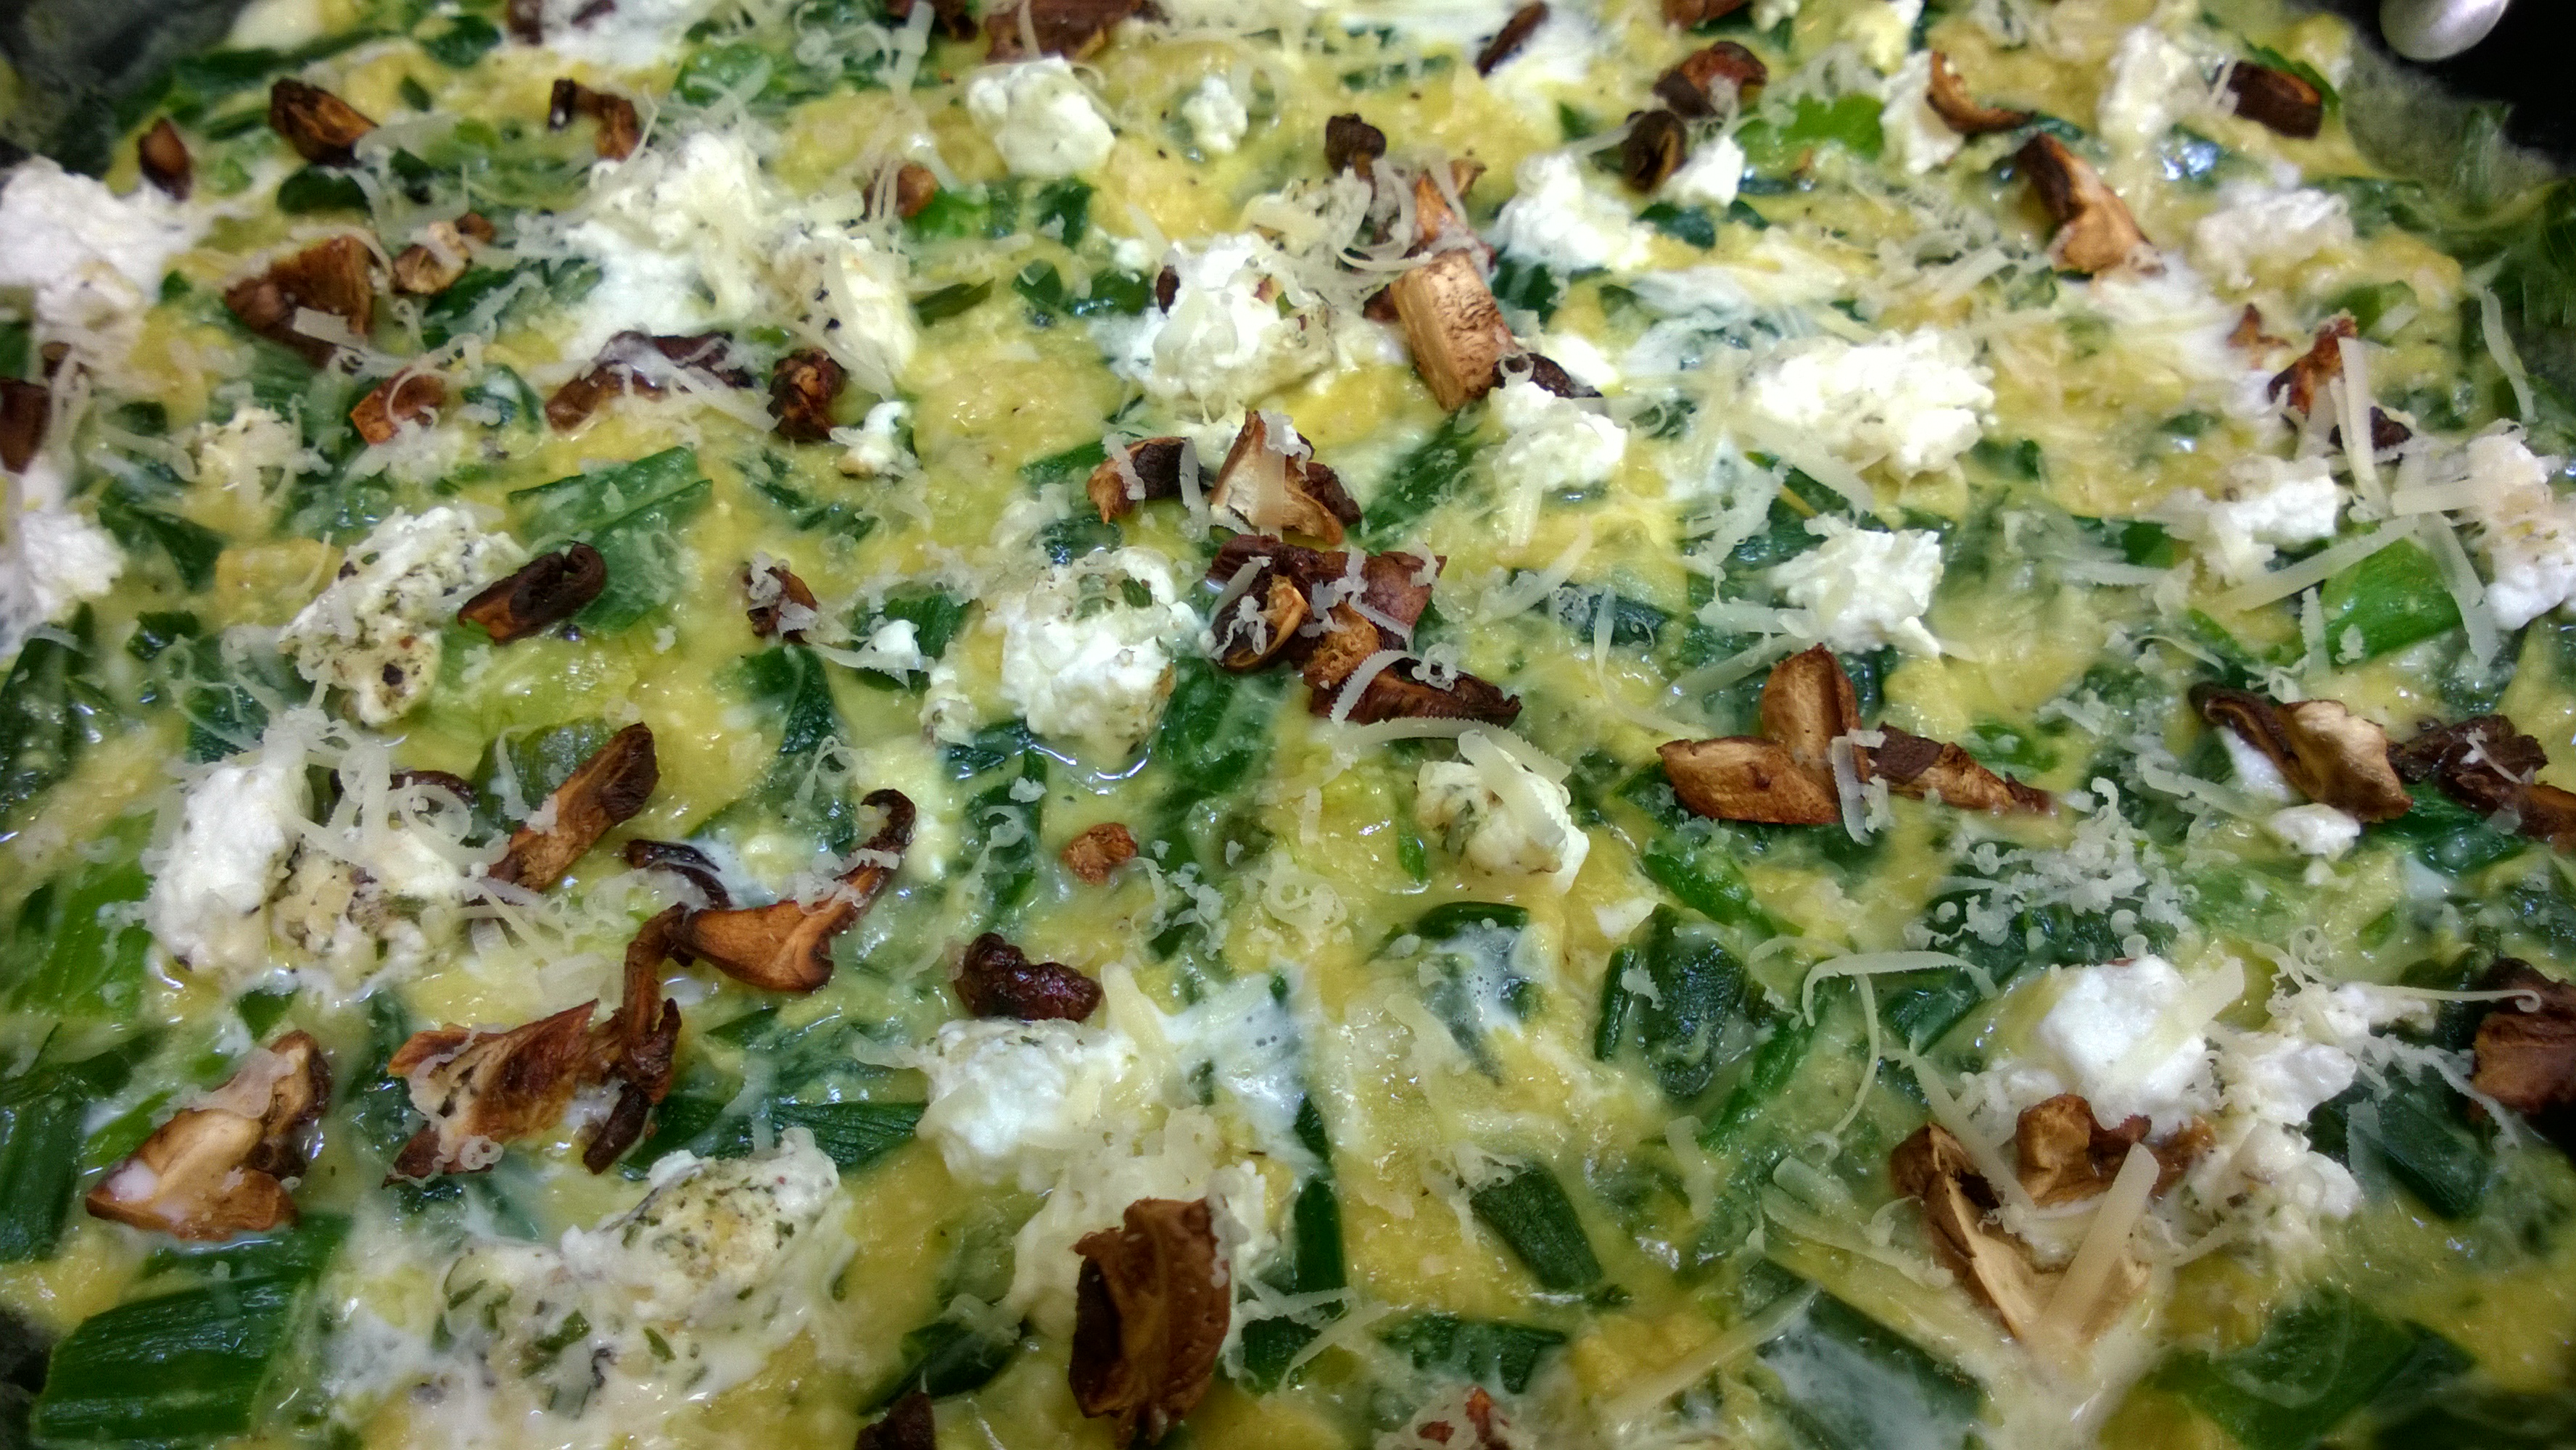
I cooked up this delicious and quick version of frittata, starting on the stove top and then finishing it under the broiler to get a nice golden brown top. I used the spring onion tops, which I think are even more flavorful than the onions themselves and cook up quicker too.

I sprinkled bits of herbed goat cheese along with crisp cooked shitakes, all over the top just before placing under the broiler, but any goat cheese you like; flavored with herbs, garlic or just plain, would be delicious here. 

If you can’t find young onions with the greens attached, scallions or leeks would work just as well. In fact frittatas are so versatile you could really add most any combination of veges and cheese you like and come out with great results!
Farmer’s Market Frittata
with Crisp Shitake Mushrooms, Spring Onions and Goat Cheese
Author: Sweet Green Kitchen’s Jen Jones
Serves about 4 as a light main dish with a salad or other veggies on the side, also perfect for brunch with a warm crusty roll.
Ingredients:
5 or 6 Shitake Mushrooms
Spring Onion Greens (that’s the onion tops) from about 3-4 onions
Or sub with 2 bunches Scallions OR 2-3 Leeks
6- 8 Eggs (depending upon size)
Grated Asiago Cheese – about ¼ cup or more to taste
2 ounces creamy Goat Cheese
Butter and Olive Oil
Salt (flaked sea salt if you have)
Ground Black Pepper
Directions:
Heat a large non stick (oven safe) skillet (either a 10 or 12 inch pan will work) over a medium flame.
Wash, dry and slice the Shitake mushrooms. Melt a bit of butter (about a teaspoon or two) into the skillet and then add in the mushrooms. Sauté the mushrooms for several minutes until they get nice and crispy. Once they’re crispy, sprinkle a little flaked salt and stir around and then remove from the pan.
While the mushrooms are cooking, clean and slice the green onion tops.
Into the same pan you’ve just removed the mushrooms from, add a little swirl of olive oil and then the onion greens. Season with a little salt and pepper. Sauté until softened and beginning to brown just a bit.
While the onion greens are cooking, whisk together the eggs in a medium bowl. Season with salt and pepper and add about 2 tablespoons of the grated Asiago cheese.
Once the greens are cooked, spread them flat over the inside of the pan so they cover the entire surface, sprinkle with about a tablespoon of grated Asiago, then pour in the eggs and immediately lower the temperature to the lowest setting. Do not stir. Once the eggs just begin to set a bit, gently stir them around the pan.
Drop the goat cheese all over the eggs in small bits and then top with the crispy mushrooms and any remaining Asiago. Remove the pan from the flame and place it in the oven about 4 – 6 inches from the broiler, turn on the broiler, watch carefully and allow to broil about 1 – 2 minutes until the top of the frittata sets and the cheese begins to brown.
Remove from the oven, cut into 4-6 portions, serve and Enjoy!
Click here for printable version
Corn Berry Muffins

It all started with a book my five year old brought home from school, a modern day version of Little Red Riding Hood “a new fangled prairie tale”, in my opinion, a truly terrible version of a classic, but it ended with grandma opening a muffin shop for the wolf to work in to keep him busy enough to stop terrorizing the neighborhood AND a recipe for Wheat Berry Muffins. Upon first reading I assumed it was muffins made with wheatberries, which as much as I love wheatberries, did not sound so tasty to me mixed into a muffin. But, then I realized it was whole wheat muffins with blueberries and “grandma’s” secret ingredient, sunflower seeds, now that didn’t sound too bad. Evan asked for days to make the Wheat Berry Muffins, but I had an open carton of buttermilk in the fridge that needed a purpose, so I decided Little Red’s grandma’s recipe needed some tweaking and the more I thought about it, I realized how yummy corn muffins are with berries and why not just for fun try to make a gluten free version….hmmm, now I was on to something. So I spent the morning scouring through recipes and ended up with four different ones I took a little from this one, a little from that one and so on until I came up with the tastiest little morsels, moist and delicious. There’s a hint of coconut, but not overwhelmingly so (in fact, Skyler, who despises all things coconut, upon tasting these for the first time, exclaimed “delicious” and then asked “is there coconut in these?” and then continued to devour the rest and ask for more), a really nice crunch from the coarse cornmeal and a bit of texture from the sunflower seeds, lightly sweet, unbelievably moist and so very yummy. These little gems are my current muffin obsession.
Corn Berry Muffins
Author: Sweet Green Kitchen’s Jen Jones
Makes about 15 muffins or 12 plus 12 minis
Ingredients:
1 cup Brown Rice Flour
1/2 cup Coarse Cornmeal **
1/2 cup Almond Flour
3/4 cup Granulated Natural Cane Sugar
1 Tablespoon Baking Powder
3/4 teaspoon Salt
1 cup Buttermilk
2 extra large Eggs
1 teaspoon Vanilla Extract
1/2 teaspoon Almond Extract
1/3 cup Coconut Oil – liquefied ***
1 – 1 1/2 cups Blueberries (or Blackberries) – about 1 -2 6 ounce containers of berries
1/4 cup Sunflower Seeds
Directions:
Preheat oven to 350 F.
In a large bowl, add in all the dry ingredients; Brown Rice flour, Cornmeal, Almond flour, Sugar, Baking Powder and Salt. Whisk together to combine.
In a small bowl or liquid measuring cup, add in the Buttermilk, Eggs, Vanilla and Almond Extract. Stir thoroughly to combine.
Add the liquids to the dry ingredients and stir to fully combine. Mix in the Coconut Oil.
Gently stir in the Blueberries and Sunflower Seeds.

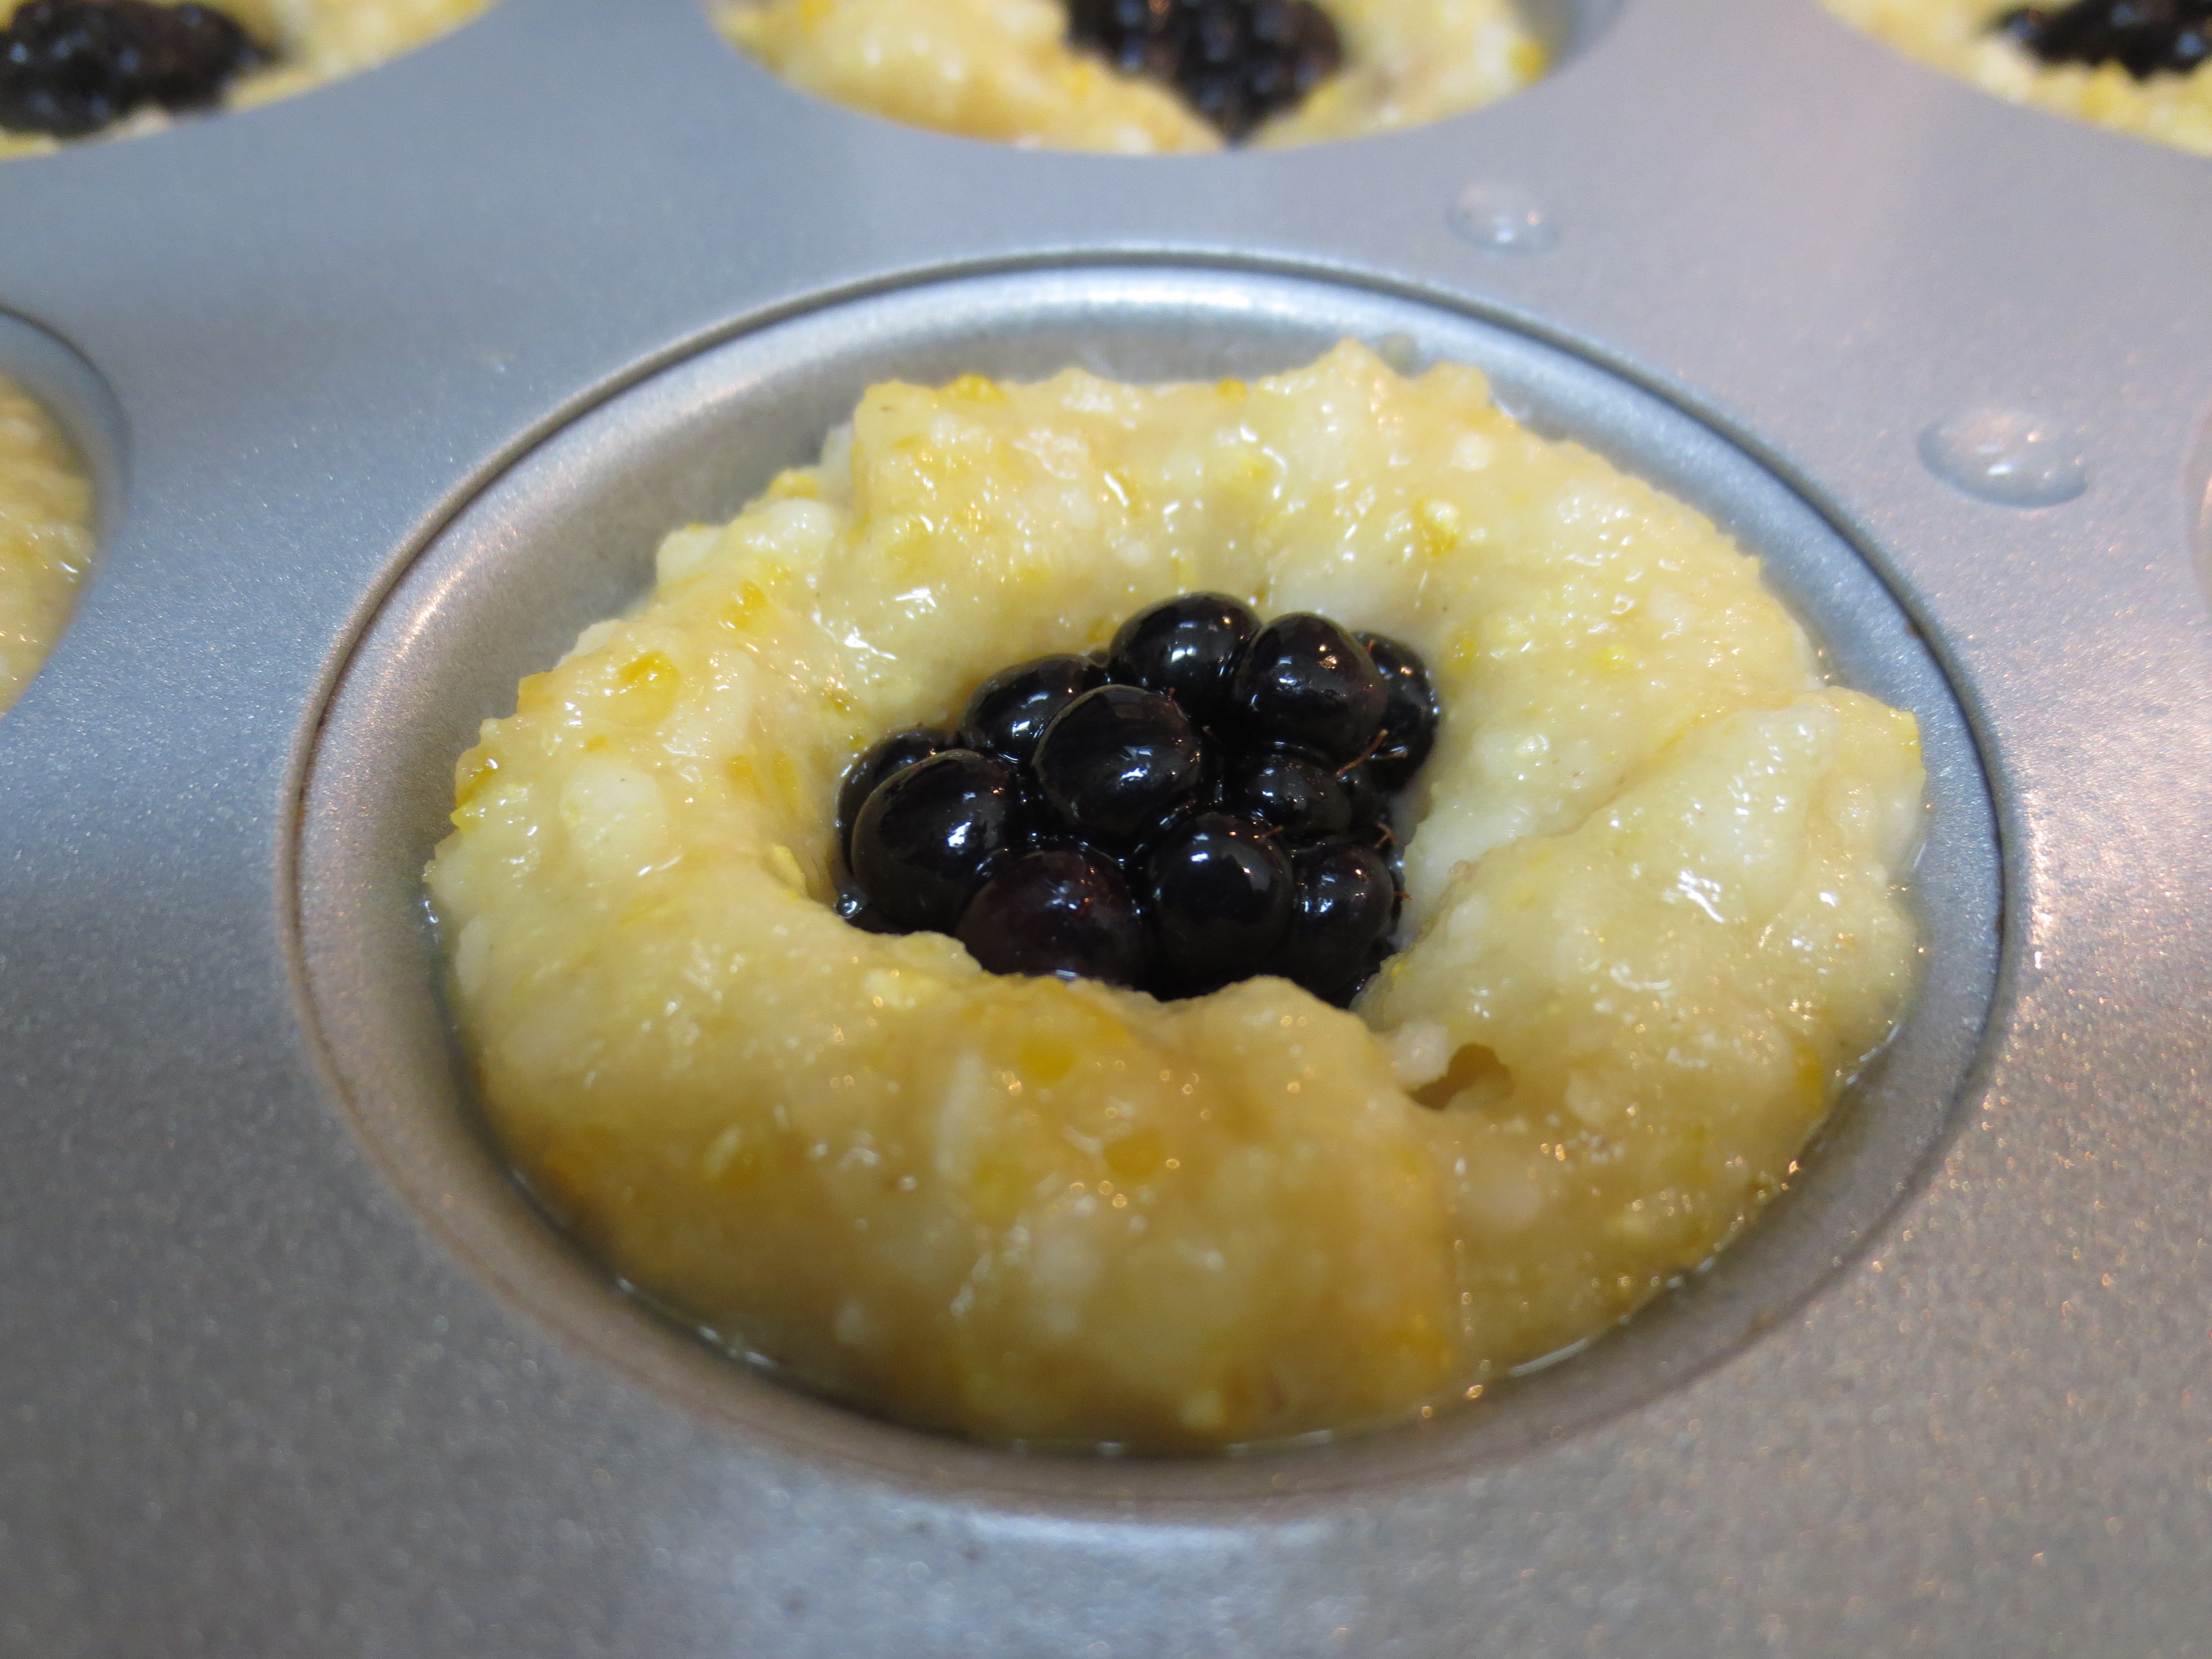
Prepare muffin tins with cooking spray. Pour in about ¼ cup of batter into each muffin cup.
Bake at 350 F, about 20-23 minutes for regular size muffins or 16-18 minutes for minis.
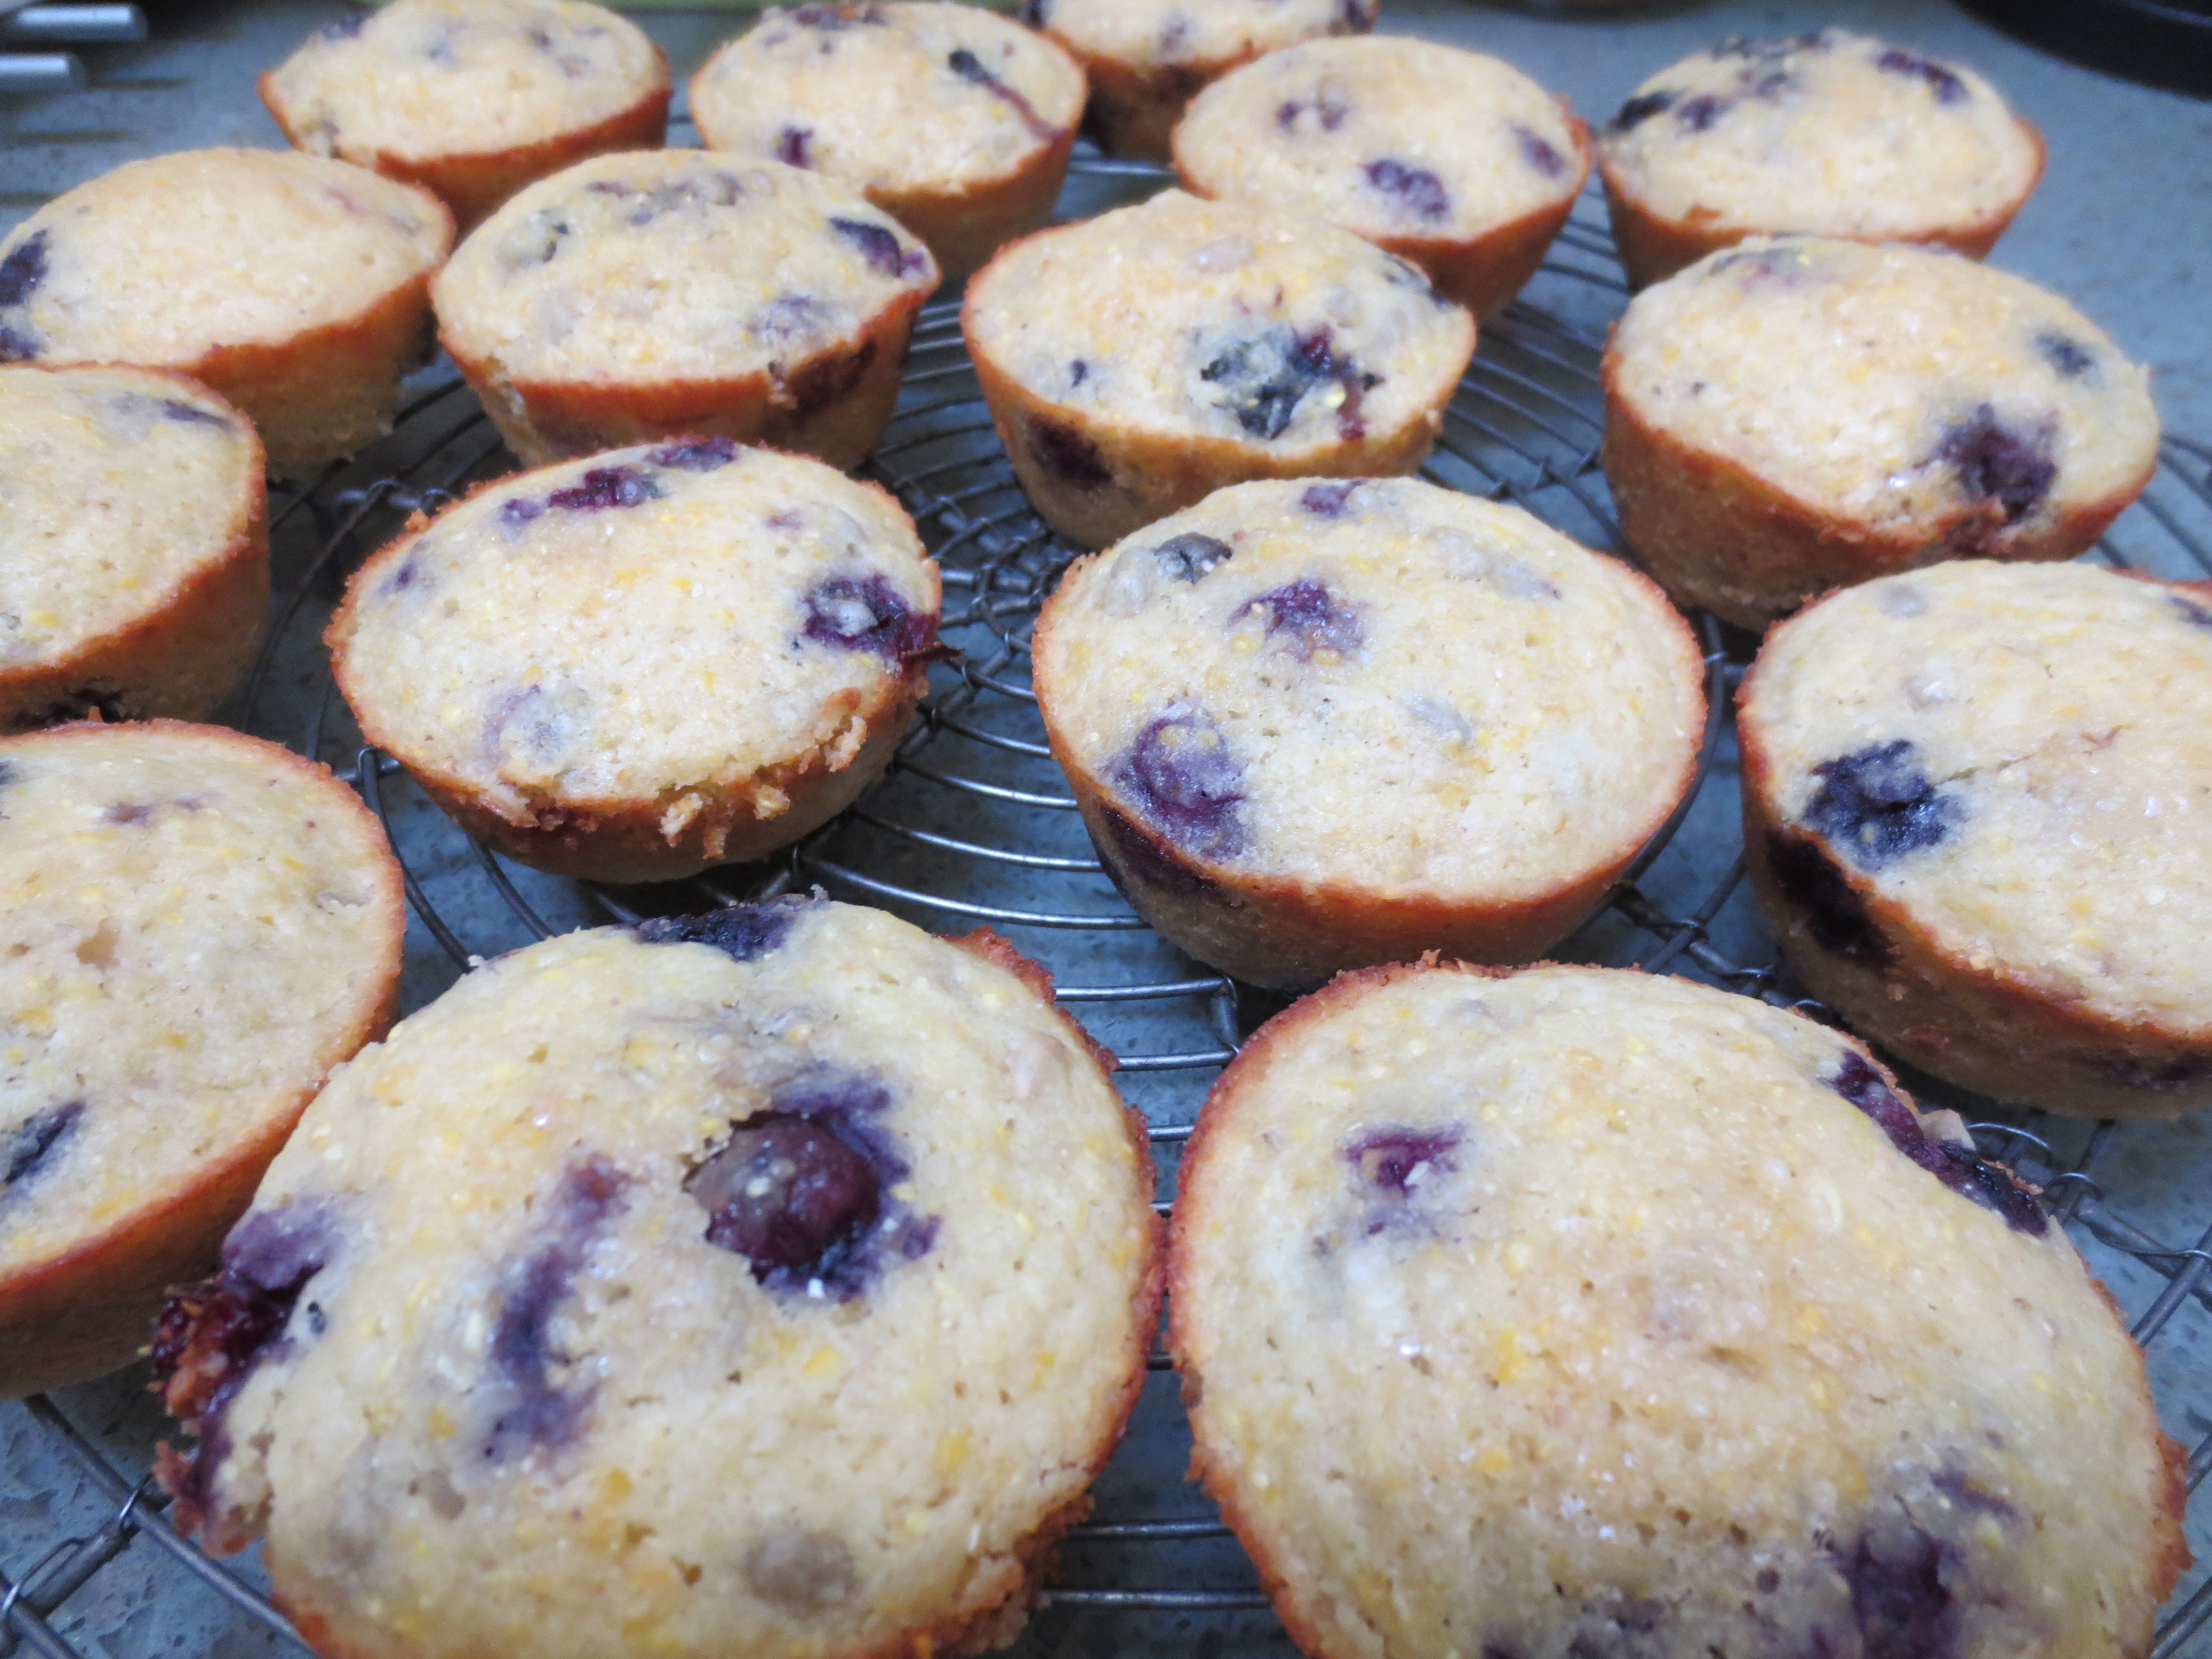

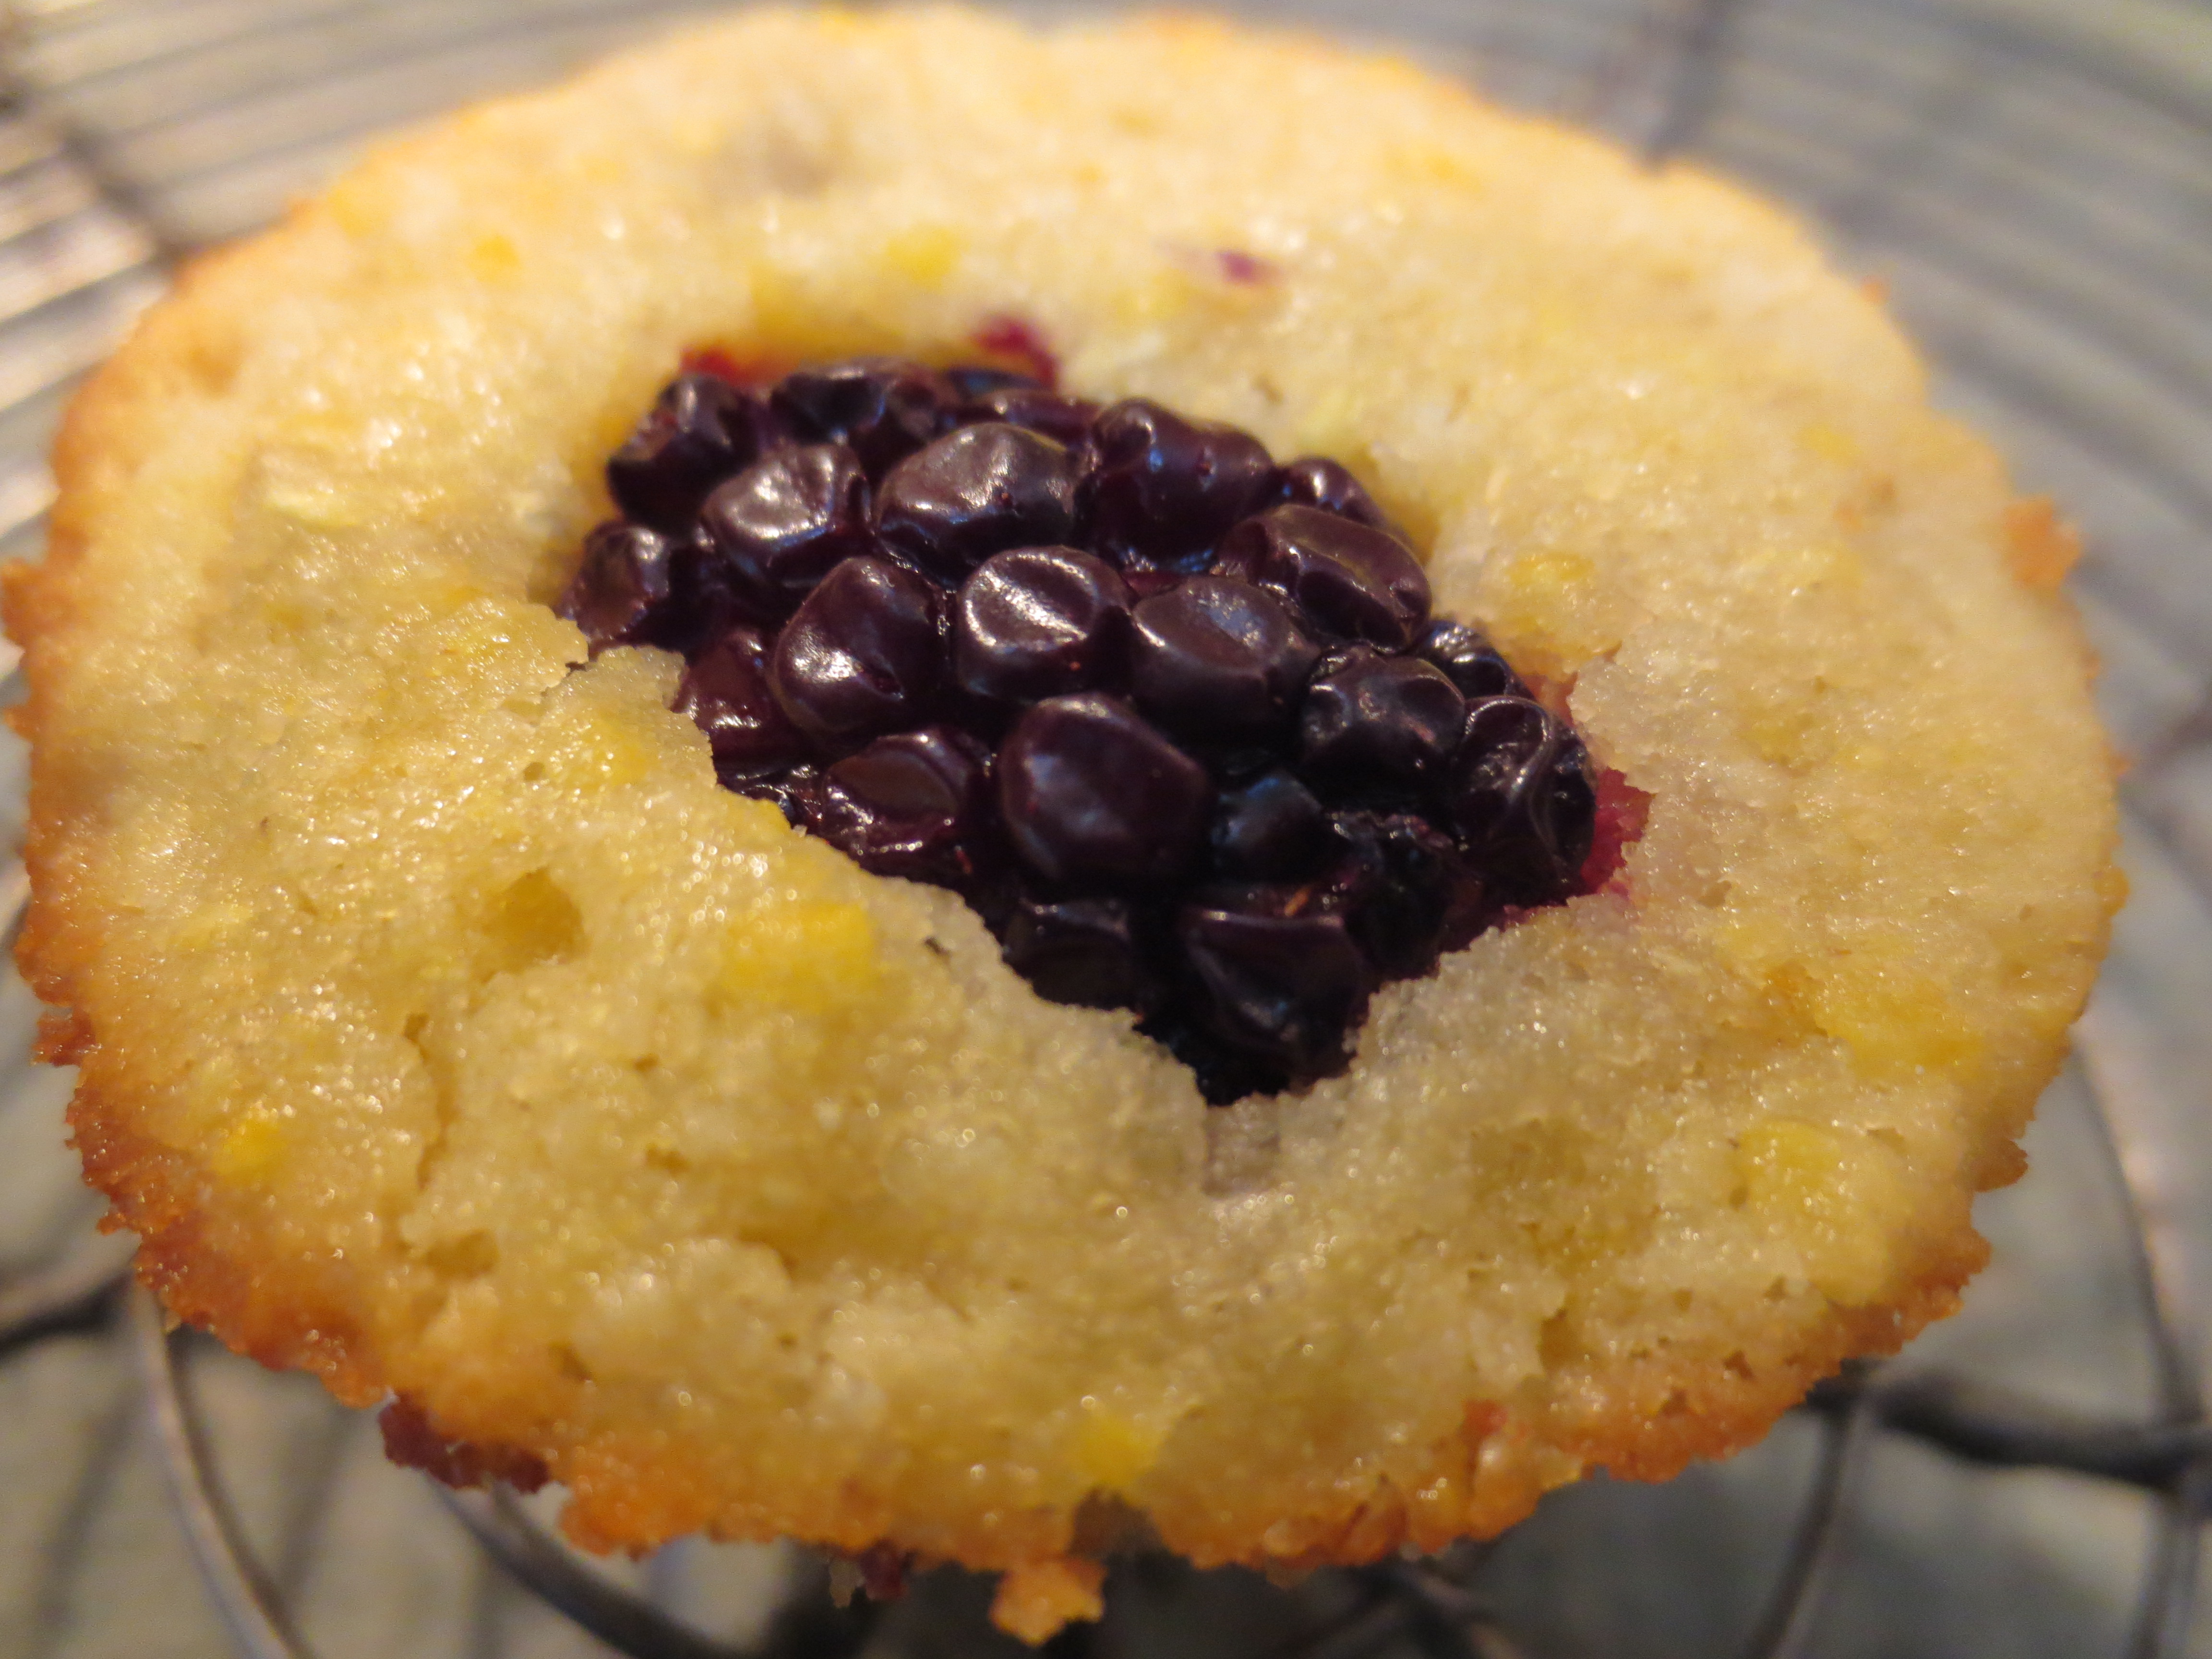
Recipe Notes: As an alternative to Blueberries these muffins are also delicious with big juicy Blackberries. I actually really like making mini muffins with 1 big Blackberry in each one. 

**A note on Cornmeal – the cornmeal adds a nice little crunch to these muffins that I just adore. Alternatively, you could use finer corn flour, but you’d lose out on the crunch. I have also used corn flour with a few tablespoons of the ½ cup subbed out with polenta or corn grits.
***One other note, if Coconut Oil is not available, I think your best bet on substitution would be butter, but I would probably up it to 1/2 cup.
Click here for Printable version
Fusilli con Broccoli with Creamy Ricotta Sauce
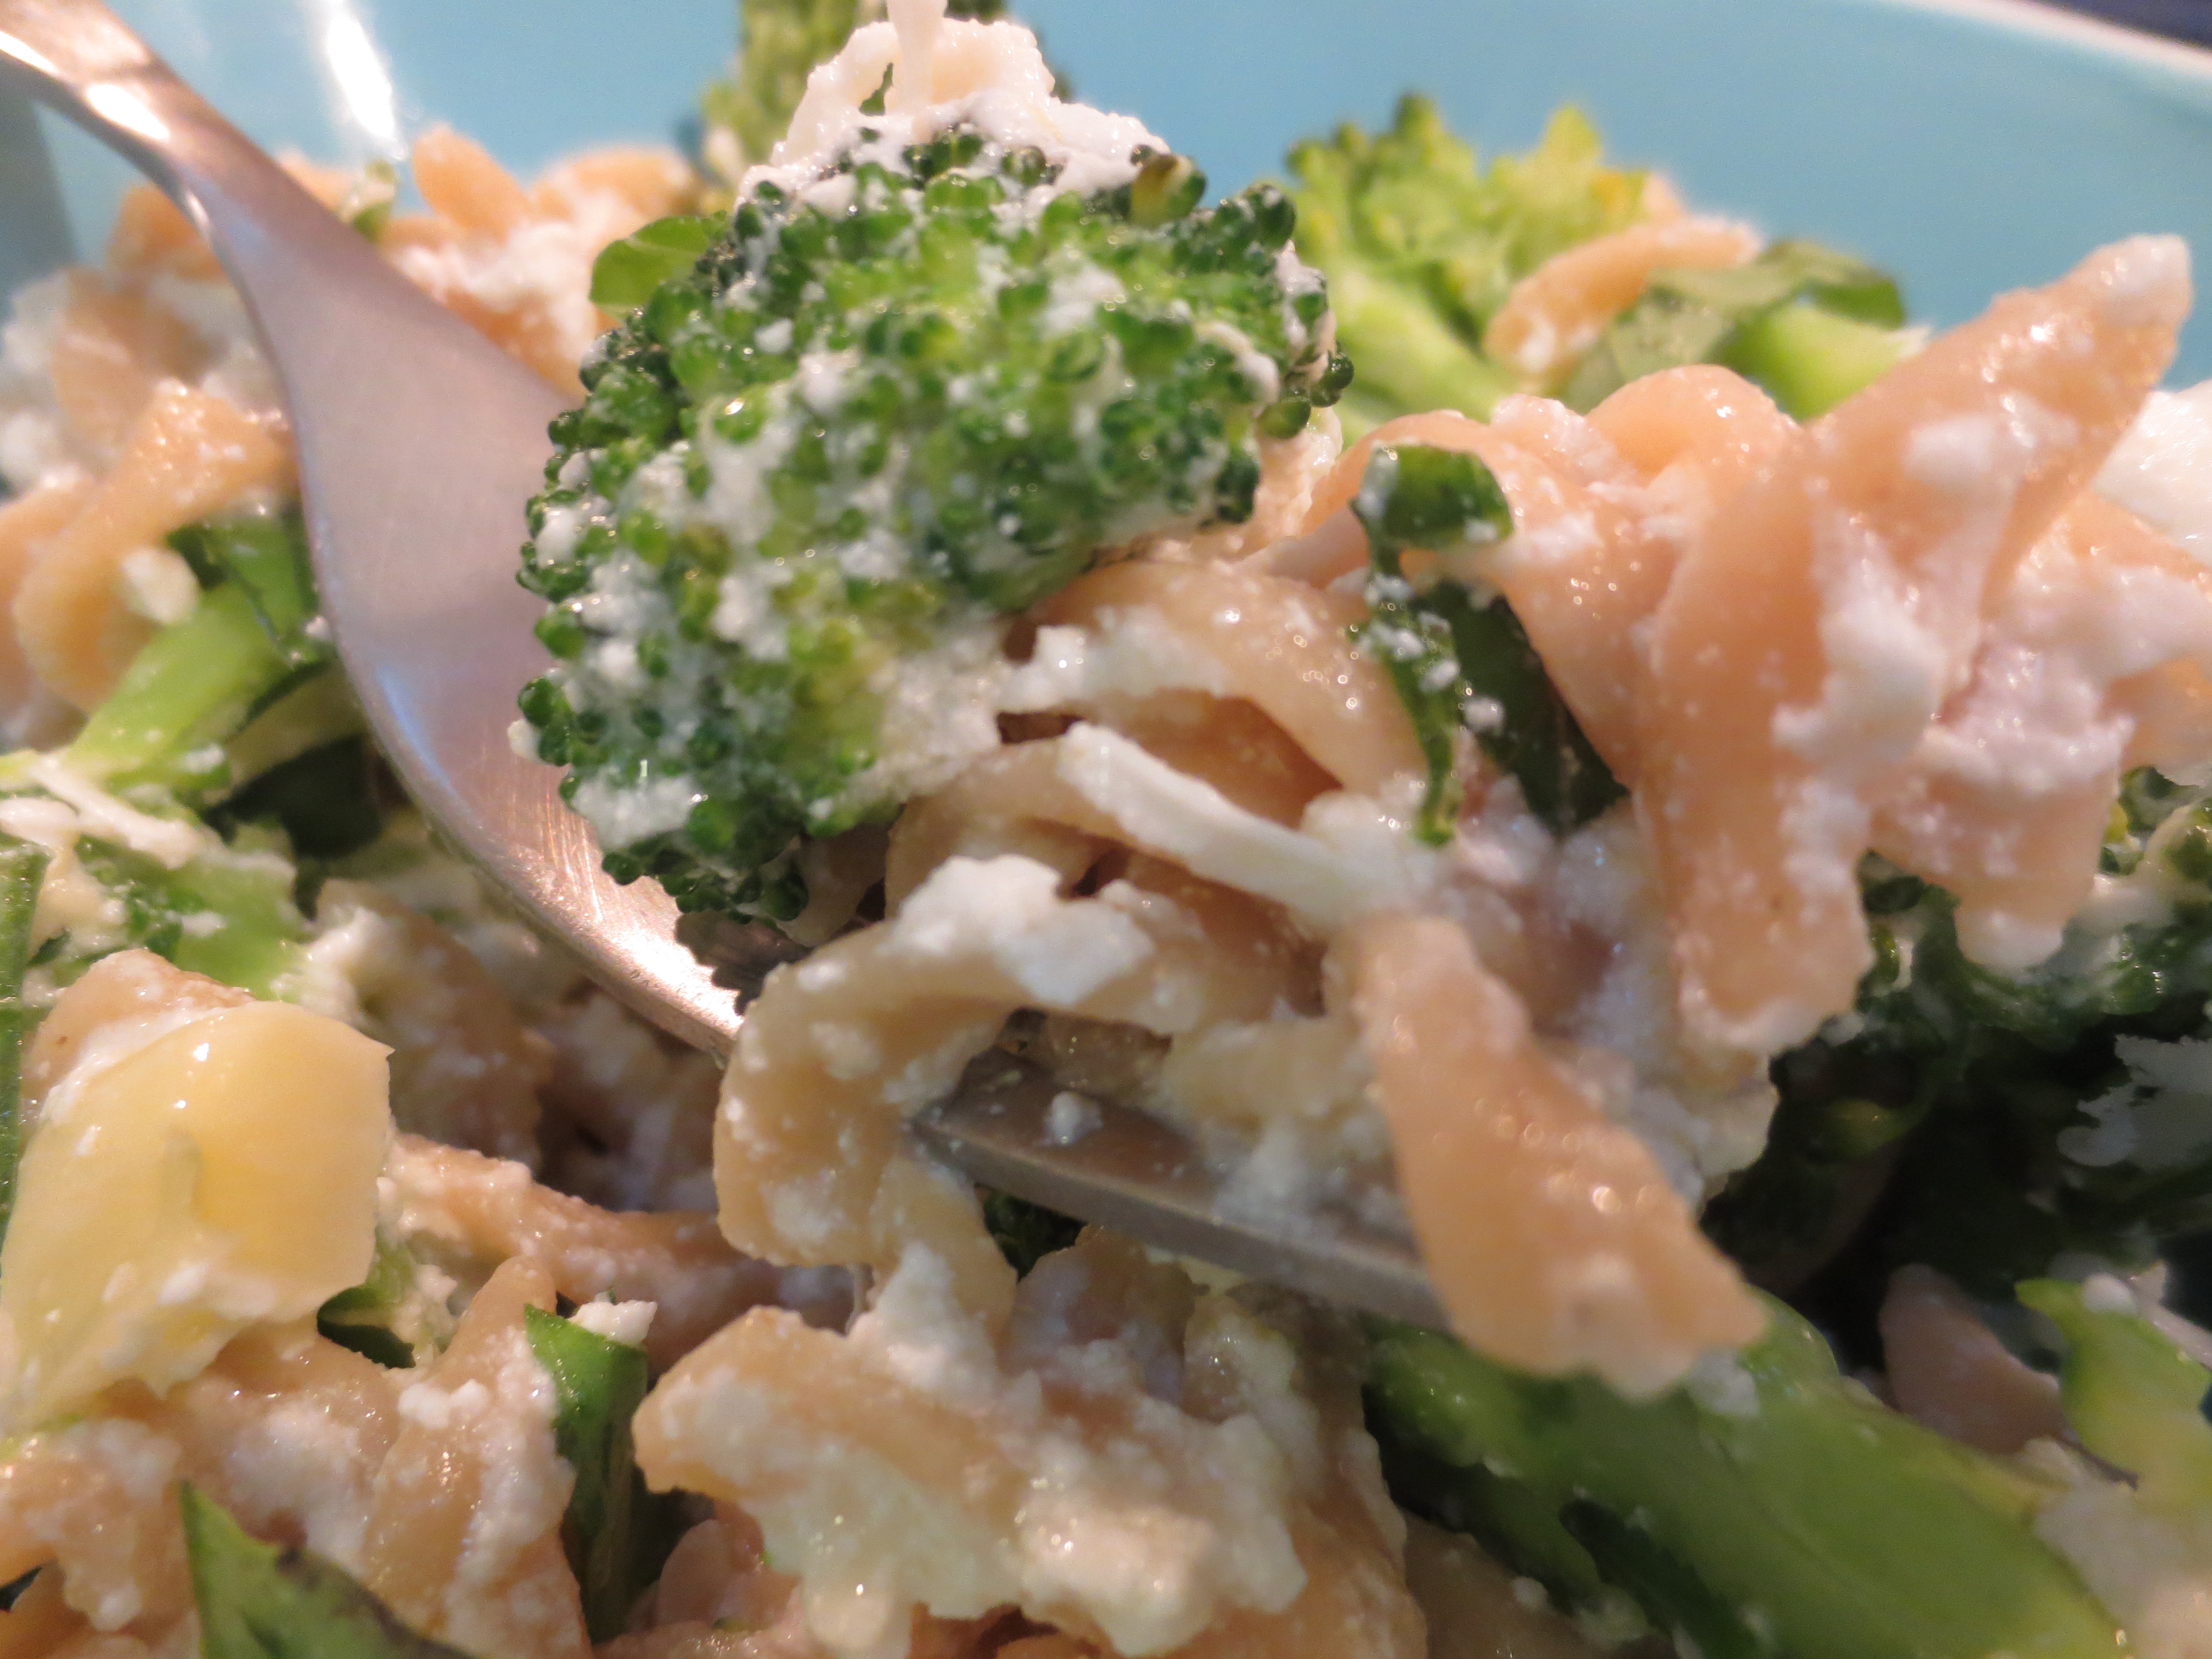
When I was young, my Italian Nana would often make a recipe for me that I loved. Long strands of twisted fusilli pasta with broccoli cooked in the same pot until it was so soft it nearly fell apart when I ate it. The salted water with the broccoli and pasta would develop a lovely brothy flavor which would be ladled into the bowl with the rest and then topped with some grated Romano cheese. It was delicious and to this day I still dream of it. Here I’ve cooked the fusilli and broccoli a bit more al dente, although the broccoli still is quite tender, and I added a creamy light ricotta “sauce”. Eating this now reminds me of my Nana. As the say in Italy, Buon Appetito! 


Fusilli con Broccoli with Creamy Ricotta Sauce
Author: Sweet Green Kitchen’s Jen Jones
Ingredients:
1 pound pasta – fusilli or other shape, orecchiettie is also good
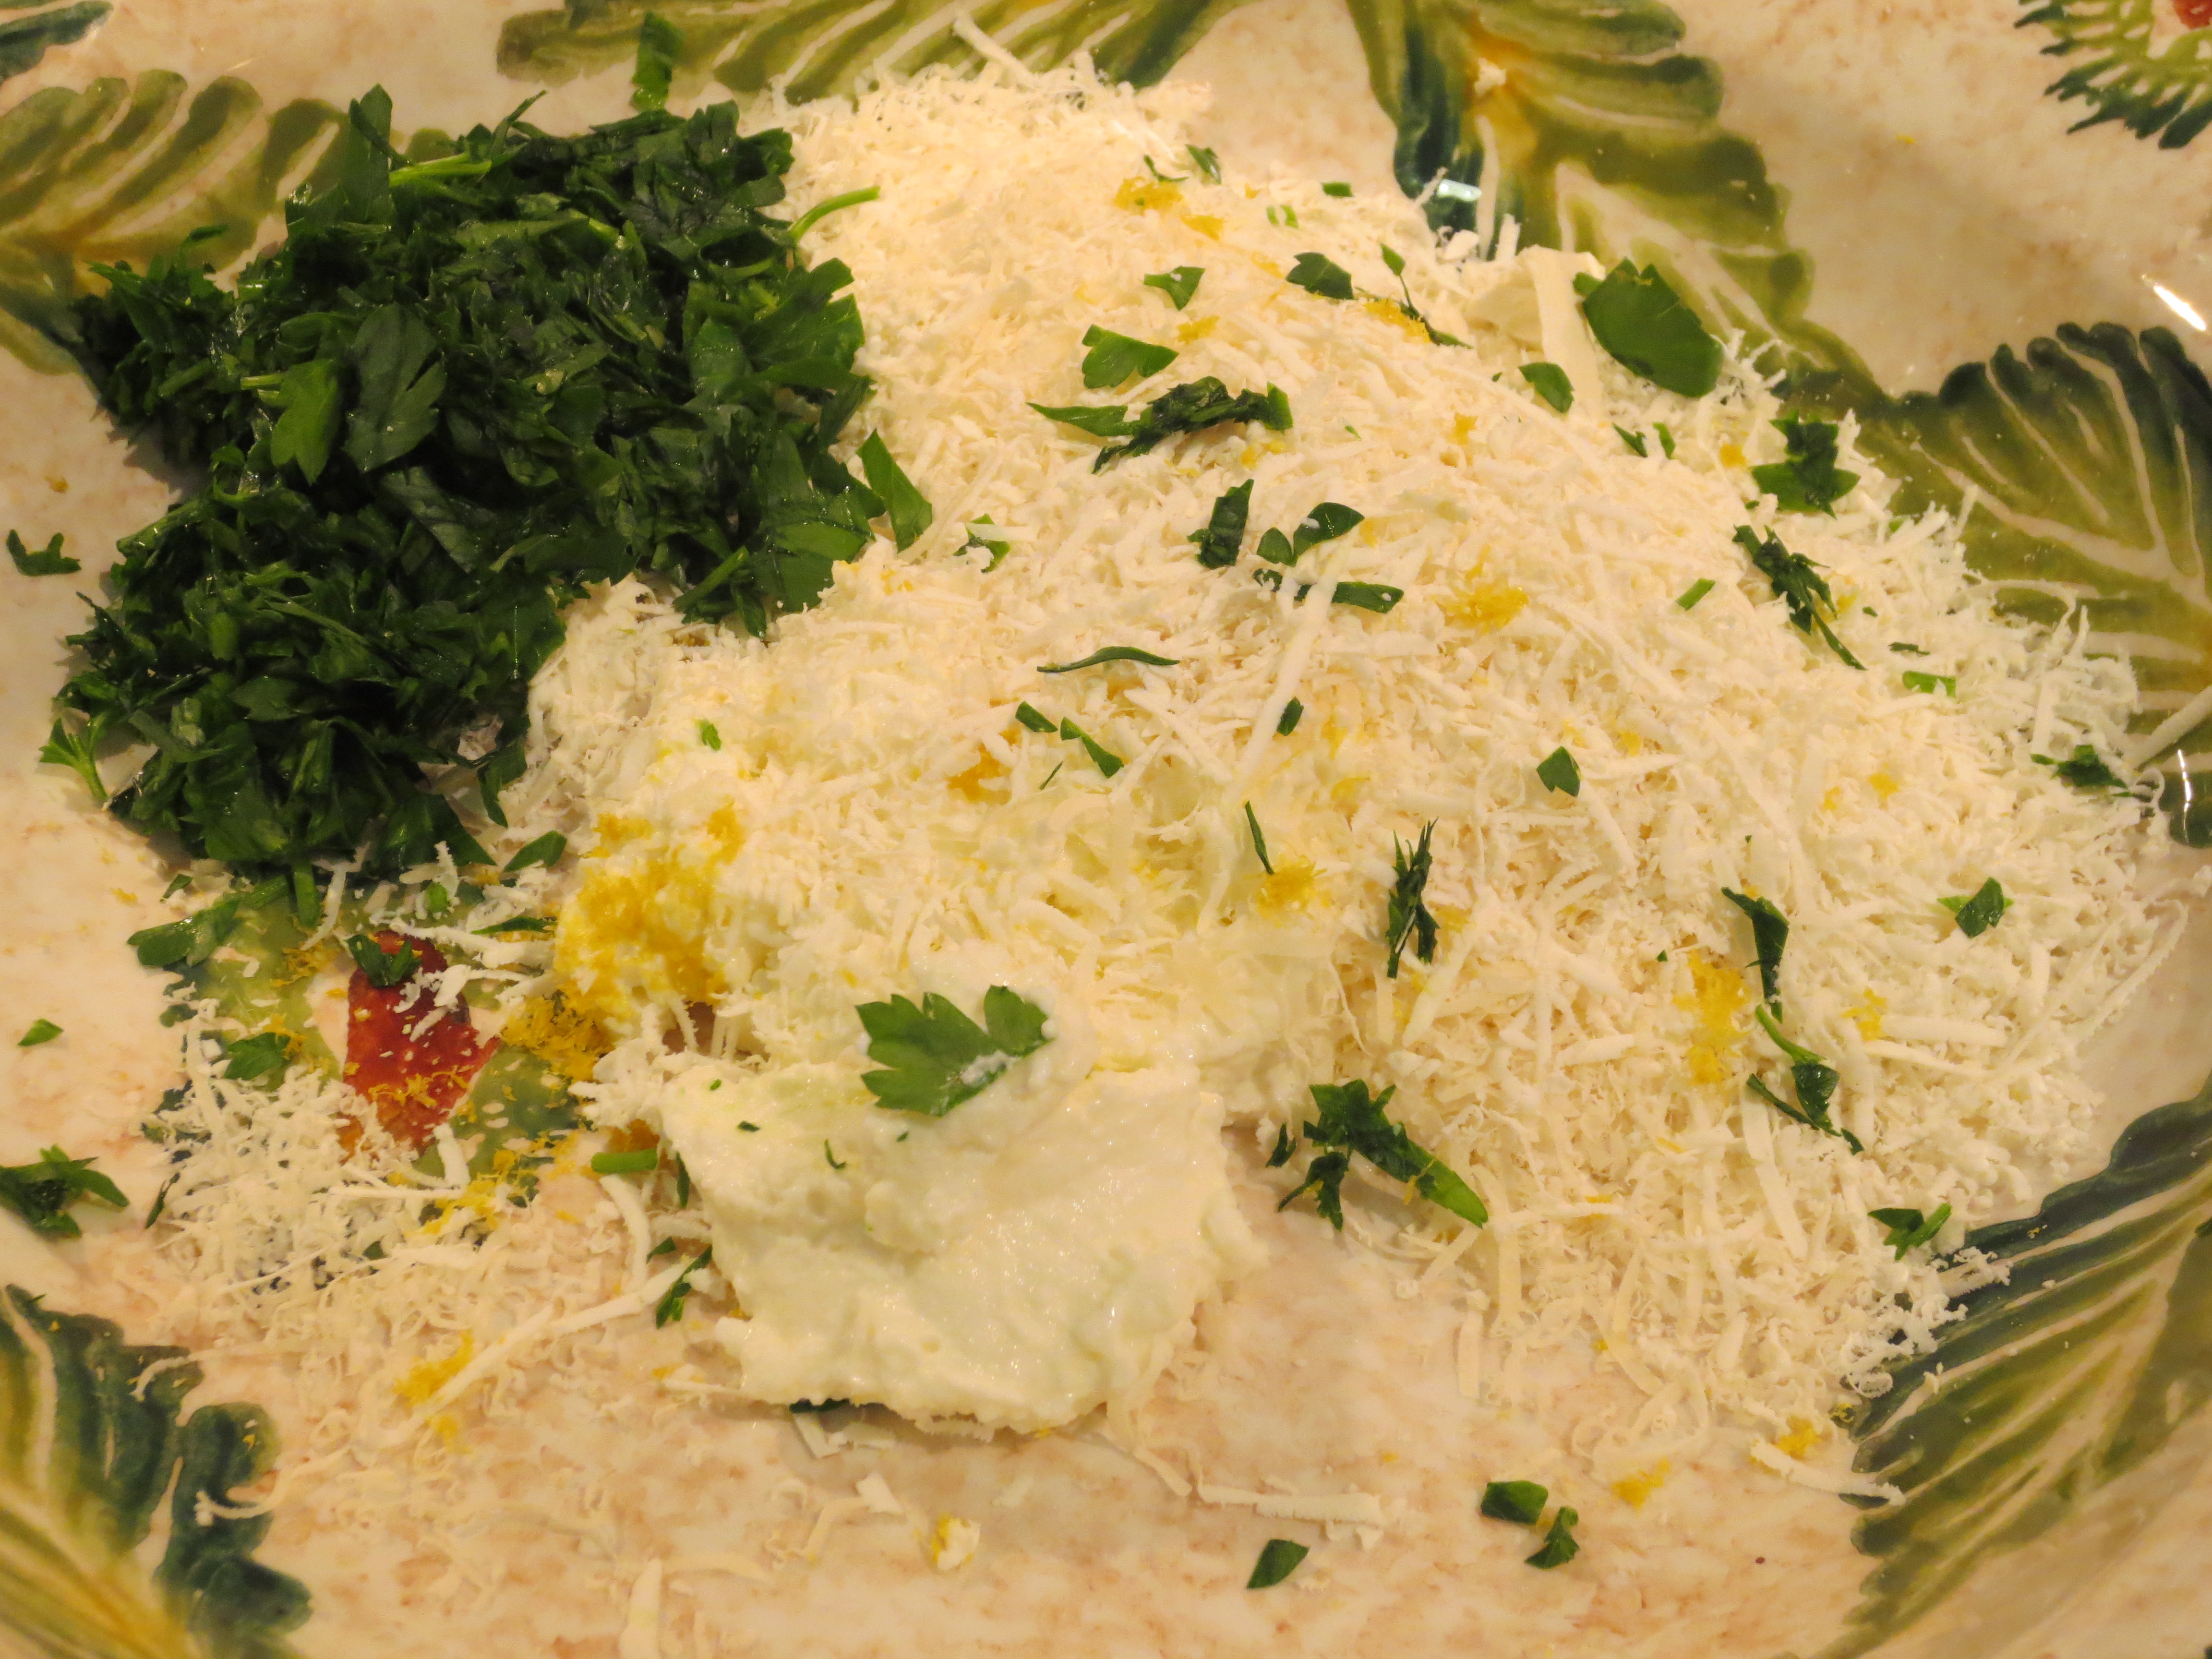
1 cup Ricotta cheese
Handful of chopped Parsley or Basil
Grated Romano cheese
Grated Ricotta Salata cheese
Zest of ½ Lemon
3 cloves Garlic – chopped
Olive oil
Salt
Hot Red Pepper Flakes or Black Pepper
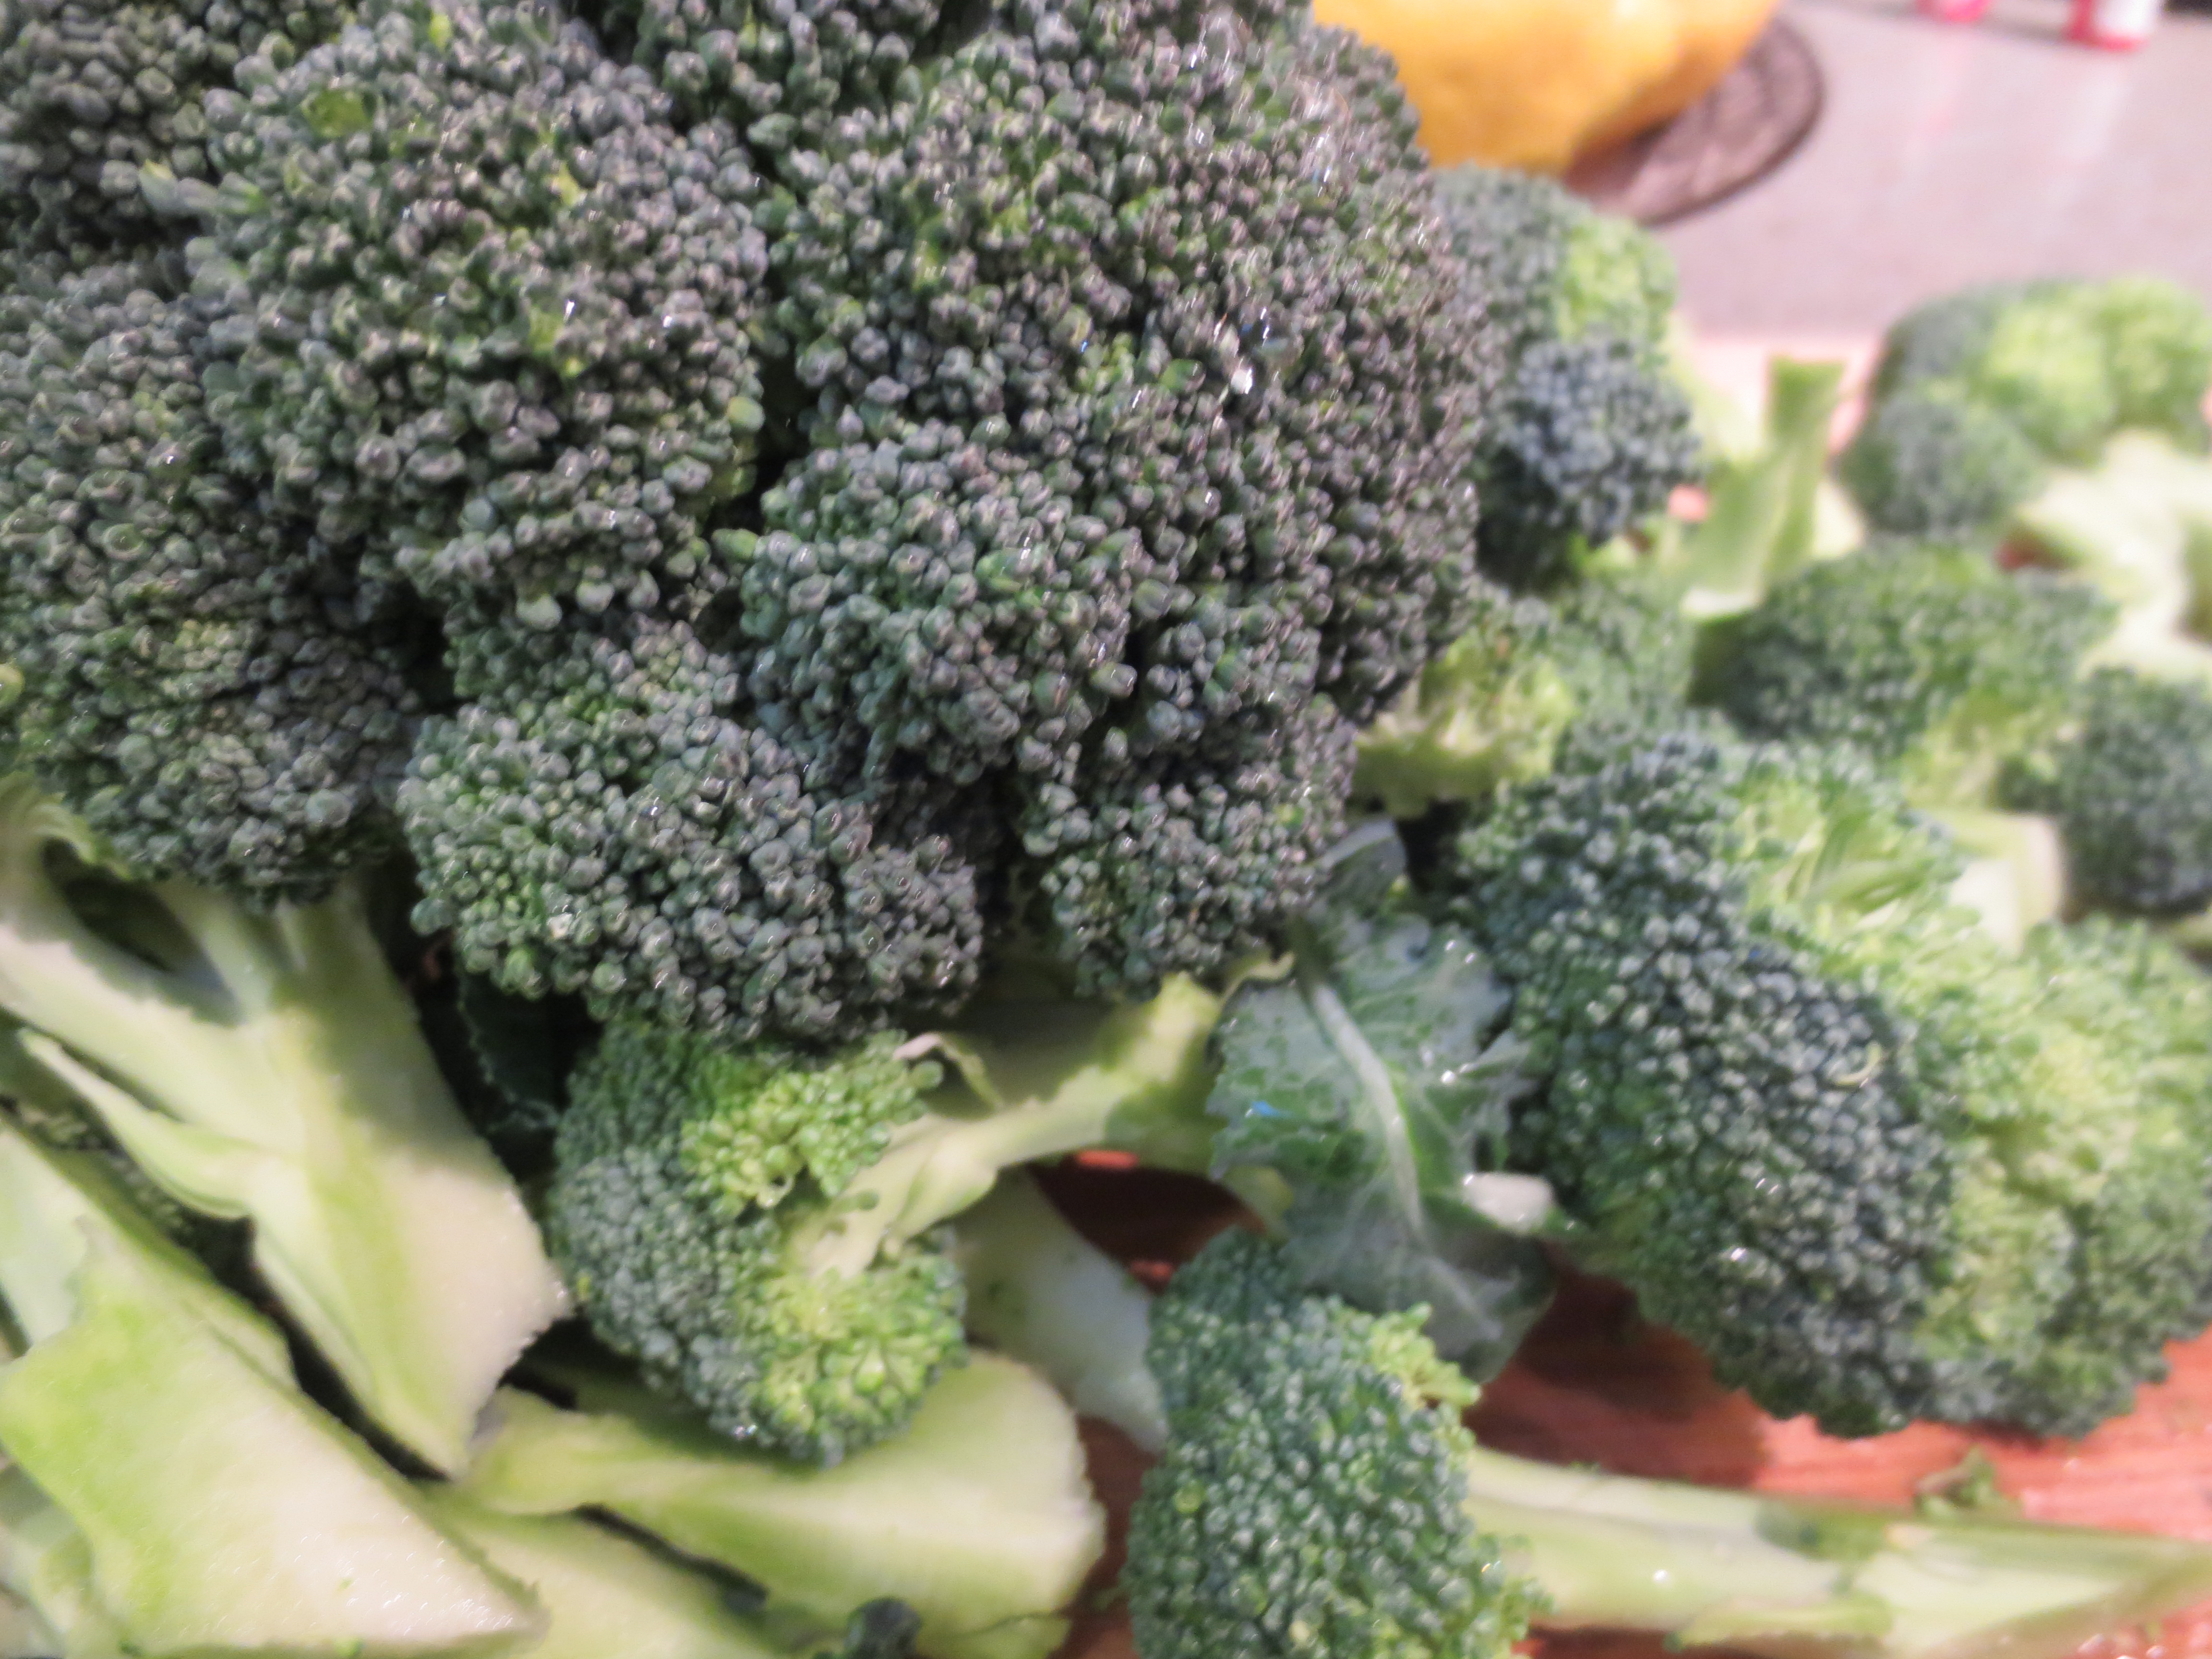
1 bunch of Broccoli florets, cut to bite size pieces
Directions:
Cook pasta until al dente in salted water, making sure to reserve some of the cooking liquid for the sauce. During the last 2 minutes, add the chopped Broccoli to the pot and stir around. 
While the pasta cooks, in a small saucepan add the chopped garlic, a pinch of salt and olive oil to cover. Warm over low heat, to infuse the oil with garlic flavor and gently cook the garlic. – this step is optional and can be skipped if you’re not a huge fan of garlic, but I think it adds a great extra layer of flavor to the finished dish.
Also, while the pasta cooks, to a large serving bowl add Ricotta, Parsley or Basil, grated cheeses and Lemon Zest. Mix together. 
Add the cooked Pasta and Broccoli to the Ricotta mixture adding in some reserved pasta liquid a little bit at a time, until the sauce is the consistency you like. Pour the infused Olive Oil and Garlic over the Pasta and top with a bit of Red Pepper flakes or ground Black Pepper, whichever you prefer. Finish with a little extra grated Cheese if you like. Serve warm and Enjoy!


Recipe Notes: I love the lemon zest in this sauce but if you’re not a fan, feel free to skip it. In it’s absence I would add a little nutmeg.
Click here for printable version
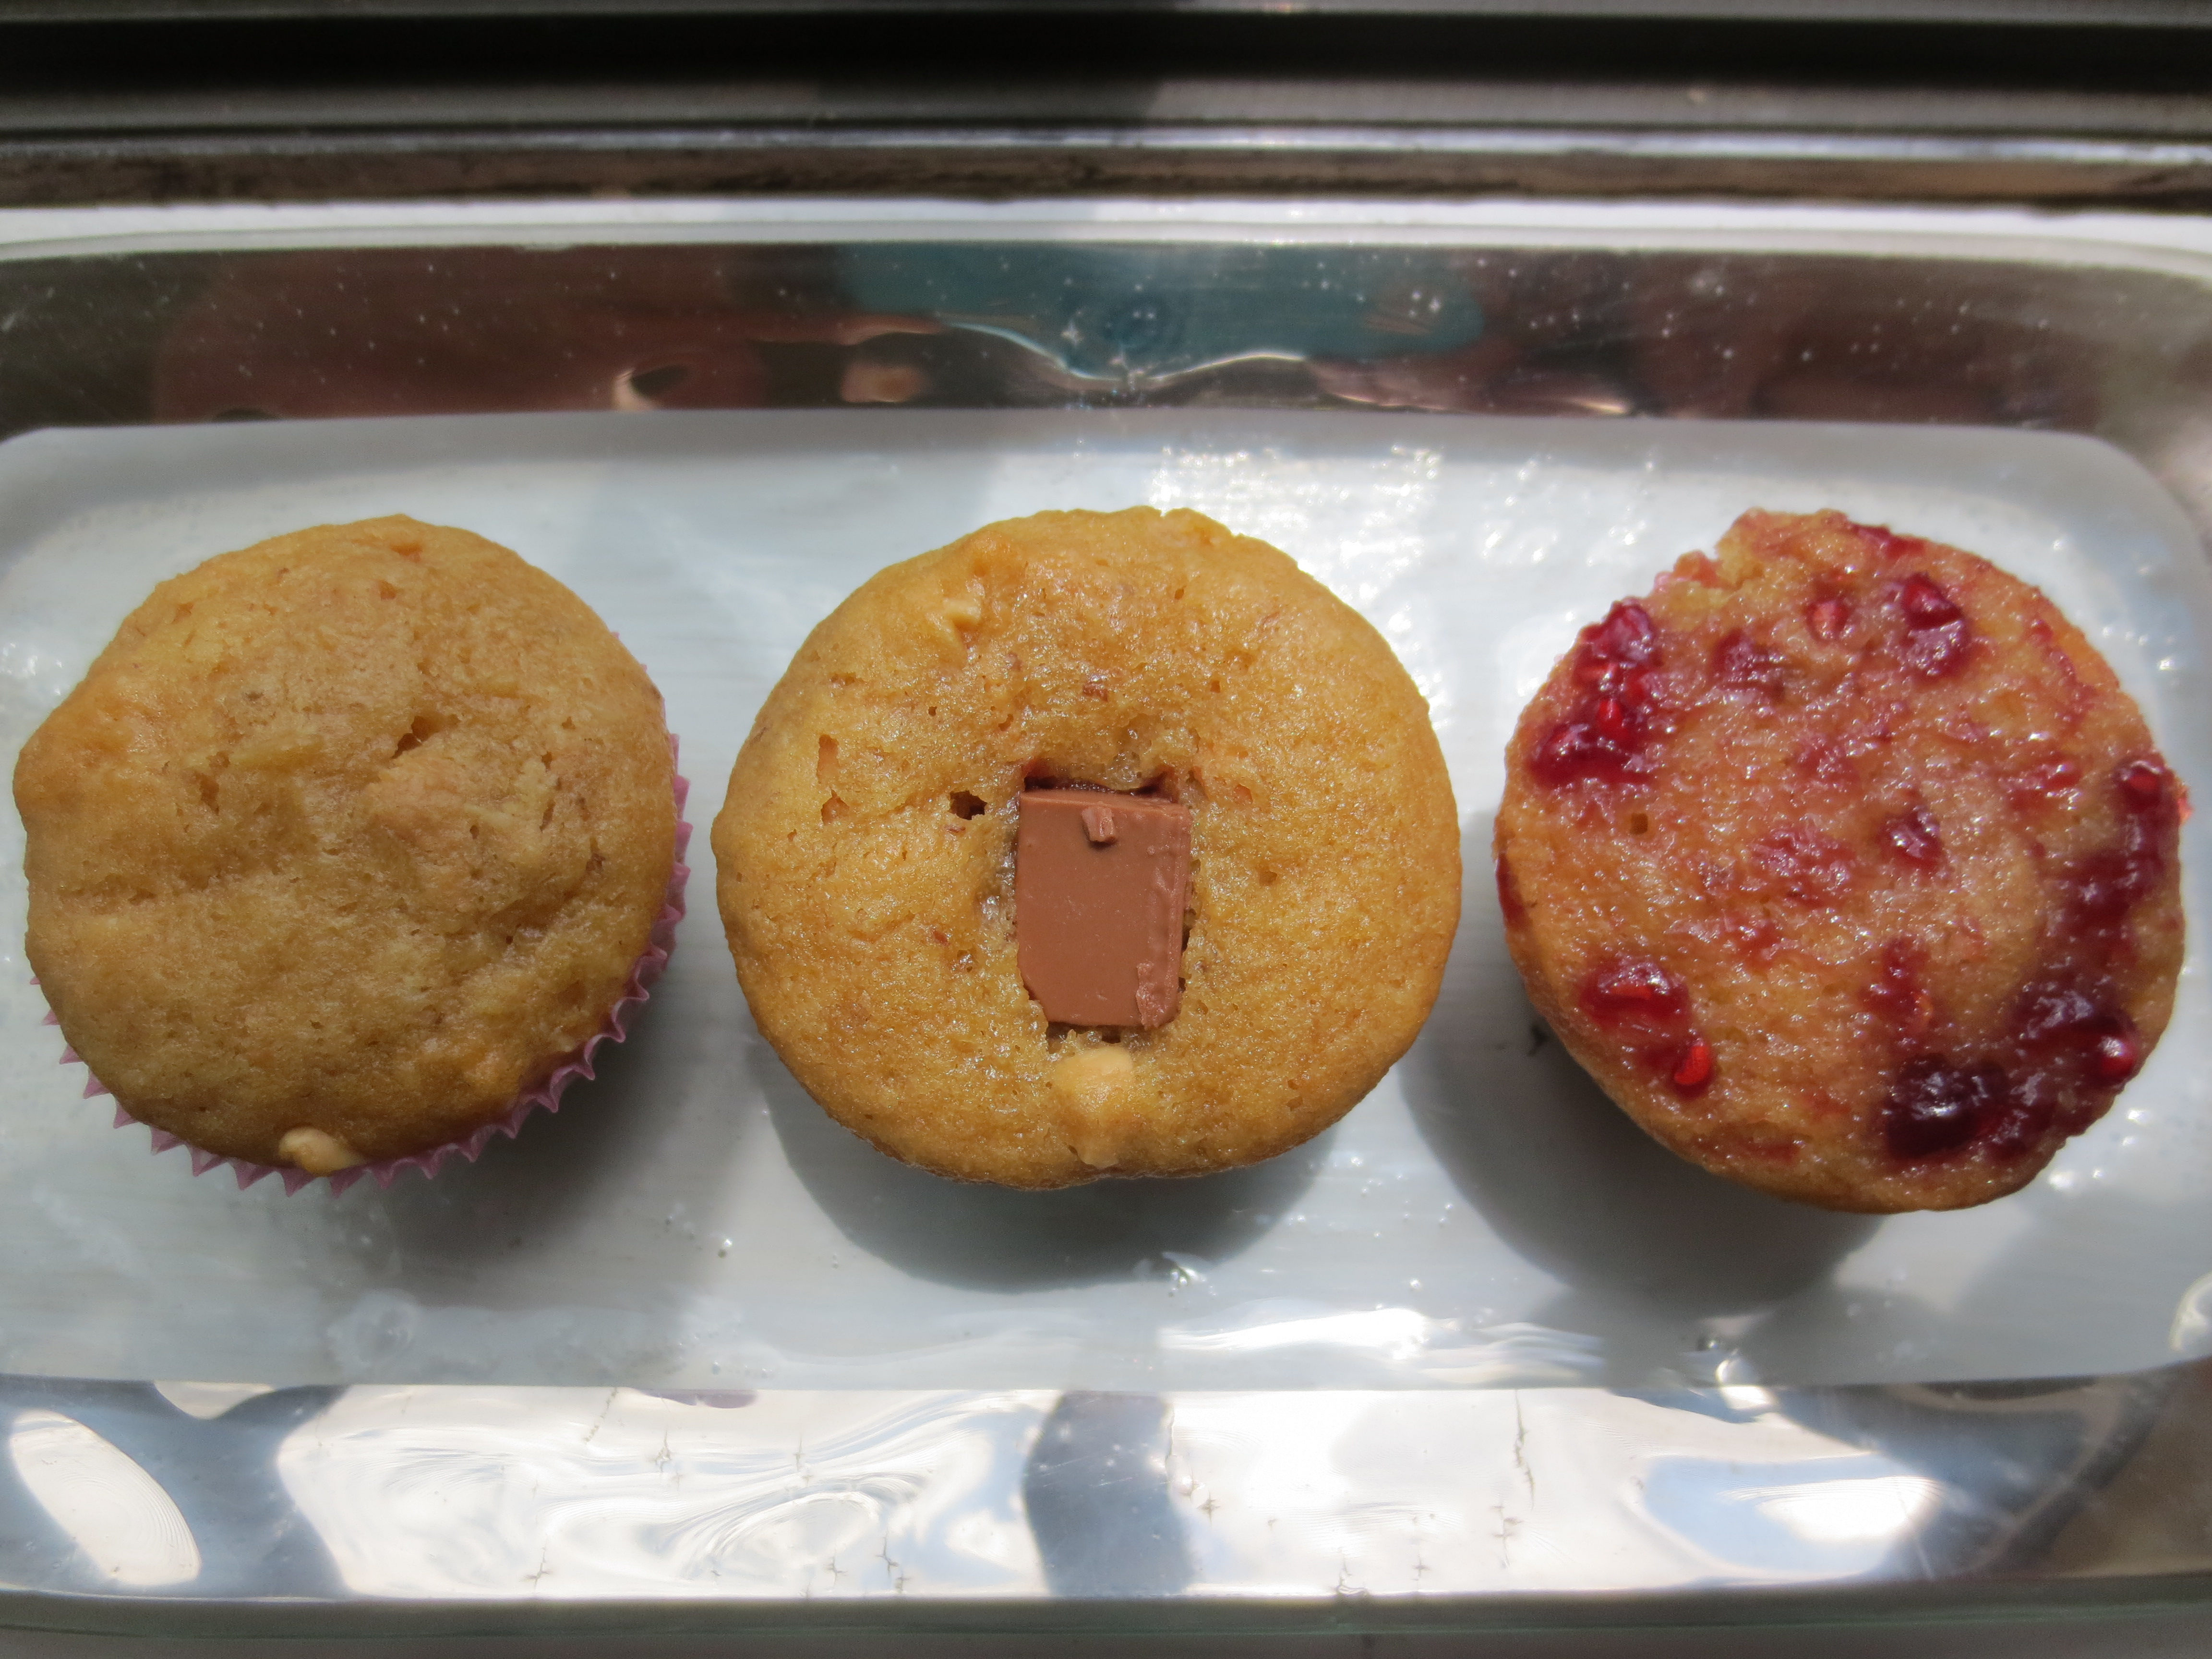
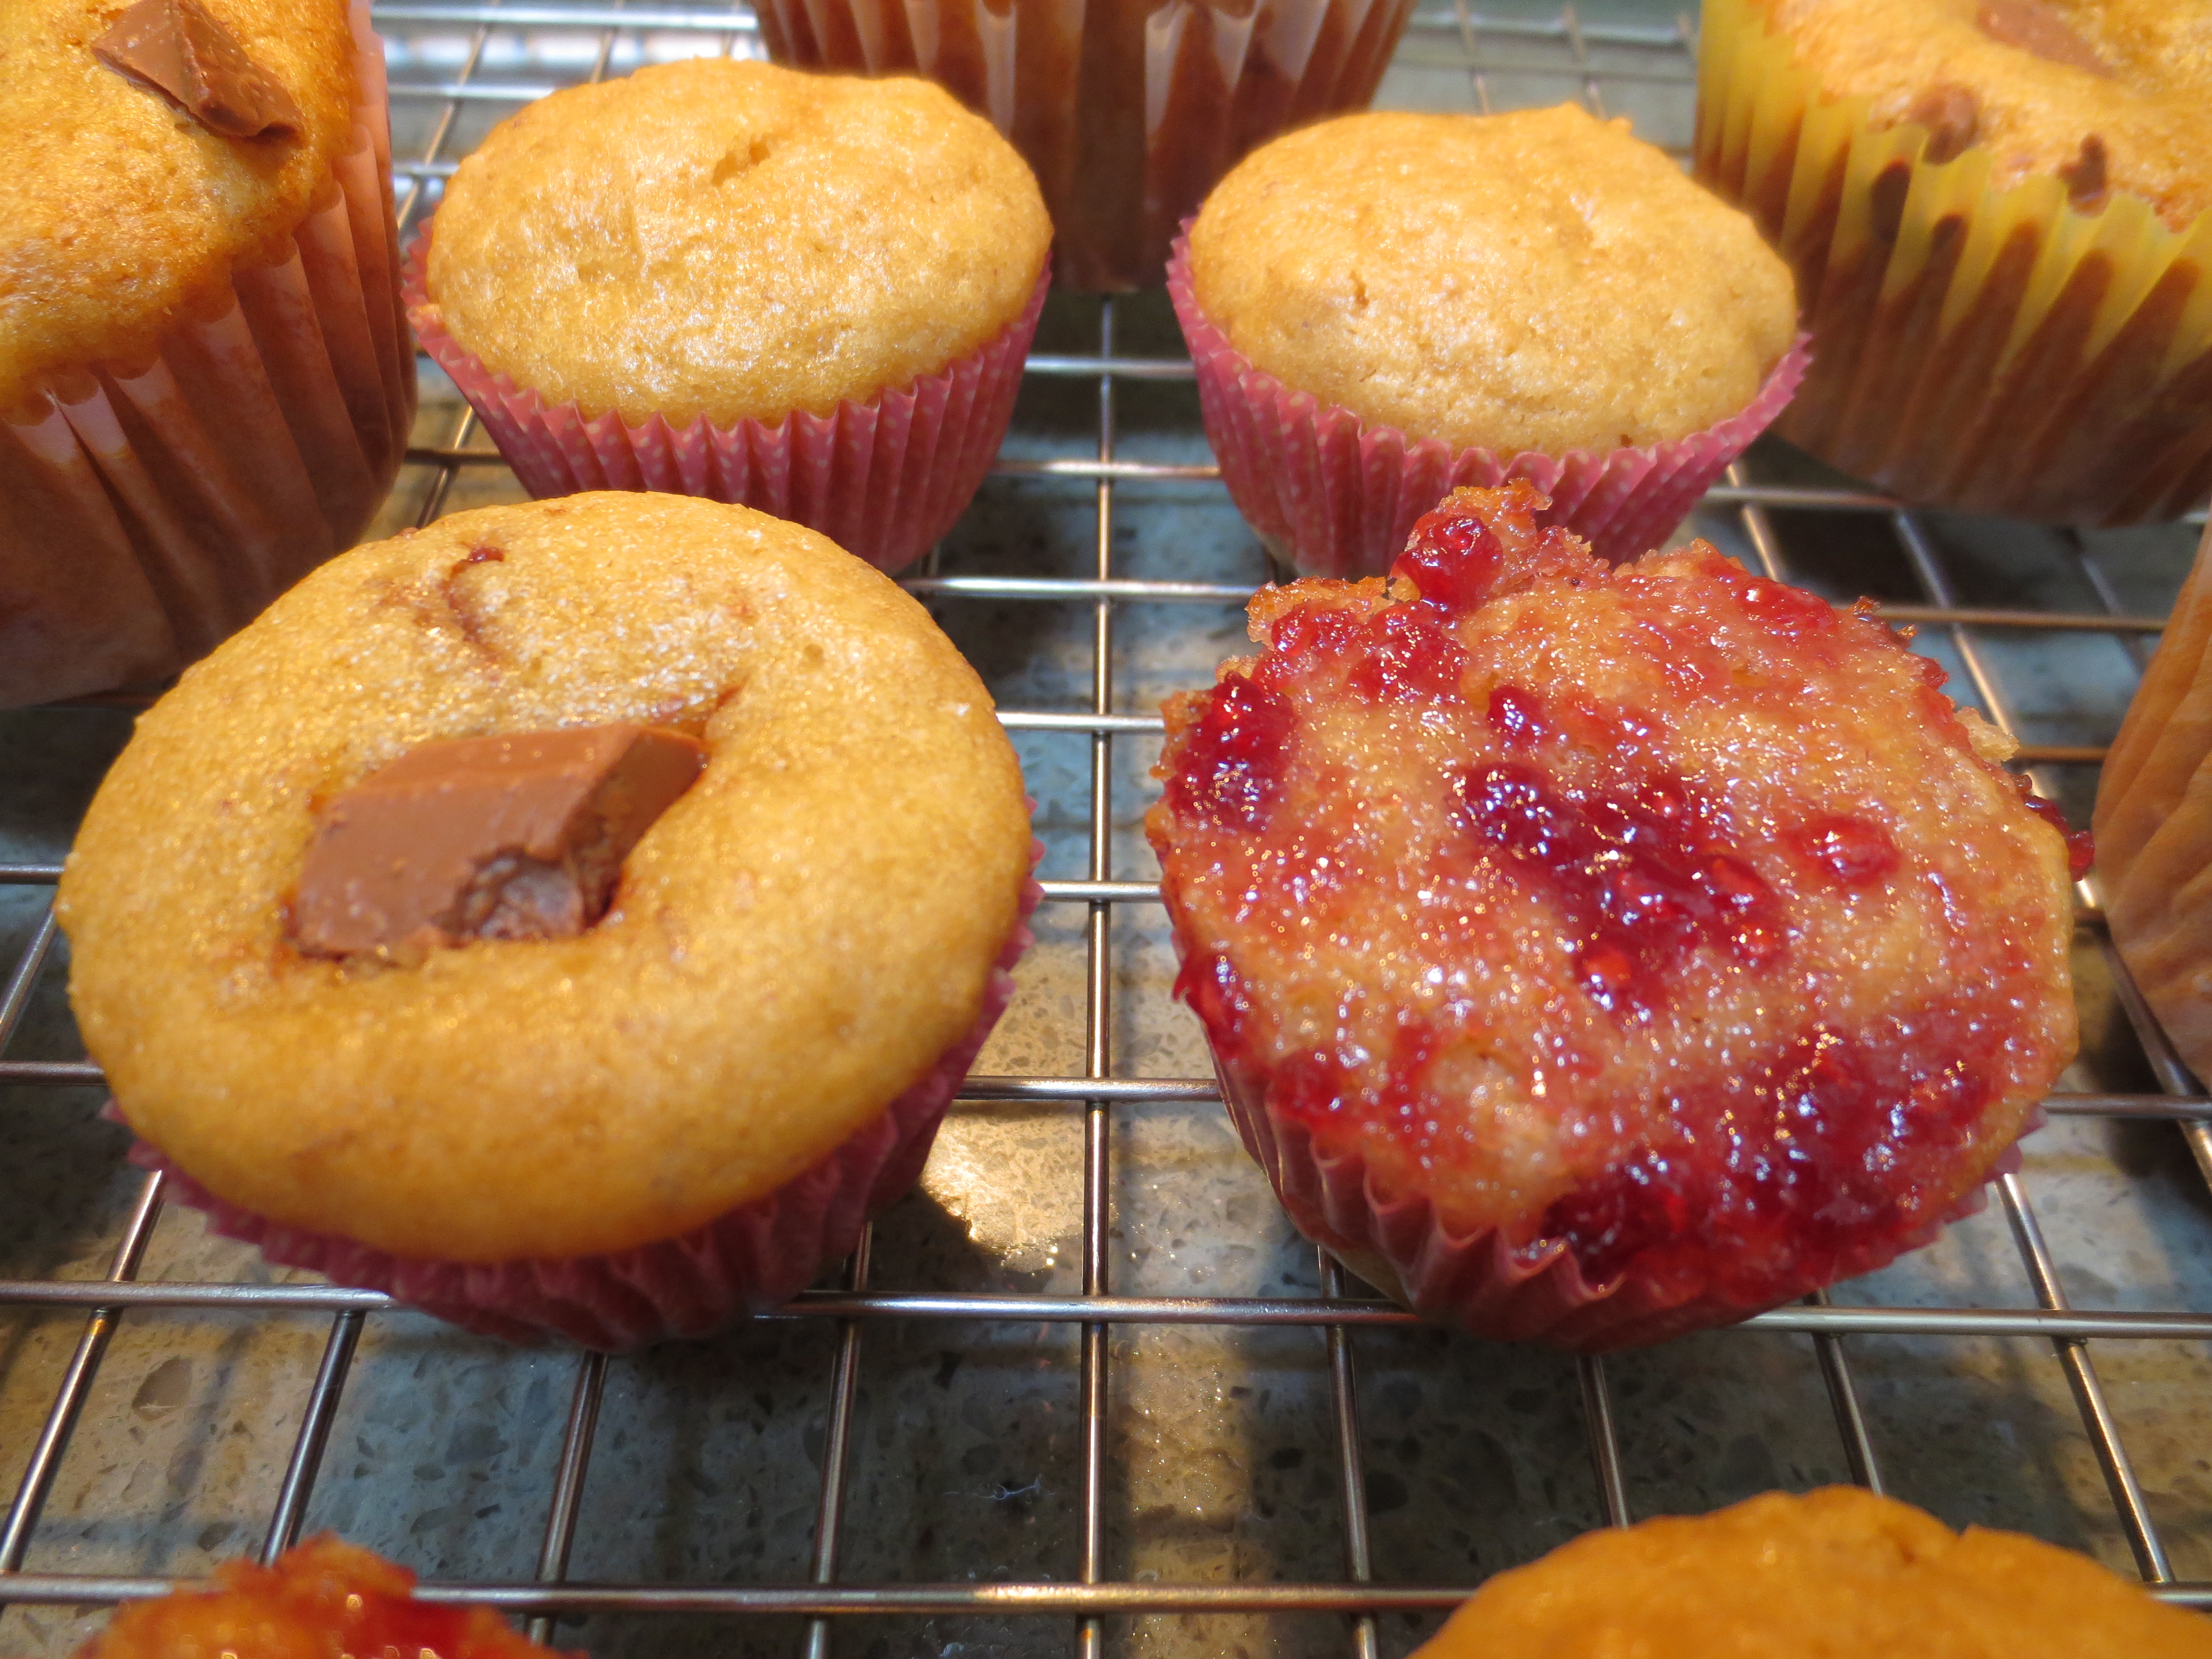
Peanut Butter Cupcakes – Three Ways


Peanut Butter Cupcakes
3 ways – Naked, Chocolate Chunk & Raspberry Jam
Author: Sweet Green Kitchen’s Jen Jones
A birthday blog for Skyler, my extraordinary daughter, who on the day she was born, forever transformed my life in the most amazing way. These cupcakes are most especially for YOU…..HAPPY BIRTHDAY…..and Enjoy – xo –


i love getting feedback, here are some of your most recent comments…